
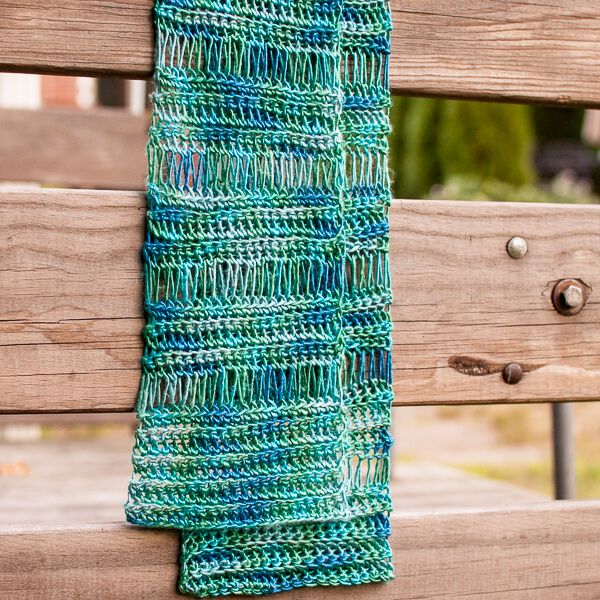
This Broomstick Lace Accent Scarf Crochet Pattern was inspired by the Knit Accent Scarf I shared recently. I got so many requests from my crochet friends for a crochet version that I knew I had to sit down and figure one out for you. And I am so happy with how it came out! I can’t believe how similar they look.
For the crochet version, I used single crochet stitches worked in the back loops to mimic the garter stitch of the knit scarf, then added broomstick lace rows to recreate the pretty openwork of the dropped stitches.
If you’re new to broomstick lace, don’t be intimidated! It’s really quite simple once you get the hang of it. I’ve included a step-by-step broomstick lace photo tutorial below the pattern to walk you through the technique.
Hope you enjoy it!
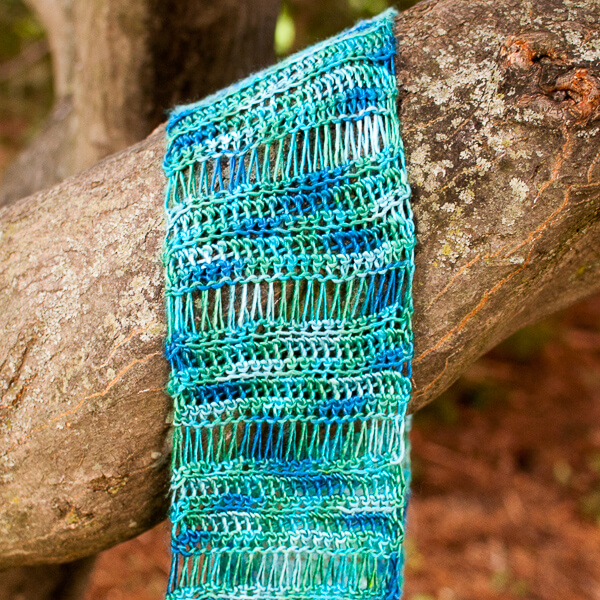
Broomstick Lace Scarf Crochet Pattern
Pattern Details
- Skill level: Easy/Intermediate
- Yarn: Sport-weight yarn
- Yardage: Approximately 163 yd (150 m)
- Hook: 5 mm (US H-8)
- Knitting needle: 15 mm (US 19), used for broomstick lace
- Finished size: Approximately 6 × 48 in. (15 × 122 cm)
- Construction: Worked flat in rows
- Stitch pattern: Back-loop single crochet alternating with broomstick lace
Materials
- 163 yd (150 m) sport-weight yarn (shown here in Lion Brand Collection® Silk Yarn, color #200 Aquarius)
- 5 mm (US H-8) crochet hook
- 15 mm (US 19) knitting needle
- Scissors and yarn needle
Abbreviations
- ch – chain
- rep – repeat
- sc – single crochet
- st(s) – stitch(es)
- yo – yarn over
Pattern Notes
- This pattern is written in U.S. crochet terms and abbreviations.
- The beginning ch 1 does not count as a stitch.
- Work the single crochet sections in the back loops only unless otherwise noted.
- A 15 mm (US 19) knitting needle is used to hold the elongated loops for the broomstick lace rows.
- Adjust the scarf length by repeating Rows 12 through 18 until approximately 3 in. (7.5 cm) shy of your desired finished length.
- Resources and tutorials you may find helpful in following this crochet pattern: Crochet Abbreviations, U.S. to U.K. Crochet Conversion Chart.
Add this pattern to your Ravelry Library.
Broomstick Lace Scarf Instructions
Ch 23.
Row 1: Work 1 sc in the back bump of the 2nd ch from hook and each ch across (working into the back bump is optional, but it creates a more finished edge.), turn — 22 sts.
Rows 2 through 8: Ch 1 (does not count as st here and throughout), work 1 sc in the back loop only of each st across, turn — 22 sts.
Row 9: Ch 1, work 1 sc in the back loop only of each st across, do not turn — 22 sts.
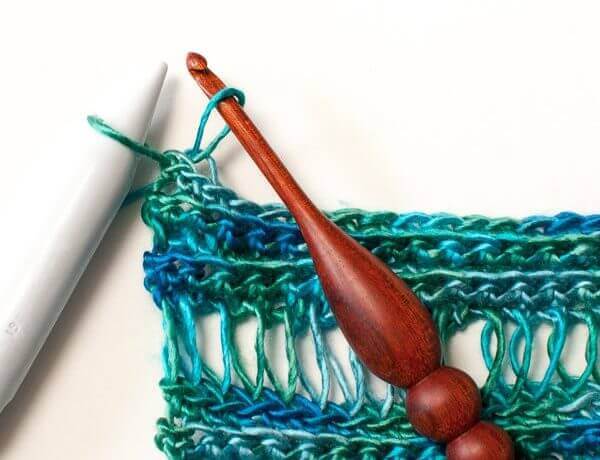
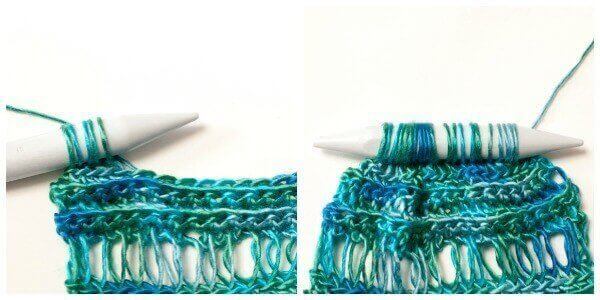
Row 10 (see Photo Tutorial below): Put loop from hook onto knitting needle; *insert hook into the back loop of the next stitch on the right and pull up a loop, transfer loop to needle, rep from * across, do not turn — 22 loops on needle.
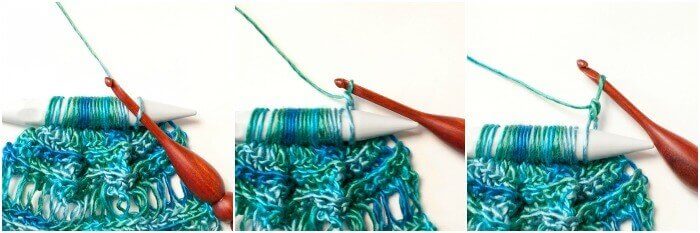
Row 11 (see Photo Tutorial below): Insert hook through first loop on needle, yo and pull through loop, ch 1, work 1 sc in same loop, *inserting hook through next loop and work 1 sc, rep from * across, turn — 22 sts.
Rows 12 through 15: Ch 1, work 1 sc in the back loop only of each st across, turn — 22 sts.
Row 16: Ch 1, work 1 sc in the back loop only of each st across, do not turn — 22 sts.
Row 17: Put loop from hook onto knitting needle; *insert hook into the back loop of the next stitch on the right and pull up a loop, transfer loop to needle, rep from * across, do not turn — 22 loops on needle.
Row 18: Insert hook through first loop on needle, yo and pull through loop, ch 1, work 1 sc in same loop, *inserting hook through next loop and work 1 sc, rep from * across, turn — 22 sts.
Rows 19 through 130: Repeat Rows 12 through 18 sixteen more times or until you reach about 3 in. (7.5 cm) shy of your desired length.
Rows 131 through 138: Ch 1, work 1 sc in the back loop only of each st across, turn — 22 sts.
Fasten off and weave in ends. Block if desired … you can find my free tutorial on How to Block Knit and Crochet Items here.
How to Crochet Broomstick Lace
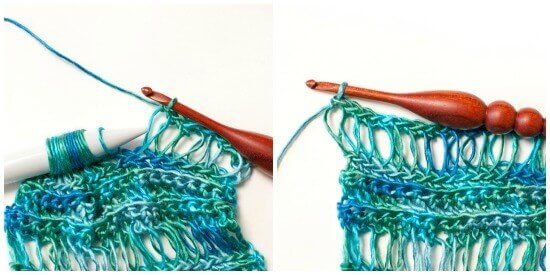
Rows 10 and 11 create the broomstick lace section of the scarf. Follow the step-by-step photos below as you work these rows.
Want to try this technique in another project? My Broomstick Lace Cowl Crochet Pattern uses broomstick lace to create a pretty openwork cowl with a button closure.
Row 10: Create the Broomstick Lace Loops
Row 11: Crochet the Loops
Finito!
Find Your Next Project
- Infinity Scarf Crochet Pattern / Mobius Scarf
- Chevron Crochet Scarf Pattern With Optional Fringe
- Transitions Crochet Wrap Pattern
- Quick and Comfy Crochet Scarf Pattern
Find Community
I would love to see your finished projects; share them with me on Instagram, Facebook, or the Petals to Picots Community.


Just checking out the pattern for the pattern for the broomstick lace accent crochet scarf. It appears that there is a typo in the instructions in that it says 2 use the front look, l-o-o-k, versus loop l-o-o p.
Kara—I have wanted to try broomstick lace for a while and I think with your explanation I can master it. Do you think this pattern would work for a table runner? Thanks so much. Linda
I think that would be lovely!
How beautiful! This scarf looks terrific! Thank you very much! 🙂
_____
Lee Ann
http://crochetgottaloveit.blogspot.com
My pleasure! So glad you like it 🙂
I love this broomstick lacy pattern.. I’m going to make mine doing 2 loops instead of one, to give more texture. There for, instead of one single crochet, I’ll do two. This way there are the same number of sc as loops to keep the stitch count. Thank you for the nice scarf pattern..
this looks different from any broomstick stitch I’ve seen.. nice though.
This is a beautiful pattern with a very clear explanation of broomstick lace! I like adding taller stitches to scarves for aesthetic appeal and to make scarves lighter. This seems much faster and less consuming of yarn than making a triple or quadruple crochet. I haven’t tried it yet, going to get some lightweight yarn today and give it a try. Do you have any tips for adjusting/adapting the pattern for a larger piece, such as a shawl or small lap throw (without using a tool longer than a standard hook or needle)?
Thanks for sharing your creativity!
Adjusting this pattern would be super easy. Just start with a chain as wide as you would like your piece an follow the pattern until you reach your desired length.
Love this!
Just in case anyone else is having trouble finding a “broomstick” I use a plastic ruler instead, works well.
Hi! I need help with this please:
Insert hook through first loop on needle, yo and pull through loop, ch 1, work 1 sc in same loop, *inserting hook through next loop and work 1 sc, rep from * across, turn —22 sts.
When you yo and pull through loop-do you leave on the hook or do you pull it under the first initial loop and then chain 1 afterwards? And then do the ` sc?
Many thanks xo
Hi Karen 🙂 You pull the loop through so you only have 1 loop remaining on your hook. Then you complete your single crochet. Hope that helps!
I have never before seen such a vivid explanation of “broomstick crochet”!! Thank you SO much for yours! You have taken away any fear I might have had for trying it! Your scarves are sensationally beautiful and I am thinking what beautiful gifts they would make! Once again, thank you for sharing your expertise!! Sincerely, Karen
I am so happy you found it helpful, Karen!