
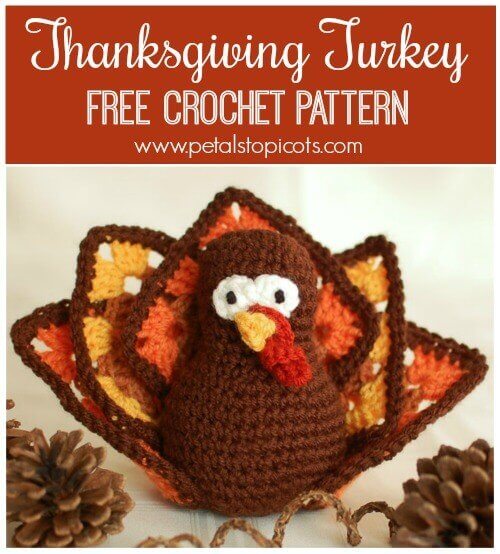
I wanted to make a cute, colorful, free crochet turkey pattern for my Thanksgiving table, so I designed this adorable Thanksgiving turkey crochet pattern. I made his body and sweet little face, but couldn’t think of how I wanted to make the wings. Then it came to me … granny squares!
I am so happy with how he turned out. I hope you enjoy making Mr. Gobble too!
Thanksgiving Turkey Crochet Pattern
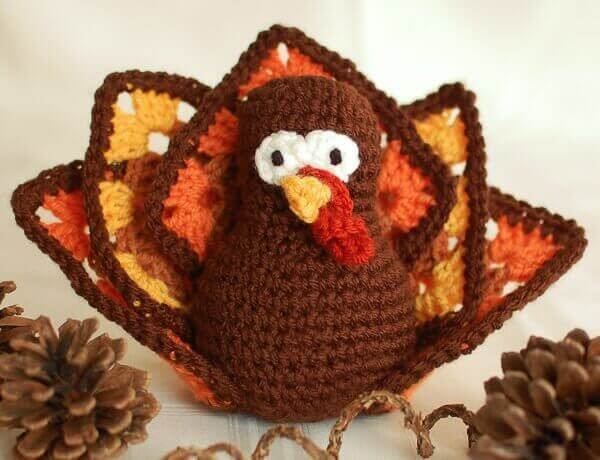
Here’s what you will need to crochet this turkey:
- worsted weight yarn in brown, yellow, tan, and orange, or 4 coordinating colors of your choice
- a small amount of red, white, and black worsted weight yarn for the face
- H / 5.0 mm crochet hook
- fiberfill stuffing or yarn scraps
- stitch marker, tapestry needle, and scissors
Finished Size: Approximately 5 in. (12.7 cm) tall × 7 in. (17.8 cm) wide from wingtip to wingtip
Helpful Crochet Resources: Refer to my Crochet Abbreviations, U.S. to U.K. Crochet Conversion Chart, and How to Make a Magic Ring {photo & video tutorial} as you work through the pattern.
Crochet Abbreviations
- ch – chain
- sc – single crochet
- st(s) – stitch(es)
- rep – repeat
- sc2tog – single crochet 2 stitches together (decrease)
- beg – beginning
- dc – double crochet
- sp – space
- sl st – slip stitch
Turkey Body
Body is worked in unjoined rounds. You may find it helpful to use a stitch marker to keep track of rounds.
With brown, make a magic ring (as an alternative to the magic ring, you can ch 4 and join with a slip stitch in the furthest chain from the hook to form a ring).
Round 1: Ch 1 (does not count as a st), work 6 sc in ring — 6 sts.
Round 2: Work 2 sc in each st around — 12 sts.
Round 3: *Work 2 sc in next st, 1 sc in next st, rep from * around — 18 sts.
Round 4: *Work 2 sc in next st, 1 sc in each of the next 2 sts, rep from * around — 24 sts.
Rounds 5 through 8: Work 1 sc in each st around — 24 sts.
Round 9: *Sc2tog, 1 sc in each of the next 2 sts, rep from * around — 18 sts.
Rounds 10 through 12: Work 1 sc in each st around — 18 sts.
Round 13: *Work 2 sc in next st, 1 sc in each of the next 2 sts, rep from * around — 24 sts.
Round 14: *Work 2 sc in next st, 1 sc in each of the next 3 sts, rep from * around — 30 sts.
Round 15: *Work 2 sc in next st, 1 sc in each of the next 4 sts, rep from * around — 36 sts.
Rounds 16 through 21: Work 1 sc in each st around — 36 sts.
Round 22: *Sc2tog, 1 sc in each of the next 4 sts, rep from * around — 30 sts.
Round 23: *Sc2tog, 1 sc in each of the next 3 sts, rep from * around — 24 sts.
Round 24: *Sc2tog, 1 sc in each of the next 2 sts, rep from * around — 18 sts.
Round 25: *Sc2tog, 1 sc in next st, rep from * around — 12 sts.
Fill body with fiberfill stuffing or yarn scraps, taking care not to overstuff.
Round 26: Sc2tog around — 6 sts.
Fasten off, leaving approximately a 6-in. tail. Using a tapestry needle and the tail, weave the opening closed.
Beak
With yellow, ch 4.
Row 1: Work 1 sc in 2nd ch from hook and each ch across, turn — 3 sts.
Row 2: Ch 1 (does not count as st), skip 1st st, sc2tog — 1 st.
Fasten off, leaving a long enough tail to sew the beak to the face.
Eyes
With white, ch 7.
Row 1: Work 2 dc in 4th ch from hook, ch 1, work 1 sc in next st, ch1, work 2 dc in next st, ch 2, sl st in next.
Fasten off, leaving a long enough tail to sew eyes to the face. Using a tapestry needle and black yarn, make a French knot at the center of each eye to form the pupil.
Snood
(or “the red thingy” as I was calling it until I Googled it)
With red, ch 8.
Row 1: Work 3 sc in 2nd ch from hook and in each ch across — 21 sts.
Fasten off, leaving a long enough tail to sew the red thingy to the face.
Finishing the Face
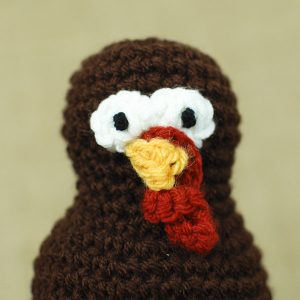
Using a tapestry needle and long tails left, sew the eyes, beak, and snood to the turkey’s head as shown below …
Wings
The colors for the wings are coded as follows:
CA – color A (yellow)
CB – color B (tan)
CC – color C (orange)
CD – color D (brown)
You will make 5 granny squares in all.
- Make 3 squares following the color sequence A-B-C-D
- Make 2 squares following the color sequence C-B-A-D
These granny squares are also a great opportunity to practice the standing stitches I showed you in my post How to Crochet Standing Stitches.
With CA, make a magic ring (as an alternative to the magic ring, you can also chain 4 and join in the furthest ch from the hook to form a ring).
Round 1: Ch 3 (counts as st), work 2 dc in ring, ch 3, *3 dc in ring, ch 3, repeat from *twice more, join in top of beg ch, fasten off — 12 sts.
Round 2: Join CB in any ch-3 sp, ch 3 (counts as st), 2 dc in same ch-3 sp, ch 2, *[3 dc, ch 3, 3 dc] in next ch-3 sp, ch 2, rep from * twice more, 3 dc in same ch-3 sp as first st of round, ch 3, join in top of beg ch, fasten off — 24 sts.
Round 3: Join CC in any ch-3 corner sp, ch 3 (counts as st), 2 dc in same ch-3 sp, *ch 2, 3 dc in next ch-2 sp, ch 2, [3 dc, ch 3, 3 dc] in next ch-3 corner sp, rep from * twice more, ch 2, 3 dc in next ch-2 sp, ch 2, 3 dc in same ch-3 corner sp as first st of round, ch 3, join in top of beg ch, fasten off — 36 sts.
Round 4: Join CD in any ch-3 corner sp, work 3 sc in same ch-3 sp, *work 1 sc in each of the next 3 sts, work 2 sc in next ch-2 sp, work 1 sc in each of the next 3 sts, work 2 sc in next ch-2 sp, work 1 sc in each of the next 3 sts, work 3 sc in ch-3 corner sp, rep from * twice more, work 1 sc in each of the next 3 sts, work 2 sc in next ch-2 sp, work 1 sc in each of the next 3 sts, work 2 sc in next ch-2 sp, work 1 sc in each of the next 3 sts, join, fasten off — 64 sts.
Finishing
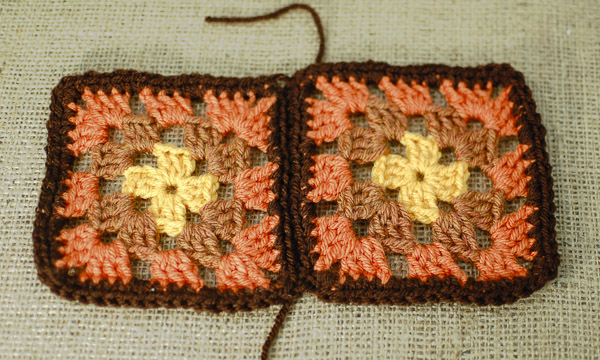
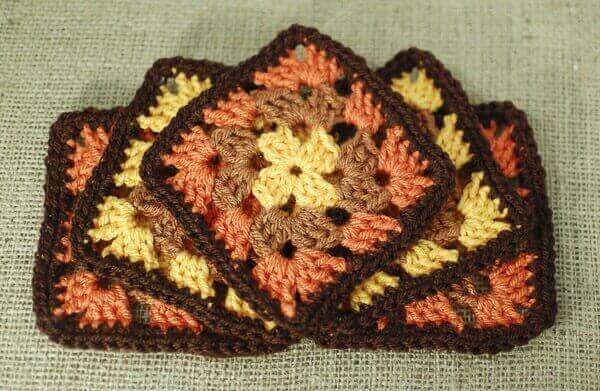
Take 2 of the 3 A-B-C-D color-sequence granny squares and slip-stitch or sew them together along one edge, as shown below.
Take the 2 C-B-A-D color-sequence grannies and lay them on top of each other as shown below. Sew a stitch or two to each to secure in place.
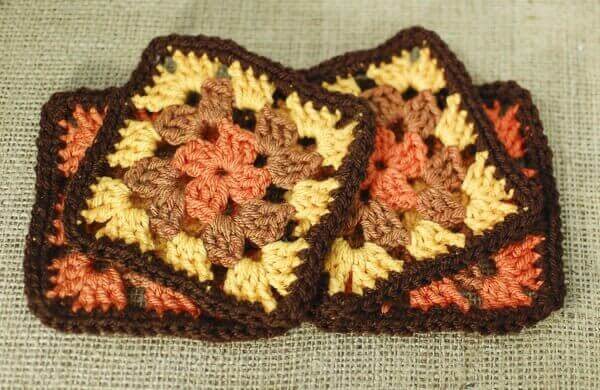
Take the last A-B-C-D color sequence granny square and lay it on top as shown below. Sew a stitch or two to secure in place.
Lay the turkey body on the granny squares.
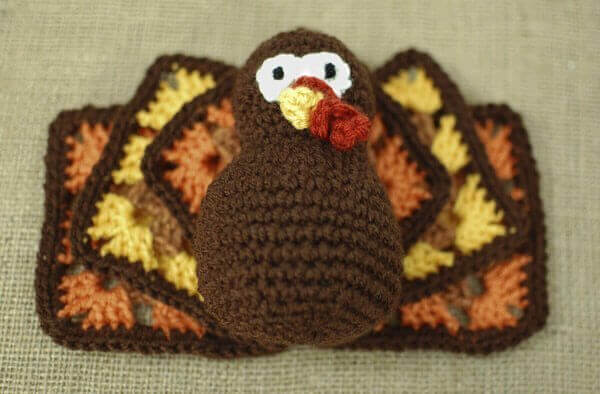
Roll the bottom squares around the bottom of the turkey body and stitch into place. Check the wings and stitch where necessary to make them secure.
Find Community
I would love to see your finished projects; share them with me on Instagram, Facebook, or the Petals to Picots Community.
More Thanksgiving Crochet Patterns


I just finished making 9 of these guys in about 2 1/2 weeks! I am giving them to friends and family for Thanksgiving gifts this year. I started out thinking I would make 3, then it blossomed into 9. I am now going cold turkey on making turkeys. Loved the pattern, the only change I made was to use size 6/0 black matte seed beads for the pupils. I really am not great at making French knots, and this little change helped!
How big are the granny squares supposed to measure??
Approximately 4 inches 🙂
This is adorable! I made it with a size H hook and a half double crochet stitch and it turned out bigger which I wanted but I was wondering if you never made it in the larger size? I have found that the turkey falls back with the granny square feathers and I didn’t know if you had any suggestions to help it not fall backwards… Thanks again for sharing and can’t wait to make some more!
So glad you enjoyed it, Megan!
Thanks for the tip on the H hoop and double sc. 😉
Going to give this a try….it’s just too darn cute!
Hope you enjoy it!
I just made this. So fun. I will be making a few more. Thanks for a great pattern
I am so happy to hear that, Angela!
I just finished my turkey. I added some feet to it which added a cute touch.
I bet it is sooo cute!
So cute! I was wondering about making some of the tail “granny Suqares” removable to use for coasters? I think if I just sew the first 2 together,and sew it to the body then I could make 4 other tail feather squares and tuck them in to be used as needed? What do you think?
Oooh … that sounds like a fabulous idea!
Thank you for your pattern, I made this yesterday, it took me 3 hours from start to finish, I have never made bodies before just regular crocheting, I was happy with the outcome. Thank you again. This project put a smile on my face.
That makes me so happy to hear! Thank you, Frieda 🙂
Thanks so very much!!! I appreciate this Thanksgiving-Christmas gift!!!
Waving from Georgia!!
My pleasure Poppy 🙂
It’s called a wattle…better check my spelling! But yours is just THE cutest!!! 🙂
Lol! Thanks, Nix 🙂