
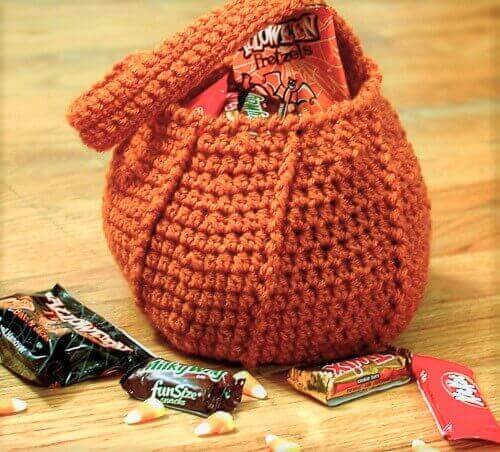
This free pumpkin trick-or-treat bag crochet pattern is a fun and practical project for Halloween! The bag is crocheted with worsted-weight yarn and features textured ribs that give it a cute pumpkin shape, plus a sturdy handle that’s perfect for little hands to carry.
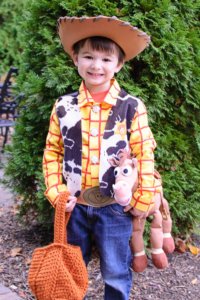
I originally made this pumpkin bag for my son, and all these years later, he still uses it for trick-or-treating. It warms this mama’s heart to see! That’s him with the bag a few years back … so sweet!
This Halloween treat bag works up fairly quickly and measures approximately 7 inches high by 11 inches wide, giving your little pumpkin plenty of room for candy and treats … and it surely beats a pillowcase!
Pumpkin Trick-or-Treat Bag Crochet Pattern
About This Crochet Pumpkin Bag
This pumpkin-shaped crochet bag is worked in the round from the bottom up. Front post double crochet stitches create the raised vertical ridges that give the bag its pumpkin look, while increases and decreases shape the body.
After completing the bag, you’ll crochet the handle separately and sew it securely in place. You can also add an optional cardboard insert to reinforce the bottom.
Pattern Details
- Skill level: Intermediate
- Yarn: Worsted-weight acrylic or cotton yarn
- Yardage: Approximately 200 yd
- Hook: 5 mm (US H-8)
- Finished size: Approximately 7 in. high × 11 in. wide (17.8 × 27.9 cm)
- Construction: Worked in the round from the bottom up
Materials
- Orange worsted weight acrylic or cotton yarn, approximately 200 yds (Lion Brand 24/7 cotton works well for this)
- US H-8 hook / 5 mm crochet hook
- A piece of cardboard, approx. 6 × 6 in. (15 × 15 cm), optional
- Tapestry needle
Helpful Crochet Resources: Refer to my Crochet Abbreviations, U.S. to U.K. Crochet Conversion Chart, and How to Make a Magic Ring {photo & video tutorial} as you work through the pattern.
Abbreviations
ch — chain
FPdc — front post double crochet
hdc — half double crochet
hdc2tog — half double crochet 2 stitches together
rev sc — reverse single crochet (crab stitch)
sc — single crochet
st(s) — stitch(es)
Special Stitches
hdc2tog: yarn over, insert hook into designated st and pull up a loop, yarn over again and insert hook into next stitch and pull up a loop, yarn over and pull through all 5 loops on hook.
FPdc: yarn over, insert hook from front to back to front around post of specified st and pull up a loop, yarn over and pull through 2 loops, yarn over again and pull through remaining 2 loops.
Instructions to Make the Pumpkin Bag
To start the body of the bag, make a magic ring (or, for a beginner-friendly alternative, chain 4 and join with a slip stitch in the furthest chain from the hook to form a ring).
Foundation Round: Ch 2 (counts as st here and throughout), work 7 hdc in ring, join — 8 sts.
Round 1: Ch 2, work 1 hdc in same stitch as join, 2 hdc in each st around, join — 16 sts.
Round 2: Ch 2, work 1 hdc in same stitch as join, 1 hdc in next st, *2 hdc in next st, 1 hdc in next, rep from * around, join — 24 sts.
Round 3: Ch 2, work 1 hdc in same stitch as join, 1 hdc in each of the next 2 sts, *2 hdc in next st, 1 hdc in each of the next 2 sts, rep from * around, join — 32 sts.
Round 4: Ch 2, work 1 hdc in same stitch as join, 1 hdc in each of the next 3 sts, *2 hdc in next st, 1 hdc in each of the next 3 sts, rep from * around, join — 40 sts.
Round 5: Ch 2, work 1 hdc in same stitch as join, 1 hdc in each of the next 4 sts, *2 hdc in next st, 1 hdc in each of the next 4 sts, rep from * around, join — 48 sts.
Round 6: Ch 2, working in back loops only, 1 hdc in same st as join and each st around, join — 49 sts.
Round 7: Ch 2, *work 1 FPdc around hdc directly below, 1 hdc in each of the next 3 sts, 2 hdc in next, 1 hdc in each of the next 2 sts, rep from * 5 more times, work 1 FPdc around hdc directly below, 1 hdc in each of the next 3 sts, 2 hdc in next, 1 hdc in each of the next st, join — 56 sts.
Round 8: Ch 2, *work 1 FPdc around FPdc directly below, 1 hdc in each of the next 7 sts, rep from * 5 more times, work 1 FPdc around FPdc directly below, 1 hdc in each of the next 6 sts, join — 56 sts.
Round 9: Ch 2, *work 1 FPdc around FPdc directly below, 1 hdc in each of the next 3 sts, 2 hdc in next, 1 hdc in each of the next 3 sts, rep from *5 more times, work 1 FPdc around FPdc directly below, 1 hdc in each of the next 3 sts, 2 hdc in next, 1 hdc in each of the next 2 sts, join — 63 sts.
Round 10: Ch 2, *work 1 FPdc around FPdc directly below, 1 hdc in each of the next 8 sts, rep from * 5 more times, work 1 FPdc around FPdc directly below, 1 hdc in each of the next 7 sts, join — 63 sts.
Round 11: Ch 2, *work 1 FPdc around FPdc directly below, 1 hdc in each of the next 4 sts, 2 hdc in next, 1 hdc in each of the next 3 sts, rep from * 5 more times, work 1 FPdc around FPdc directly below, 1 hdc in each of the next 4 sts, 2 hdc in next, 1 hdc in each of the next 2 sts, join — 70 sts.
Rounds 12 through 14: Ch 2, *work 1 FPdc around FPdc directly below, 1 hdc in each of the next 9 sts, rep from * 5 more times, work 1 FPdc around FPdc directly below, 1 hdc in each of the next 8 sts, join — 70 sts.
Round 15: Ch 2, *work 1 FPdc around FPdc directly below, 1 hdc in each of the next 4 sts, hdc2tog, 1 hdc in each of the next 3 sts, rep from * 5 more times, work 1 FPdc around FPdc directly below, 1 hdc in each of the next 4 sts, hdc2tog, 1 hdc in each of the next 2 sts, join — 63 sts.
Round 16: Ch 2, *work 1 FPdc around FPdc directly below, 1 hdc in each of the next 8 sts, rep from * 5 more times, work 1 FPdc around FPdc directly below, 1 hdc in each of the next 7 sts, join — 63 sts.
Round 17: Ch 2, *work 1 FPdc around FPdc directly below, 1 hdc in each of the next 3 sts, hdc2tog, 1 hdc in each of the next 3 sts, rep from * 5 more times, work 1 FPdc around FPdc directly below, 1 hdc in each of the next 3 sts, hdc2tog, 1 hdc in each of the next 2 sts, join — 56 sts.
Round 18: Ch 2, *work 1 FPdc around FPdc directly below, 1 hdc in each of the next 7 sts, rep from * 5 more times, work 1 FPdc around FPdc directly below, 1 hdc in each of the next 6 sts, join — 56 sts.
Round 19: Ch 2, *work 1 FPdc around FPdc directly below, 1 hdc in each of the next 3 sts, hdc2tog, 1 hdc in each of the next 2 sts, rep from * 5 more times, work 1 FPdc around FPdc directly below, 1 hdc in each of the next 3 sts, hdc2tog, 1 hdc in each of the next st, join — 49 sts.
Round 20: Ch 2, *work 1 FPdc around FPdc directly below, 1 hdc in each of the next 6 sts, rep from * 5 more times, work 1 FPdc around FPdc directly below, 1 hdc in each of the next 5 sts, join — 49 sts.
Round 21: Ch 2, *work 1 FPdc around FPdc directly below, 1 hdc in each of the next 2 sts, hdc2tog, 1 hdc in each of the next 2 sts, rep from * 5 more times, work 1 FPdc around FPdc directly below, 1 hdc in each of the next 2 sts, hdc2tog, 1 hdc in each of the next st, join — 42 sts.
Round 22: Ch 1 (does not count as st), working back across stitches just made, work 1 rev sc in each st around, join — 42 sts.
Fasten off and weave in ends.
Bag Handle
Ch 45.
Row 1: Work 1 single crochet in 2nd ch from hook and each ch across, turn — 44 sts.
Rows 2 through 4: Ch 1 (does not count as st), work 1 sc in each st across, turn — 44 sts.
Fasten off.
Finishing
Using the same color yarn and a tapestry needle, sew the handle to the pumpkin bag. Weave in ends. If desired, you can use a piece of cardboard to help reinforce the bottom of the bag. Measure the base of your bag and trim the cardboard piece in a circular fashion to fit.
Find even more free Halloween crochet patterns for spooky-season projects and decor.

Try One of These Halloween Crochet Patterns
- Cauldron Halloween Treat Holder
- Candy Corn Treat Holder
- Crochet Spider Pattern
- Halloween Ghost Pattern + Printable
- Rustic Pumpkin Made With T-Shirt Yarn


This is so cute, but I can’t get the bottom of mine to lay flat, either. Six hdc in a magic ring only gives me a semicircle. I end up with a bowl at the bottom instead of a flat bottom. I tried it with two different sized hooks.
I love the pattern!! Thanks for sharing 🙂 I must be a really tight stitcher…..had to use a M hook to get it remotely close to 11 inches wide….and it is still small 🙁
I’ve made a few of these or my kids. The bottom droops down, is this normal? I can’t figure out how to make it sit the way you did in the picture. I love the pattern though 🙂
Hi Rachel 🙂 Do you mean when it is filled? Mine pulls down when filled with candy too. I mostly give it to my little one to use because he isn’t too serious about getting it filled to the top 😉
The bottom doesn’t sit flat. I switched to crocheting in the front loop only instead of the back loop only and now the bag sits up right.
Hmmm … I’m not sure … mine sits flat.
You may want to try inserting a round cardboard to fit inside. This way the candy will not weigh down the bottom of the pumpkin.
Great idea!
Great pattern (as usual) Kara! I featured a link to it this morning on Moogly:
Thanks so much, Tamara!
This would be perfect for a knitting on the go bag! I’d use a smaller crochet hook to make a tighter fabric and make sure the handle fit over my arm nicely. It would just need to be the right size to hold a cake of sock yarn and my 42″ circular needles.
Super cute bag!!
This is really great. I’m no good at this sort of thing though. We made paper ones instead.
Thanks for sharing.
Very nice, Kara! I like the cabled texture down the sides. And I like your new format with the grey boxes. Thanks for sharing at Hookin On Hump Day!
Great idea! I have sewn trick or treat bags but never crocheted them!:)
Wow, you are so talented, this is just darling, and so much cuter than the plastic variety!
Carlee
http://www.ladybirdln.com