
These adorable little crochet chickens are a fun way to add a touch of farmhouse charm to your spring or Easter decor! This free crochet chicken pattern includes instructions for two sizes—a little baby chick and a larger mama chicken—both made with simple single crochet stitches and colorful face details.
I love how cute my little crochet chicks look sitting on my kitchen windowsill! They’re filled with a combination of stuffing and dried beans or popcorn kernels, which helps them sit upright.
I originally spotted some adorable fabric chicken bean bags on Gluesticks Blog and immediately imagined making a crocheted version. Since you already know I don’t drag out my sewing machine very often, I decided to reach for my crochet hook instead. And that’s how this little crochet chicken pattern was hatched (ha ha!).
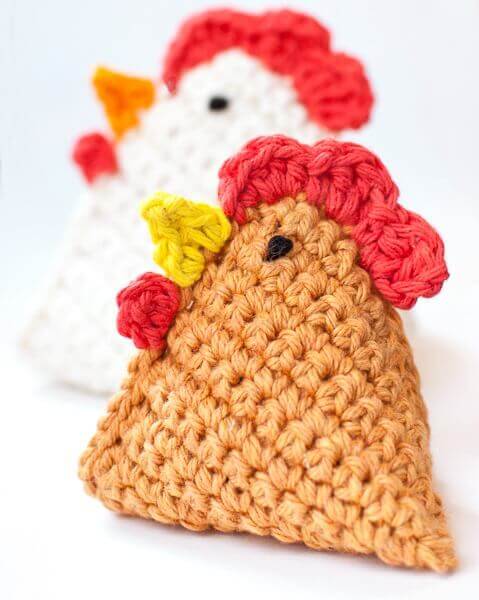
Crochet Chicken Pattern – Mama and Baby Chicks
Pattern Details
- Skill level: Easy to intermediate
- Yarn: Worsted-weight cotton yarn
- Hooks: 5 mm (US H-8) and 4 mm (US G-6)
- Finished size: Baby chick approximately 3½ in. (9 cm); mama chicken approximately 4½ in. (11.5 cm)
- Construction: Crocheted flat in single crochet rows, folded and joined, with crocheted face details and embroidered eyes
Materials
- Worsted-weight cotton yarn in three colors (CA, CB, and CC), shown here in Lion Brand’s 24/7 Cotton
- Small amount of black yarn or crochet thread for the eyes
- 5 mm (US H-8) crochet hook
- 4 mm (US G-6) crochet hook
- Dried beans or popcorn kernels, securely contained
- Fiberfill stuffing
- Yarn needle
- Scissors
Crochet Abbreviations
CA = Color A
CB = Color B
CC = Color C
ch = chain
dc = double crochet
hdc = half double crochet
sc = single crochet
sl st = slip stitch
st(s) = stitch(es)
This pattern uses U.S. crochet terminology. For additional help, see my Crochet Abbreviations guide and U.S. to U.K. Crochet Conversion Chart.
Pattern Notes
- Instructions are written for the baby chick, with changes for the mama chicken in parentheses.
- The body is worked flat in rows before being folded and joined.
- Use the smaller hook for the baby chick’s face details and the larger hook for the mama chicken’s face details.
- The dried filling should be enclosed in a securely sealed inner pouch to prevent it from escaping through the crochet stitches.
- These chicks are intended as decorations, not toys for young children or pets.
A French translation of this pattern was generously provided by Christelle Sobaba of Sobaba-Maternage Blog. View the French translation (Français).
Get the convenient, ad-free PDF pattern on Ravelry.
Add this pattern to your Ravelry library.

How to Crochet the Chicken Body
With 5 mm (US H-8) hook and CA, ch 13 (17).
Row 1: Work 1 sc in 2nd ch from hook and each ch across, turn — 12 (16) sts.
Row 2: Ch 1 (does not count as st), work 1 sc in each st across, turn — 12 (16) sts.
Rows 3–28 (38): Repeat Row 2.
Fold piece so that Row 1 lines up with last row, slip stitch together to corner, then slip stitch down side to fold.
Fasten off and weave in ends.

Crochet Chicken Face Details
Use the 4 mm (US G-6) hook for the baby chick and the 5 mm (US H-8) hook for the mama chicken.
Join CB in 4th st from the slip-stitched corner, ch 3 (counts as dc), work 2 dc in same st as join, 1 sc in next, 3 dc in next, 1 sc in next, 3 hdc in next, 1 sc in next, sl st in next, fasten off.
Join CC in next st, ch 1, work 1 sc in same st as join, ch 3, 1 sc in furthest ch from hook, 1 sc in next st, sl st in same st, fasten off.
Skip next st, join CB in next, ch 1, 1 hdc in same st as join, ch 1, sl st in same st, fasten off.
Weave in ends.

Crochet Chicken Face Stitch Chart
The stitch chart below illustrates the crocheted face details for the chicken. If you need help reading the diagram, see my Crochet Stitch Chart Symbols guide.

Adding the Eyes
Using black yarn or crochet thread, embroider a French knot for each eye as shown in the photos.

Stuffing and Finishing Your Crochet Chicken
Turn the piece so the opening is in the back.
Add a small amount of fiberfill stuffing to the head.
Fill the body approximately three-quarters full with dried beans or popcorn kernels enclosed in a securely sealed inner pouch. (I used expired popcorn kernels in a Ziploc!)
Close the opening and slip stitch it shut securely.
That’s it! Your little mama and baby chicks are ready to brighten up a windowsill, shelf, or spring display.
I hope you enjoy making these little chick-chick-chick crochet chickens as much as I did!

More Free Crochet Patterns
- Pineapple Crochet Hot Pad
- Crochet Kitchen Patterns
- Crochet Dishcloth Patterns
- Amigurumi Crochet Patterns
Browse more of my free crochet patterns here.


My little chickens….
So cute!
Thank you für this pattern. so cute!!!!
So cute!!!
Thank you very much!!
My pleasure, Eva 🙂
Would you consider doing a post on how to read the crochet symbols in your little drawing? You explain stuff so well!
Hi Jessica 🙂 Yes, those symbols can get confusing! Here is a link that helps translate them 🙂 https://www.petalstopicots.com/resources/stitch-chart-symbols/
They are so sweet. Thanks…. Hugs from Italy. Barbara
I admit I’m not too computer savey, but I refuse to print a pattern that has, like, 10 pages of comments. I love your pattern too, but I wouldn’t want someone using up valuable ink and paper to print my comment in order to get the pattern.
Hi Ruth 🙂 I have a print button at the bottom of the page that only prints the post itself. It even allows you to delete photos or extra text you don’t want. Hope that helps.
Thank you for this pattern! We recently lost one of our chicks…my 4-year-old’s favorite one. 🙁 I made her one of these (but added little wings and feet ) for her to hug whenever she’s missing her “Buttercup.”
Here’s a photo of how mine turned out.
Yay! Awesome!! Thanks so much for sharing with me 🙂
Awww … I am so sorry for your loss. I hope little Buttercup helps give some comfort 🙂
Hello Kara, I love this pattern for the chicken. My question is, if it would be possible to translate your pattern for my blog, and putting a link to the original pattern on your site. It is a wonderful project, I would like to talk about. 🙂
Gorgeous!!! And so sweet ♥. Many thanks for the pattern 🙂
Happy Easter!
Nata
Happy Easter, Nata!
They are adorable – they perfect for little hands to play with.
Yes! My son has been loving them 🙂