
These adorable little crochet chickens are a fun way to add a touch of farmhouse charm to your spring or Easter decor! This free crochet chicken pattern includes instructions for two sizes—a little baby chick and a larger mama chicken—both made with simple single crochet stitches and colorful face details.
I love how cute my little crochet chicks look sitting on my kitchen windowsill! They’re filled with a combination of stuffing and dried beans or popcorn kernels, which helps them sit upright.
I originally spotted some adorable fabric chicken bean bags on Gluesticks Blog and immediately imagined making a crocheted version. Since you already know I don’t drag out my sewing machine very often, I decided to reach for my crochet hook instead. And that’s how this little crochet chicken pattern was hatched (ha ha!).
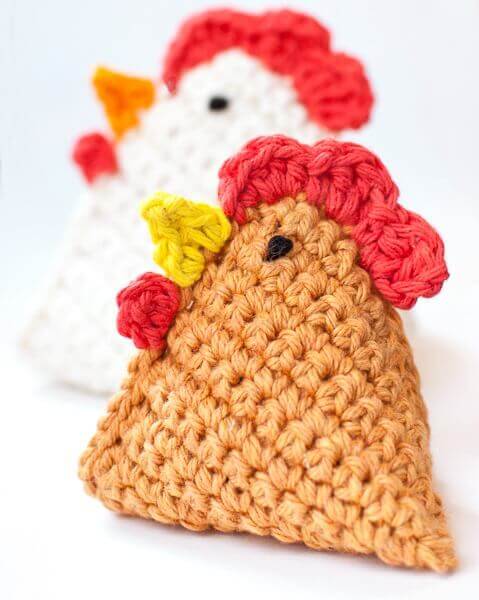
Crochet Chicken Pattern – Mama and Baby Chicks
Pattern Details
- Skill level: Easy to intermediate
- Yarn: Worsted-weight cotton yarn
- Hooks: 5 mm (US H-8) and 4 mm (US G-6)
- Finished size: Baby chick approximately 3½ in. (9 cm); mama chicken approximately 4½ in. (11.5 cm)
- Construction: Crocheted flat in single crochet rows, folded and joined, with crocheted face details and embroidered eyes
Materials
- Worsted-weight cotton yarn in three colors (CA, CB, and CC), shown here in Lion Brand’s 24/7 Cotton
- Small amount of black yarn or crochet thread for the eyes
- 5 mm (US H-8) crochet hook
- 4 mm (US G-6) crochet hook
- Dried beans or popcorn kernels, securely contained
- Fiberfill stuffing
- Yarn needle
- Scissors
Crochet Abbreviations
CA = Color A
CB = Color B
CC = Color C
ch = chain
dc = double crochet
hdc = half double crochet
sc = single crochet
sl st = slip stitch
st(s) = stitch(es)
This pattern uses U.S. crochet terminology. For additional help, see my Crochet Abbreviations guide and U.S. to U.K. Crochet Conversion Chart.
Pattern Notes
- Instructions are written for the baby chick, with changes for the mama chicken in parentheses.
- The body is worked flat in rows before being folded and joined.
- Use the smaller hook for the baby chick’s face details and the larger hook for the mama chicken’s face details.
- The dried filling should be enclosed in a securely sealed inner pouch to prevent it from escaping through the crochet stitches.
- These chicks are intended as decorations, not toys for young children or pets.
A French translation of this pattern was generously provided by Christelle Sobaba of Sobaba-Maternage Blog. View the French translation (Français).
Get the convenient, ad-free PDF pattern on Ravelry.
Add this pattern to your Ravelry library.

How to Crochet the Chicken Body
With 5 mm (US H-8) hook and CA, ch 13 (17).
Row 1: Work 1 sc in 2nd ch from hook and each ch across, turn — 12 (16) sts.
Row 2: Ch 1 (does not count as st), work 1 sc in each st across, turn — 12 (16) sts.
Rows 3–28 (38): Repeat Row 2.
Fold piece so that Row 1 lines up with last row, slip stitch together to corner, then slip stitch down side to fold.
Fasten off and weave in ends.

Crochet Chicken Face Details
Use the 4 mm (US G-6) hook for the baby chick and the 5 mm (US H-8) hook for the mama chicken.
Join CB in 4th st from the slip-stitched corner, ch 3 (counts as dc), work 2 dc in same st as join, 1 sc in next, 3 dc in next, 1 sc in next, 3 hdc in next, 1 sc in next, sl st in next, fasten off.
Join CC in next st, ch 1, work 1 sc in same st as join, ch 3, 1 sc in furthest ch from hook, 1 sc in next st, sl st in same st, fasten off.
Skip next st, join CB in next, ch 1, 1 hdc in same st as join, ch 1, sl st in same st, fasten off.
Weave in ends.

Crochet Chicken Face Stitch Chart
The stitch chart below illustrates the crocheted face details for the chicken. If you need help reading the diagram, see my Crochet Stitch Chart Symbols guide.

Adding the Eyes
Using black yarn or crochet thread, embroider a French knot for each eye as shown in the photos.

Stuffing and Finishing Your Crochet Chicken
Turn the piece so the opening is in the back.
Add a small amount of fiberfill stuffing to the head.
Fill the body approximately three-quarters full with dried beans or popcorn kernels enclosed in a securely sealed inner pouch. (I used expired popcorn kernels in a Ziploc!)
Close the opening and slip stitch it shut securely.
That’s it! Your little mama and baby chicks are ready to brighten up a windowsill, shelf, or spring display.
I hope you enjoy making these little chick-chick-chick crochet chickens as much as I did!

More Free Crochet Patterns
- Pineapple Crochet Hot Pad
- Crochet Kitchen Patterns
- Crochet Dishcloth Patterns
- Amigurumi Crochet Patterns
Browse more of my free crochet patterns here.


Bonjour,
Je suis tombée par hasard sur vos jolies poulettes, et je les adore! Merci pour les explications, je ne manquerais pas de les tester et de faire un lien vers votre blog.
Encore merci et au plaisir!
Adeline
🙂
These are so cute. 🙂 I’m pinning them!
Thank you, Adrianne 🙂
Oh my goodness these are adorable! I’m going to have to make a few!
They are a lot of fun!
These are so cute! I have already crochet two of them and just posted
Thank you Kara
They are so cute!!! I scheduled them to share on my Facebook page on Friday 🙂
I loved your cute little chickens so much…I made them into to cat toys for the shelter I crochet toys for, they either sell the toys for money for the shelter or auction off the toys in there Christmas auctions, which gain a lot of attention!! I will send you pics if you so want…and I cannot wait to check out your other free crochet patterns!! Thanks for sharing your talents with us!! 🙂
What a great idea!! I would love to see photos if you feel like sharing. Feel free to post them up on my Facebook page 🙂
Cute chickens !
Have a nice week !
Anna
Thank you, Anna 🙂
These turned out SO cute! I can’t even imagine trying to crochet one because it would be a fiasco! I would much rather pull out my sewing machine, this is what I love about blogging. Seeing everyone’s strengths! Crocheting definitely isn’t mine, thanks for sharing and linking back to me so that I could see it! 🙂
I am so glad you like them, Brandy!! I LOVE your little chicks (as you can see). Thank you so much for the inspiration. So glad you came by to see!
That is just too cute! Thanks for the pattern.
My pleasure, Naida! Glad you like them 🙂
These are cute enough, that I think they would actually make me enjoy doing dishes! Great job!
They make me smile every time I look at them 🙂
I will stuff them with fiberfill and use them as cat toys.
Good idea!