
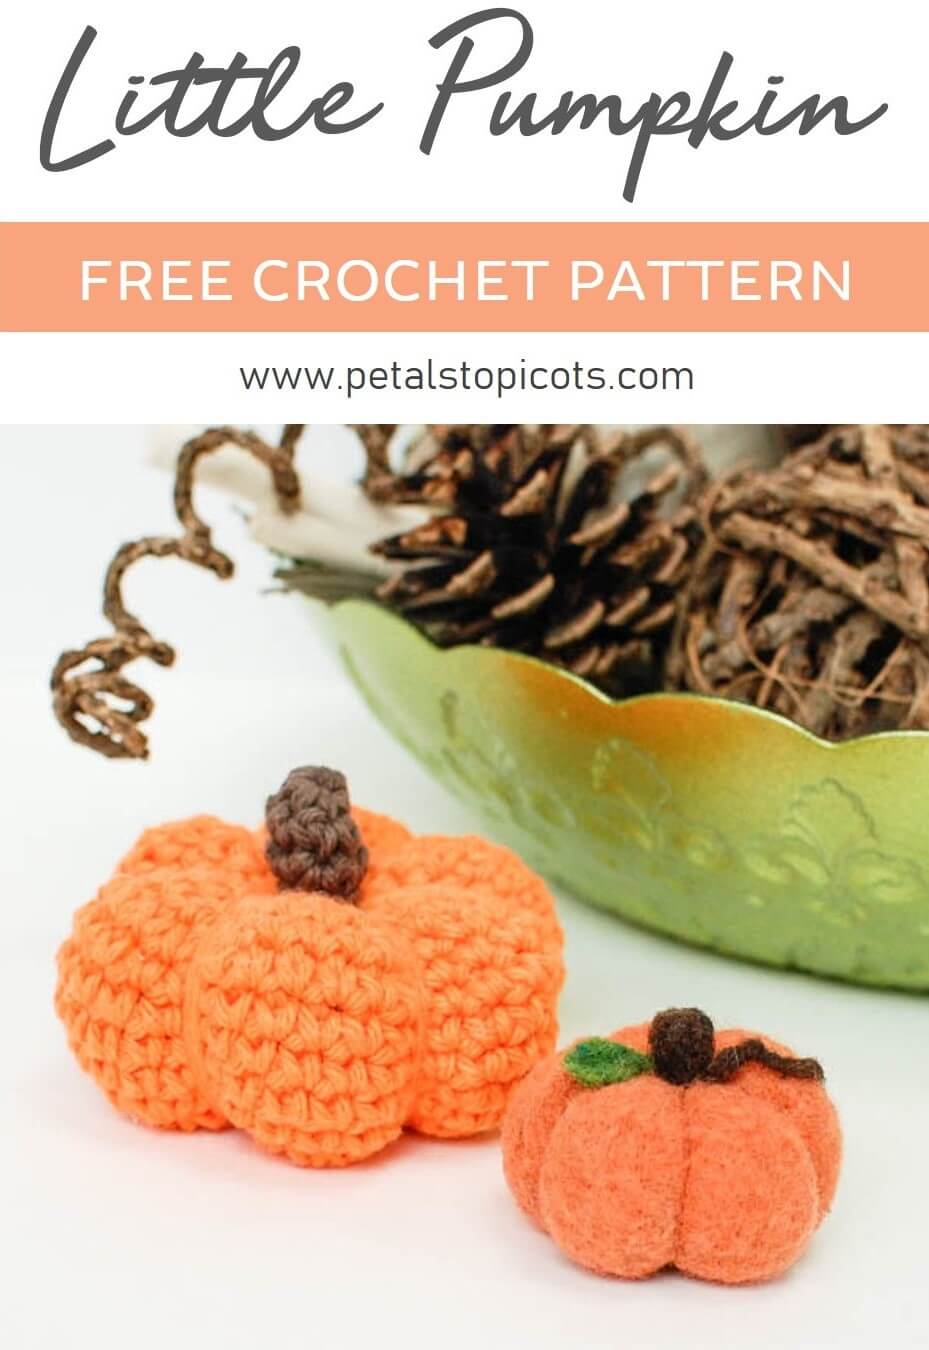
This sweet little crochet pumpkin pattern is perfect for kicking off the Autumn season. With the crisp cool weather starting it is usually when my crochet projects kick into overdrive. I love to decorate for fall with pumpkins and gourds and colorful leaves and mums … all those burnt colors of reds and golds and browns, yes! And of course no Fall scene would be complete without small adorable crochet pumpkins scattered around.
I had so much fun stitching these adorable little crochet pumpkins. It’s a super simple pattern with only single crochet stitches and some basic increases and decreases for shaping. I’ve also included some how to photos for getting those indents around the pumpkin.
Once your done you can expand your Fall-scape with some different sized and shaped pumpkins like these needle-felted pumpkins or this adorable rustic pumpkin made with T shirt yarn.
I hope you enjoy this sweet little crochet pumpkin pattern!
Little Crochet PUMPKIN Pattern
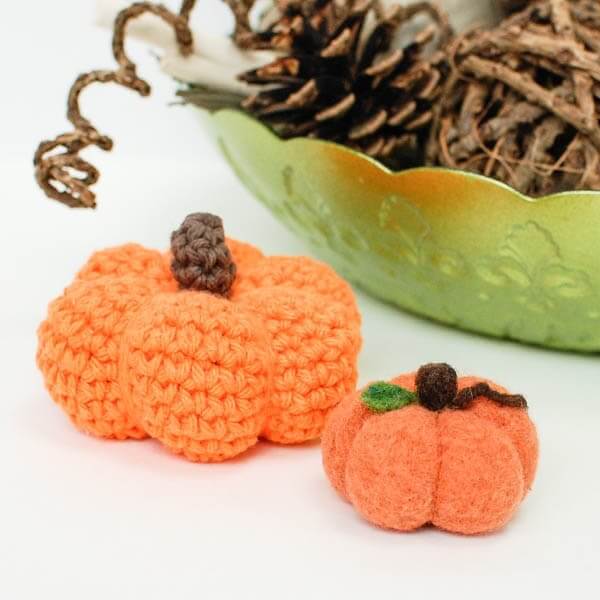
And if you’re also loving that sweet little needle felted pumpkin shown above, you can find the tutorial to make one here.
Here’s what you need:
- Orange and brown worsted weight cotton yarn
- US G-6 hook / 4 mm crochet hook
- tapestry needle and scissors for finishing
- fiberfill stuffing or yarn scraps
Resources and tutorials you may find helpful in following this crochet pattern: Crochet Abbreviations, U.S. to U.K. Crochet Conversion Chart, How to Make a Magic Ring {photo & video tutorial}.
Add this pattern to your Ravelry library.
Finished crochet pumpkin measures approx 2½ in. high and 10½ in. in circumference.
Jump to Printable PatternPumpkin
Using orange, create a magic ring (new to the magic ring? See the video above to guide you through. As an alternative to the magic ring, you can ch 4 and join with a slip stitch in furthest chain from hook to form a ring).
Round 1: Ch 1 (does not count as st), 6 sc in ring, join — 6 sts.
Round 2: Ch 1 (does not count as st), work 2 sc in same st as join and in each st around, join — 12 sts.
Round 3: Ch 1 (does not count as st), work 2 sc in same st as join, 1 sc in next, *2 sc in next, 1 sc in next, rep from * around, join — 18 sts.
Round 4: Ch 1 (does not count as st), work 2 sc in same st as join, 1 sc in each of the next 2 sts, *2 sc in next, 1 sc in each of the next 2 sts, rep from * around, join — 24 sts.
Round 5: Ch 1 (does not count as st), work 2 sc in same st as join, 1 sc in each of the next 3 sts, *2 sc in next, 1 sc in each of the next 3 sts, rep from * around, join — 30 sts.
Round 6: Ch 1 (does not count as st), work 2 sc in same st as join, 1 sc in each of the next 4 sts, *2 sc in next, 1 sc in each of the next 4 sts, rep from * around, join — 36 sts.
Rounds 7 through 11: Ch 1 (does not count as st), work 1 sc in same st as join and in each st around, join — 36 sts.
Round 12: Ch 1 (does not count as st), starting in same st as join sc2tog, 1 sc in each of the next 4 sts, * sc2tog, 1 sc in each of the next 4 sts, rep from * around, join — 30 sts.
Round 13: Ch 1 (does not count as st), starting in same st as join sc2tog, 1 sc in each of the next 3 sts, * sc2tog, 1 sc in each of the next 3 sts, rep from * around, join — 24 sts.
Round 14: Ch 1 (does not count as st), starting in same st as join sc2tog, 1 sc in each of the next 2 sts, * sc2tog, 1 sc in each of the next 2 sts, rep from * around, join — 18 sts.
Round 15: Ch 1 (does not count as st), starting in same st as join sc2tog, 1 sc in next st, * sc2tog, 1 sc in next st, rep from * around, join — 12 sts.
Round 16: Ch 1 (does not count as st), starting in same st as join sc2tog around, join — 6 sts.
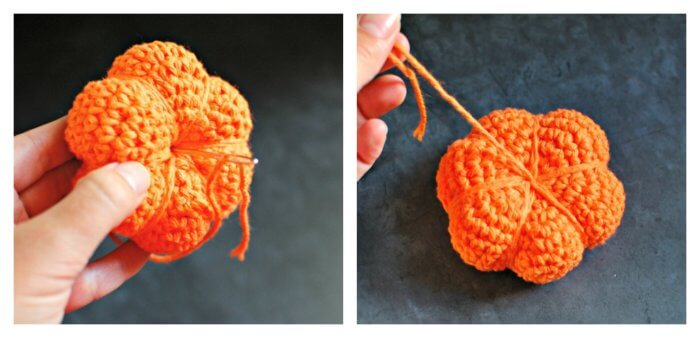
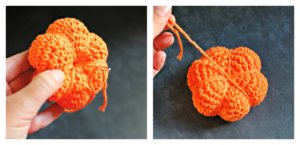
**Stuff crochet pumpkin with fiberfill stuffing or yarn scraps.**
Round 17: Ch 1 (does not count as st), starting in same st as join sc2tog around, join — 3 sts.
Fasten off leaving a tail of about 48 in.
To shape your crochet pumpkin, use a tapestry needle to pull the tail through the center of the pumpkin, wrap the yarn around the side, and pull back through the center. Give a gentle tug to make a slight indent. Repeat this five more times to create evenly spaced indents around the pumpkin. If desired, you can go around again, working over the same yarn indents until you get the result you want.
Stem
Using brown, create a magic ring.
Round 1: Ch 1 (does not count as st), 6 sc in ring — 6 sts.
Round 2: 1 sc in first st and each st around — 6 sts.
Round 3: 1 sc in first st and next 4 sts, Sl st in last — 6 sts.
Fasten off leaving a long enough tail to sew stem to pumpkin. Sew stem onto pumpkin.

Little Crochet Pumpkin Pattern
Materials
- Orange and brown worsted weight cotton yarn
- US G-6 hook / 4 mm crochet hook
- tapestry needle and scissors
- fiberfill stuffing or yarn scraps
Instructions
Pumpkin
- Using orange, create a magic ring (as an alternative to the magic ring, you can ch 4 and join with a slip stitch in furthest chain from hook to form a ring).
- Round 1: Ch 1 (does not count as st), 6 sc in ring, join — 6 sts.
- Round 2: Ch 1 (does not count as st), work 2 sc in same st as join and in each st around, join — 12 sts.
- Round 3: Ch 1 (does not count as st), work 2 sc in same st as join, 1 sc in next, *2 sc in next, 1 sc in next, rep from * around, join — 18 sts.
- Round 4: Ch 1 (does not count as st), work 2 sc in same st as join, 1 sc in each of the next 2 sts, *2 sc in next, 1 sc in each of the next 2 sts, rep from * around, join — 24 sts.
- Round 5: Ch 1 (does not count as st), work 2 sc in same st as join, 1 sc in each of the next 3 sts, *2 sc in next, 1 sc in each of the next 3 sts, rep from * around, join — 30 sts.
- Round 6: Ch 1 (does not count as st), work 2 sc in same st as join, 1 sc in each of the next 4 sts, *2 sc in next, 1 sc in each of the next 4 sts, rep from * around, join — 36 sts.
- Rounds 7 through 11: Ch 1 (does not count as st), work 1 sc in same st as join and in each st around, join — 36 sts.
- Round 12: Ch 1 (does not count as st), starting in same st as join sc2tog, 1 sc in each of the next 4 sts, * sc2tog, 1 sc in each of the next 4 sts, rep from * around, join — 30 sts.
- Round 13: Ch 1 (does not count as st), starting in same st as join sc2tog, 1 sc in each of the next 3 sts, * sc2tog, 1 sc in each of the next 3 sts, rep from * around, join — 24 sts.
- Round 14: Ch 1 (does not count as st), starting in same st as join sc2tog, 1 sc in each of the next 2 sts, * sc2tog, 1 sc in each of the next 2 sts, rep from * around, join — 18 sts.
- Round 15: Ch 1 (does not count as st), starting in same st as join sc2tog, 1 sc in next st, * sc2tog, 1 sc in next st, rep from * around, join — 12 sts.
- Round 16: Ch 1 (does not count as st), starting in same st as join sc2tog around, join — 6 sts.
- **Stuff pumpkin with fiberfill stuffing or yarn scraps.**
- Round 17: Ch 1 (does not count as st), starting in same st as join sc2tog around, join — 3 sts.
- Fasten off leaving a tail of about 48 in.
- To create a pumpkin shape, use a tapestry needle to pull the tail through the center of the pumpkin, wrap the yarn around the side, and pull back through the center. Give a gentle tug to make a slight indent. Repeat this five more times to create evenly spaced indents around the pumpkin. If desired, you can go around again, working over the same yarn indents until you get the result you want.
Stem
- Using brown, create a magic ring.
- Round 1: Ch 1 (does not count as st), 6 sc in ring — 6 sts.
- Round 2: 1 sc in first st and each st around — 6 sts.
- Round 3: 1 sc in first st and next 4 sts, Sl st in last — 6 sts.
- Fasten off leaving a long enough tail to sew stem to pumpkin. Sew stem onto pumpkin.
Notes
Click here for more free Halloween crochet patterns.
you may Also enjoy …
- Halloween Trick or Treat Bag
- Crochet Spider Pattern
- Halloween Ghost Pattern + Printable
- Rustic Pumpkin Made With T-Shirt Yarn

Hi! This pattern is awesome! I was wondering, would you be okay with me making a limited amount of these to sell as earrings? I was thinking around 3-5 pairs total!
Thanks for the crochet pumpkin pattern! I haven’t seen a pattern in which the ending yarn tail can be used for creating the cute pumpkin shape, after the rounds are finished. Also, thank you for the great magic ring video!
I LOVE this! I’ve never really got into crochet very much – but this has inspired me to give it another go! 🙂 Thanks for sharing!
Thank you! I love the little pumpkins!
New to crocheting, how many stitches in the ring?
I’m not sure what the !cord is. Can you explain?
Fabulous! Thanks so much for this! 🙂
Oh my goodness. This is seriously the cutest crochet pumpkin pattern I’ve ever seen. I wish I’d seen this in October! But hey, I can always whip a few up next year, right?! 🙂
Thanks so much, Kersten! If you start now you can have a whole patch of the ready for next year 😉
This pattern is by far the cutest pumpkin crochet pattern I’ve ever seen! Thank you so much for sharing this with us.
Thanks so much for the great compliment!
Thank you so much for sharing this on your website! I made it tonight and I am so pleased with how it came out. I know it is just a smidgen early for Fall, Halloween, or Thanksgiving, but I will have this little guy ready for display when the time comes.
Yay! So glad you like it, Jeannette!
This pattern is just TOO adorable! I just got home from late shift so I have to sleep first, but I can’t wait to start making one 😀 Thank you so much for sharing!
Hope you enjoy it 🙂
cute!!!
Kara, I featured this pattern in my fall crochet roundup! http://mymerrymessylife.com/2012/10/fall-and-halloween-crochet-roundup.html
Kara, this is just a perfect, gorgeous pumpkin! Great job and another great tutorial. I just love your work! Thanks for sharing at Hookin On Hump Day again!!
This is so cute! Pinning for later. (Like way later when I learn how to crochet ha ha) 🙂
This pumpkin is too cute! I need to learn to crochet so I can make one! 🙂 Thank you so much for sharing this at Artsy Corner! Hope to see you again this week!
I just found you on artsyfartsymama.com. This is SO sweet! It makes me wish I knew how to crochet!
So adorable! I just love how cute that little pumpkin is! Thanks for sharing at the Pomp Party! Hope to see you back next week!
Just in time for a Halloween challenge in my pincushion group. I am going to use rug yarn to make a larger pumpkin and fill the bottom with crushed walnut shells for weight.
hi, Kara! I was so much happy when found your pattern of a little pumpkin:) I made two of them, however used the basic amigurumi pattern to create pumpkin’s “body”. thanks for sharing this nice idea!it i will make an awesome Autumn decor for my room 🙂
Absolutely Fabulous! I love autumn too and your little pumpkin will make a great decoration for our table. Thanks so much for sharing!
This so makes me wish I could crochet!!!
Great pattern – thanks. I just made 3 – see them here…
http://www.violet-white.blogspot.com/2012/10/pumpkins-for-halloween.html
Thanks for the pattern!
Penny
x
I absolutely love this Kara!!! I ALMOST bought a pattern for a pumpkin similar to this about a month ago and so glad I didn’t because now I can use your free pattern which is MUCH cuter!! Thanks so much! -Sarah
Great little pumpkin! I love the way you got the shape. Thanks for the pattern.:)
ahaa! this is how the shape is done! I kept wondering about it and ended up doing something totally different for mine, love urs tho! 🙂
Oh Kara, this is SO adorable!!
This stuff is awesome!! 🙂 Thanks for the patterns! 🙂
What a cute idea! I’m pinning this for later because I just don’t have any yarn that fits. A pink pumpkin might be weird 😉
It’s a cute pumpkin! Thank you for sharing the pattern; I can now make some Halloween crochet 🙂
We do not have Halloween month in India, but my daughter and her friends do have fun time with Halloween:) She makes Halloween things on her own. The next generation is globally compatible with celebrations and having fun ! 🙂
Lovely…
When english isn’t our language, it’s more dificult for us following the instructions than following a graphic…but I’ll try anyway…
Hug
Anna
Thanks the pumpkins are real cute