
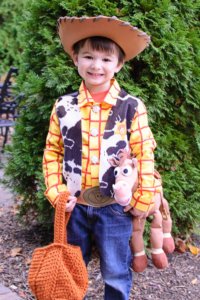
We are heading into Halloween week, and I am so excited to take my kids trick-or-treating around the neighborhood … visiting friends, being outdoors, and chocolate (yummm)! And all these years later, my son still uses the Pumpkin Trick-or-Treat Bag Crochet Pattern I made him … it warms this mama’s heart to see.
That’s him with the bag a few years back … so sweet! Check out the pattern below if you’d like to whip up a new bag for the little one in your life.
This cute trick or treat bag works up quickly and is perfect for holding all your little pumpkin’s treats to tote around the neighborhood … and it surely beats pillowcases!
Pumpkin Trick or Treat Bag Crochet Pattern
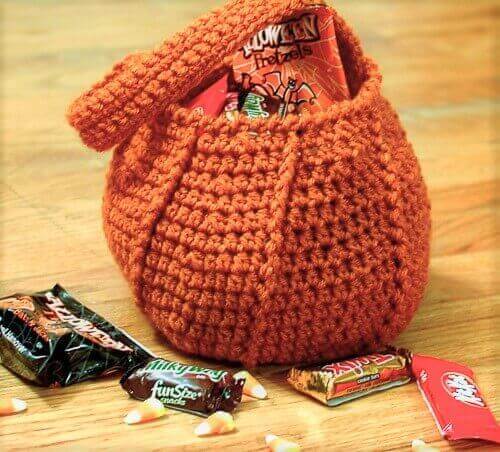
Here’s what you need:
- Orange worsted weight acrylic or cotton yarn, approximately 200 yds (Lion Brand 24/7 cotton works well for this)
- US H-8 hook / 5 mm crochet hook
- a piece of cardboard approx 6 × 6 in. (optional)
- tapestry needle
Resources and tutorials you may find helpful in following this crochet pattern: Crochet Abbreviations, U.S. to U.K. Crochet Conversion Chart, How to Make a Magic Ring {photo & video tutorial}.
Special Stitches:
hdc2tog: yarn over, insert hook into designated st and pull up a loop, yarn over again and insert hook into next stitch and pull up a loop, yarn over and pull through all 5 loops on hook.
FPdc: yarn over, insert hook from front to back to front around post of specified st and pull up a loop, yarn over and pull through 2 loops, yarn over again and pull through remaining 2 loops.
Finished bag measures approx. 7 in. high and 11 in. wide (17.78 cm high and 27.94 cm wide)
Instructions to Make the Pumpkin Bag
To start making the body of the bag, make a magic ring (as an alternative to the magic ring, try this beginner-friendly variation: Chain 4 and join with a slip stitch in the furthest chain from the hook to form a ring).
Foundation Round: Ch 2 (counts as st here and throughout), work 7 hdc in ring, join — 8 sts.
Round 1: Ch 2, work 1 hdc in same stitch as join, 2 hdc in each st around, join — 16 sts.
Round 2: Ch 2, work 1 hdc in same stitch as join, 1 hdc in next st, *2 hdc in next st, 1 hdc in next, rep from * around, join — 24 sts.
Round 3: Ch 2, work 1 hdc in same stitch as join, 1 hdc in each of the next 2 sts, *2 hdc in next st, 1 hdc in each of the next 2 sts, rep from * around, join — 32 sts.
Round 4: Ch 2, work 1 hdc in same stitch as join, 1 hdc in each of the next 3 sts, *2 hdc in next st, 1 hdc in each of the next 3 sts, rep from * around, join — 40 sts.
Round 5: Ch 2, work 1 hdc in same stitch as join, 1 hdc in each of the next 4 sts, *2 hdc in next st, 1 hdc in each of the next 4 sts, rep from * around, join — 48 sts.
Round 6: Ch 2, working in back loops only, 1 hdc in same st as join and each st around, join — 49 sts.
Round 7: Ch 2, *work 1 FPdc around hdc directly below, 1 hdc in each of the next 3 sts, 2 hdc in next, 1 hdc in each of the next 2 sts, rep from * 5 more times, work 1 FPdc around hdc directly below, 1 hdc in each of the next 3 sts, 2 hdc in next, 1 hdc in each of the next st, join — 56 sts.
Round 8: Ch 2, *work 1 FPdc around FPdc directly below, 1 hdc in each of the next 7 sts, rep from * 5 more times, work 1 FPdc around FPdc directly below, 1 hdc in each of the next 6 sts, join — 56 sts.
Round 9: Ch 2, *work 1 FPdc around FPdc directly below, 1 hdc in each of the next 3 sts, 2 hdc in next, 1 hdc in each of the next 3 sts, rep from *5 more times, work 1 FPdc around FPdc directly below, 1 hdc in each of the next 3 sts, 2 hdc in next, 1 hdc in each of the next 2 sts, join — 63 sts.
Round 10: Ch 2, *work 1 FPdc around FPdc directly below, 1 hdc in each of the next 8 sts, rep from * 5 more times, work 1 FPdc around FPdc directly below, 1 hdc in each of the next 7 sts, join — 63 sts.
Round 11: Ch 2, *work 1 FPdc around FPdc directly below, 1 hdc in each of the next 4 sts, 2 hdc in next, 1 hdc in each of the next 3 sts, rep from * 5 more times, work 1 FPdc around FPdc directly below, 1 hdc in each of the next 4 sts, 2 hdc in next, 1 hdc in each of the next 2 sts, join — 70 sts.
Rounds 12 through 14: Ch 2, *work 1 FPdc around FPdc directly below, 1 hdc in each of the next 9 sts, rep from * 5 more times, work 1 FPdc around FPdc directly below, 1 hdc in each of the next 8 sts, join — 70 sts.
Round 15: Ch 2, *work 1 FPdc around FPdc directly below, 1 hdc in each of the next 4 sts, hdc2tog, 1 hdc in each of the next 3 sts, rep from * 5 more times, work 1 FPdc around FPdc directly below, 1 hdc in each of the next 4 sts, hdc2tog, 1 hdc in each of the next 2 sts, join — 63 sts.
Round 16: Ch 2, *work 1 FPdc around FPdc directly below, 1 hdc in each of the next 8 sts, rep from * 5 more times, work 1 FPdc around FPdc directly below, 1 hdc in each of the next 7 sts, join — 63 sts.
Round 17: Ch 2, *work 1 FPdc around FPdc directly below, 1 hdc in each of the next 3 sts, hdc2tog, 1 hdc in each of the next 3 sts, rep from * 5 more times, work 1 FPdc around FPdc directly below, 1 hdc in each of the next 3 sts, hdc2tog, 1 hdc in each of the next 2 sts, join — 56 sts.
Round 18: Ch 2, *work 1 FPdc around FPdc directly below, 1 hdc in each of the next 7 sts, rep from * 5 more times, work 1 FPdc around FPdc directly below, 1 hdc in each of the next 6 sts, join — 56 sts.
Round 19: Ch 2, *work 1 FPdc around FPdc directly below, 1 hdc in each of the next 3 sts, hdc2tog, 1 hdc in each of the next 2 sts, rep from * 5 more times, work 1 FPdc around FPdc directly below, 1 hdc in each of the next 3 sts, hdc2tog, 1 hdc in each of the next st, join — 49 sts.
Round 20: Ch 2, *work 1 FPdc around FPdc directly below, 1 hdc in each of the next 6 sts, rep from * 5 more times, work 1 FPdc around FPdc directly below, 1 hdc in each of the next 5 sts, join — 49 sts.
Round 21: Ch 2, *work 1 FPdc around FPdc directly below, 1 hdc in each of the next 2 sts, hdc2tog, 1 hdc in each of the next 2 sts, rep from * 5 more times, work 1 FPdc around FPdc directly below, 1 hdc in each of the next 2 sts, hdc2tog, 1 hdc in each of the next st, join — 42 sts.
Round 22: Ch 1 (does not count as st), working back across stitches just made, work 1 rev sc in each st around, join — 42 sts.
Fasten off and weave in ends.
Bag Handle
Ch 45.
Row 1: Work 1 single crochet in 2nd ch from hook and each ch across, turn — 44 sts.
Rows 2 through 4: Ch 1 (does not count as st), work 1 sc in each st across, turn — 44 sts.
Fasten off.
Finishing
Using the same color yarn and a tapestry needle, sew the handle to the pumpkin bag. Weave in ends. If desired, you can use a piece of cardboard to help reinforce the bottom of the bag. Measure the base of your bag and trim the cardboard piece in a circular fashion to fit.
Click here for more free Halloween crochet patterns.

You may also enjoy …
- Cauldron Halloween Treat Holder
- Candy Corn Treat Holder
- Crochet Spider Pattern
- Halloween Ghost Pattern + Printable
- Rustic Pumpkin Made With T-Shirt Yarn


I really like this pattern and used your print button so I could print it out but the printout didn’t include the materials list. Just thought you should know.
Love this pattern! Although, I cannot figure why I get 70 stitches on round 7, when it says join 56?
I love the idea and design. But I’m not entirely how much yarn it needs, I have one ball of orange yarn which I got as a leftover from my auntie (it’s still biggish). Is this enough? I’d say it would be 100-150 grams. If not, can you please give me instructions for a slightly smaller size that I can make with the yarn available? Thank you so much!
So I have a question, how many cables are there supposed to be in each round? 7 or 8? It looks like 8, but the pattern is written in 7. But I can’t get it to come out right! Please help me!! I could also be messed up on figuring out where the stitches should go too. Is their one before the front post double crochet and after? Like in the stitch before, then post, then stitch after? It does look really cute though!! 🙂
Hi Crystal 🙂 There should be 7 cables around the bag. The post stitch takes the place of the next stitch, so you don’t want to work a stitch in the top of the same stitch that you are doing a post stitch around … this sounds like it is most likely what is happening. Hope that helps!
Thanks so much!!! That helps a ton!!! Now I think I’ll be able to get it figured out!!! 🙂
I am working on this pattern, but I’m not getting the cable look down the sides.
Try flipping the design over when you’re doing the front post double crochet. they’ll only show up if you’re working from the outside. Hope that helps! Great design. I’m doing it a bit bigger and making a little pumpkin purse. So cute!
Is this a one skein wonder?
Yep 🙂 Just one skein!
Kara, this is such a cute trick or treat pumpkin! Thanks so much for the free pattern! 😀
Thanks so much, Marilyn!
Stitch counts for 9, 10, 15 & 16 should be 63. Stitch counts for 11 through 14 should be 70.
Working on the pattern now, turning out really cute!
Every time there is an increase I also come up 1 stitch short…even counting the chain 2. I have no idea what I’m doing wrong. I’ve crocheted and then let it out several times and I still can’t get the right number so I’ve just been slipping in an extra stitch at the end of the round to make it the right count.
Hi Cori 🙂 Oh, I see what I did wrong!!! I missed a stitch on Round 6 that threw the whole count off! So, so sorry for the confusion. It should be correct now. Let me know if you see any else wonky. Thanks so much for letting me know!!
Hi Ginnna 🙂 Yes, I see now!! I missed a stitch on Round 6 that threw the whole count off! So, so sorry for the confusion. It should be correct now. Let me know if you see any else wonky. Thanks so much for letting me know!!