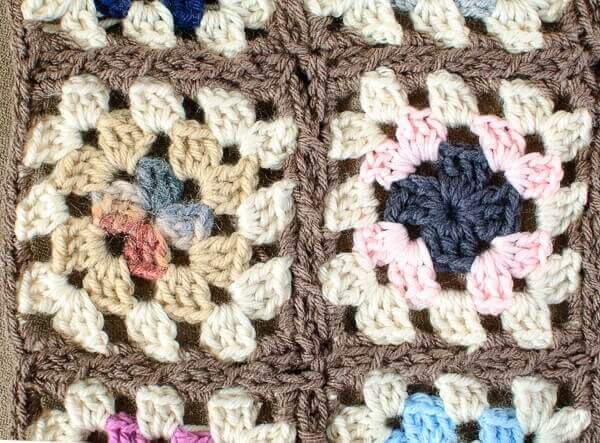
Last week I shared with you the pattern to make some traditional crochet granny squares and today I am going to show you how to join them using my all time favorite method … the Join As You Go (JAYGO) method.
No more sewing pieces together (yay!). In the JAYGO method, you join your squares together while working the final round of each square. It is super easy and also creates a beautiful design between your squares …

Joining Granny Squares With the Join As You Go (JAYGO) Method
Resources and tutorials you may find helpful in following this pattern: Crochet Abbreviations, U.S. to U.K. Crochet Conversion Chart.
For your first square only, work Round 4 as written.
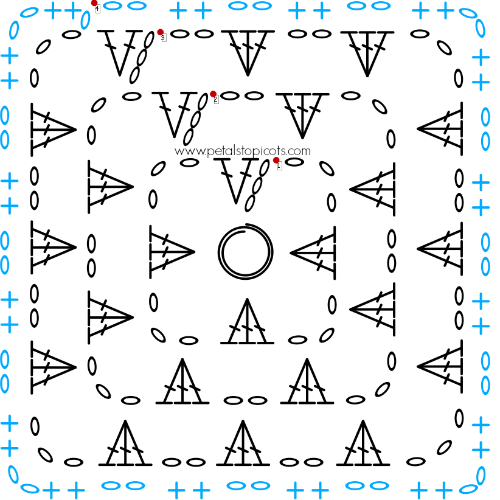
Round 4: Join yarn in any corner ch-3 sp, ch 1 (does not count as st), *work [2 sc, ch 2, 2 sc] in corner ch-3 sp, ch 2, work 2 sc in next ch-2 sp, ch 2, work 2 sc in next ch-2 sp, ch 2, rep from * three more times, join and fasten off — 32 scs and 16 ch-sps.

Are you left handed? You can find a left handed crochet stitch diagram here.
To join your second square to the first, begin working Round 4 as above until you reach the first corner that will join, then:
Work 2 sc in the corner ch-sp of the second square, ch 1, drop the loop off your hook and insert hook from front to back into the corner ch-sp of the first square, pick up the loop and pull it through, ch 1, work 2 sc in same corner ch-sp of the second square,

ch 1, drop loop again and pull it up in opposite ch-2 sp of the first square, ch 1 again and work 2 sc in next ch-2 sp on the second square,

ch 1, drop loop again and pull it up in opposite ch-2 sp of the first square, ch 1 again and work 2 sc in next ch-2 sp on the second square,

ch 1, drop loop again and pull it up in opposite ch-2 sp of the first square, ch 1 again and work 2 sc in ch-2 corner sp on the second square,

ch 1, drop the loop off your hook and pull it up in the opposite ch-2 corner space, ch 1, work 2 sc in same corner ch-sp of the second square, finish working Round 4 on second square as written above.

You join your third square and each one that follows the same way as you joined the first two, except now you will be joining across two sides of the squares. Join squares along sides as shown for your first two squares. When you reach the corner, work 2 sc in the corner space of the square you are joining, ch 1, drop the loop off your hook and pull it up in the ch-2 corner space that is diagonal, ch 1, work 2 sc back in same corner ch-sp of the square you are joining.

Make sense? How’d you do?
Once you’re finished joining all your squares, you are ready to add the finished touch to your blanket with a pretty granny edging. You can find my free granny edging pattern here.


Would this basically be adding in a diagonal pattern and not in stips? I am working on a lapghan that has two different main colors: one is blue the other is purple so am trying to fiqure out how to keep the repeating design.
Hi there, Thanks for your lovely pattern, when you joined the squares, were you join a number(example, 10 squares) in one go to all of them . then joined the other to complete all together? Hope you understand what I mean. Thanks
Hi again, I am redoing some of the squares, if I crochet after the number 3 squares, is it to crochet back to back or front to front? Thanks
Hi Louise 🙂 I am not sure I understand you’re question.
This method of joining the granny squares looks great. I want to print a PDF for my use, but the link isn’t working. What can I do?
Hi Jean 🙂 There are two icons at the bottom of the post, one to print and one to save as a pdf. If those aren’t working for you, you can try to print from your browser. Hope that helps!
Does anyone know if there is a video for this particular joining method? I could not find it on youtube, and I am bad at reading patterns. Kinda need the visual. I started this blanket and would like to figure out the joining method. Thanks.
Hi Brianna ❤
Did you find a VIDEO for this particular joining method?
I need the visual too 🤔
Thank you
Lilja Hafdís, from Iceland
I have loved making the squares having never done squares before and I love your design. I especially love the way you have joined the squares together. I’m thinking I must be really thick because whilst I have managed the stitches I get stuck trying to do the joining of squares together. Have you done a video tutorial I might be better with the visual. Also I can’t work out what pattern you follow do you do up and down lines first and then join across? Am I beyond help
I love granny squares and this is a cute way to join them and it looks fast. Thanks for sharing.
My pleasure, Laura 🙂
you always write thing so clearly! Great instructions!
Thanks so much for the step-by-step JAYGO pattern! I do have a question though… If you were to imagine working with a total of 4 granny squares and wanted to join them using this method into 1 large square shape, laid out like below:
1 | 2
—–
4 | 3
…would you join the 3rd square into the diagonal corner of the 1st/original square when you reach that intersecting corner point? Or do you join to the corner of the 2nd square and only join the 4th square corner with the diagonal (which in this above case would be the corner of the 2nd square)? I can’t seem to find that answer on any blog/site I’ve visited, and your instructions are by far the best I’ve come across, so I was hoping you’d be able to clarify for me? 🙂 Thanks so much again, your patterns are beautifully written and so easy to follow!!
Hi Erica 🙂 So glad you are finding the instructions helpful! Yes, when there is a corner diagonal, that is where I join, whether it be the third square, or fourth, and so on. This makes for a secure join where they all intersect and prevents having a little hole as well. Hope that helps!
Gorgeous ! Can’t wait to try this! Beautiful finish and elegant!
Kara, I have to say that the granny square stitch pattern is my most favorite of all when I crochet. I love how you did this really great step by step tutorial with connecting these babies!
Would love to have the pattern for the granny square
Hi Tina 🙂 You can find the granny pattern here: http://www.petalstopicots.com/2014/05/crochet-granny-square-pattern/
The pattern is the stitch diagram in the blog.
I’m new to crochet and need all the tutorials I can find! Thanks for this great one! Can’t wait to make something new!
Woah. That. is. genius.
I know I will be back at some point to try this, I think you would have to have a go at it for it to make sense. I love the idea of this I will be trying it next time I’m on a granny square project. Thanks for taking the time to show us all here today … this deserves a G+ share lol 🙂
I love using this method, Kara! I’ve never liked sewing the pieces together and this method works perfectly!
I have another method I can show you after I write it out. Its my own way and it works great. 🙂
Please post your method so i can com. Compare I have never been able to make something reading a pattern. I am a visual person if the other reader could help with jets maybe would get it. Thanks
Hi, This pattern is so beautiful and i like it . Thank you for great explanation.
I was given granny squares in pastel variegated yarn and was asked to put them together. This way of joining them would be more fun than whip stitching together and more attractive.