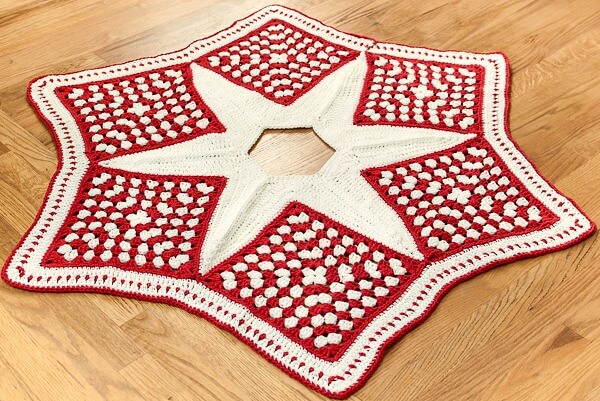
I am usually not one to rush into the holidays … I love to linger in Autumn as long as possible, with its crisp and colorful days and the bounty of Thanksgiving. But I wanted to give you plenty of time to work up this pretty crochet Christmas tree skirt pattern. This has been my labor of love in recent weeks and it was so worth every stitch!

Since this pattern has a bunch of parts to write up, I have broken the pattern down into three separate posts, kind of like a crochet along. But if you would prefer the complete pattern all in one download, I also have it available here as a convenient ad free pdf.
Crochet Christmas Tree Skirt Pattern

Here’s what you need:
- red and white worsted weight cotton yarn (approx. 710 yds each, I used less than one skein each of Bernat Handicrafter in White and Country Red)
- US H-8 / 5 mm crochet hook
- scissors and a tapestry needle
Resources and tutorials you may find helpful in following this free pattern: Crochet Abbreviations, U.S. to U.K. Crochet Conversion Chart.
Add this pattern to your Ravelry library.
Complete pattern is also available as a convenient, ad-free pdf download here.
Finished grannies measure approximately 10¼ in. × 10¼ in. each. Finished tree skirt measures approximately 46 in. from each point to the opposite point.
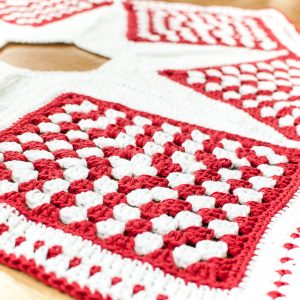
Granny Squares (make 6)
With white yarn, make a magic ring (as an alternative to the magic ring method, you can ch 4 and join in furthest ch from hook to form a ring.)
Round 1: Ch 3 (counts as dc), 2 dc in ring, ch 3, *3 dc in ring, ch 3, repeat from *twice more, join in top of beg ch, drop white — 12 sts.
Round 2: Join red in any ch-3 sp, ch 3 (counts as dc), work [2 dc , ch 3, 3 dc] in same ch-3 sp, ch 2 *[3 dc, ch 3, 3 dc] in next ch-3 sp, ch 2, rep from * twice more, join in top of beg ch, drop red — 24 sts.
Round 3: Join white yarn in any ch-3 sp, ch 3 (counts as dc), work [2 dc , ch 3, 3 dc] in same ch-3 sp, *ch 2, 3 dc in next ch-2 sp, ch 2, [3 dc, ch 3, 3 dc] in next ch-3 sp, rep from * twice more, ch 2, 3 dc in next ch-2 sp, ch 2, join in top of beg ch, drop white — 36 sts.
Round 4: Join red yarn in any ch-3 sp, ch 3 (counts as dc), work [2 dc , ch 3, 3 dc] in same ch-3 sp, *ch 2, 3 dc in next ch-2 sp, ch 2, 3 dc in next ch-2 sp, ch 2, [3 dc, ch 3, 3 dc] in next ch-3 sp, rep from * twice more, ch 2, 3 dc in next ch-2 sp, ch 2, 3 dc in next ch-2 sp, ch 2, join in top of beg ch, drop red — 48 sts.
Round 5: Join white yarn in any ch-3 sp, ch 3 (counts as dc), work [2 dc , ch 3, 3 dc] in same ch-3 sp, *ch 2, 3 dc in next ch-2 sp, ch 2, 3 dc in next ch-2 sp, ch 2, 3 dc in next ch-2 sp, ch 2, [3 dc, ch 3, 3 dc] in next ch-3 sp, rep from * twice more, ch 2, 3 dc in next ch-2 sp, ch 2, 3 dc in next ch-2 sp, ch 2, 3 dc in next ch-2 sp, ch 2, join in top of beg ch, drop white — 60 sts.
Round 6: Join red yarn in any ch-3 sp, ch 3 (counts as dc), work [2 dc , ch 3, 3 dc] in same ch-3 sp, *ch 2, 3 dc in next ch-2 sp, ch 2, 3 dc in next ch-2 sp, ch 2, 3 dc in next ch-2 sp, ch 2, 3 dc in next ch-2 sp, ch 2, [3 dc, ch 3, 3 dc] in next ch-3 sp, rep from * twice more, ch 2, 3 dc in next ch-2 sp, ch 2, 3 dc in next ch-2 sp, ch 2, 3 dc in next ch-2 sp, ch 2, 3 dc in next ch-2 sp, ch 2, join in top of beg ch, drop red — 72 sts.
Round 7: Join white yarn in any ch-3 sp, ch 3 (counts as dc), work [2 dc , ch 3, 3 dc] in same ch-3 sp, *ch 2, 3 dc in next ch-2 sp, ch 2, 3 dc in next ch-2 sp, ch 2, 3 dc in next ch-2 sp, ch 2, 3 dc in next ch-2 sp, ch 2, 3 dc in next ch-2 sp, ch 2, [3 dc, ch 3, 3 dc] in next ch-3 sp, rep from * twice more, ch 2, 3 dc in next ch-2 sp, ch 2, 3 dc in next ch-2 sp, ch 2, 3 dc in next ch-2 sp, ch 2, 3 dc in next ch-2 sp, ch 2, 3 dc in next ch-2 sp, ch 2, join in top of beg ch, drop white — 84 sts.
Round 8: Join red yarn in any ch-3 sp, ch 3 (counts as dc), work [2 dc , ch 3, 3 dc] in same ch-3 sp, *ch 1, 3 dc in next ch-2 sp, ch 1, 3 dc in next ch-2 sp, ch 1, 3 dc in next ch-2 sp, ch 1, 3 dc in next ch-2 sp, ch 1, 3 dc in next ch-2 sp, ch 1, 3 dc in next ch-2 sp, ch 1, [3 dc, ch 3, 3 dc] in next ch-3 sp, rep from * twice more, ch 1, 3 dc in next ch-2 sp, ch 1, 3 dc in next ch-2 sp, ch 1, 3 dc in next ch-2 sp, ch 1, 3 dc in next ch-2 sp, ch 1, 3 dc in next ch-2 sp, ch 1, 3 dc in next ch-2 sp, ch 1, join in top of beg ch — 96 sts.
Round 9: Continuing on with red yarn, ch 1 (does not count as st), work 1 sc in same st as join and next 2 sts, *work 3 sc in corner ch-3 sp, work 1 sc in each st and in each ch-1 sp across to next corner, rep from * around, join and fasten off — 136 sts.
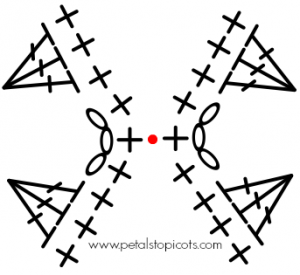
Repeat for a total of 6 granny squares. Join squares through the center single crochet of corners as shown below (joins are indicated in red). You can either use the join as you go (JAYGO) method or just use a tapestry needle and red thread to stitch them together. Weave in ends.


Have fun!


Grannies no problem trying to find the star
Such a pretty tree skirt! Love the granny squares.
Looking forward making this for my Church ready for Christmas 2021 but where are the instructions for part 3, please.
so confused. i don’t understand where it says rows left unworked. Do i crochet the star through 5 squares and leave the 6th one unworked. Please clarify
Hi Martha 🙂 I’m not sure to which part of the pattern you are referring. Can you please provide a little more information and I will do my best to answer.
when you finish row 9 you have 136 stitches, 34 per side. When you join white yarn for star, instructions say sc in 32 stitches and 3sc in corner stitch. Even with deducting for the corner stitch for 3 sc, it still leaves 33 stitches, not 32 – what do you do with the extra stitch?
Hi Muriel 🙂 When you join the white yarn you are doing so in the last sc of the corner sts (and not counting that as a stitch). Then you single crochet across the next 32 sts. This is 31 sts from along the edge + the 1st sc of the corner 3-sc grouping from Round 9. Hope that helps 🙂
Thinking of making the granny squares with red and green and the other parts in the white and red combination. Thanks for the pattern!!
I made it!!!! sooooo great and easy pattern!!! Thank you so much. My first tree in my new home….lovely!!!Merry Christmas to all!!!!
Hi, I’m fairly new to crochet, and for some reason I always have trouble with my tension when making granny square, could you please tell me the size each square should be so that I can check as I go? Thanks.
Hi Samantha 🙂 My granny squares ended up being approx 10 1/4 in. x 10 1/4 in. I wouldn’t worry too much about gauge though because most likely your gauge will be the same for the rest of the skirt too. Also, granny squares are pretty forgiving 🙂
Is the worsted weight cotton yarn you used thinner or thicker or the same as worsted weight acrylic yarn (such as Red Heart super saver)?
This is stunning!!
Do you plan on doing a tutorial video for it? Or have one done?
I can’t follow a pattern and make it come out right to save my soul LOL I’m a visual learner 🙂
Question? Row 9 says to sc in each stitch around and in each ch-1 sp along the edge but rows 2-8 it call for ch-2 sp? Could you please clarify since it looks like a miscalculated amount of stitches may mess up the star. Thanks!
Row 8 doesn’t use the ch-2 spaces like the previous rounds, instead it calls for ch-1 spaces. Therefore, Row 9 works 1 sc in each of the ch-1 spaces. Make sense?
Hi!! Could you tell me the dimensions of the finished skirt!! I want to make sure it will be big enough!! 🙂 thanks!!
Yes I would like to know how big it is also. Thanks in advance
It measures 46 in. from each point to the opposite point.
Question, is this a completely joined star? Or is there a slit in it somewhere?
Yes, there is a slit to get it around the tree 🙂
I was thinking i’d have to put it around the tree base before i put the tree in, and I was like, that’s cool, but I don’t plan that far in advance 🙂
Good picture, hiding the slit 🙂
I’m so excited! I’ve been looking for a good tree skirt pattern, this is beautiful. Off to amazon (clicking link above) to get my yarn.
Yay! So glad you are joining in!
I had to order yarn – as soon as it gets here, I’m in!
Awesome!
Hi, thank you for this free pattern! Is there a benefit to using cotton yarn rather than acrylic?
Not really … I just felt like the cotton would be more durable.
It’s a beatiful work… 🙂 🙂
Thank you, Liliana!
Beautiful Crochet Christmas Tree Skirt! Appreciate your sharing this pattern with us and I plan to come back for the other pieces!
Thanks so much!
It’s lovely, Kara!:) thanks for sharing!
My pleasure, Preeti!
Hi. I love this skirt! So unique. I have a question. I absolutely hate finishing off and attaching a new color! I also don’t like all the resulting ends to weave in. Is it possible to add the new color in the usual way and crochet over the ends? I am making a granny square throw right now and am deliberately using only one color! I simply slip stitch to the next corner.
Thanks!
Hi Jana 🙂 I have a little cheat I do … at the end of each round I slip stitch behind my work with the color I am dropping, kinda like tacking it back there out of the way, then I pick up my new color and continue and do the same when I’m done with that one. Hope that helps!
how do you slip stitch behind the work?
Hi Kara, This is so very pretty. I have been looking for a tree skirt to make for awhile. I knew as soon as I saw yours my search had ended! I am reading the comments to see if I can pick any tips before starting.
Do you mean that you slip stitch a few stitches behind your work and then just fasten off? Is there no need to weave in the ends after this? Or are you leaving the dropped color attached and just picking it back up when you are ready for it?
Thanks!
And Thanks for sharing all your patterns. I am making a set of your dishcloths now. I will be sure to click on some links while I am here 🙂
Hi Kimberly 🙂 Yes, I slip stitch to the back of my work to get the yarn secured and out of the way before starting a new color, but I don’t fasten off. Instead, I just drop the color to pick up again when I need it. Definitely helps eliminate weaving in all those ends!
Kara, this tree skirt is absolutely GORGEOUS!
Thank you, Marilyn!
This is awesome, but I’m a tad overwhelmed by the directions (I’m not much of a pattern reader). These are just normal granny squares one row red, one row white for 8 rounds with a border, right?
What’s the schedule look like to have it done by Thanksgiving, How should i pace myself to finish these squares in time for the next installment?
Will the 710 Yds each do the whole skirt or just the squares?
Sorry for all the questions, I’m just dying to dive in 🙂
Yep, just normal granny squares so far alternating red and white. I am hoping to have the star center next Monday and then the outer edging the following Monday. And yes, that yardage is for the whole entire project
Hi! What a fantastic tree skirt. I really like that you created it with grannies and incorporate that neat looking star and fun border. I’m hoping to find some time to make this myself (fingers crossed). I do have a question. How much of the yarn that you listed do you need to complete the project? I may not be able to get that particular yarn and want to know how much might I need of a substitute brand. Thanks so much!
Hi Jeanne 🙂 I don’t know the exact yardage used from each skein but I definitely had a good amount left over. I would say a little less more than half of each was used.
Thanks so much, Kara! I appreciate your feedback. 🙂