
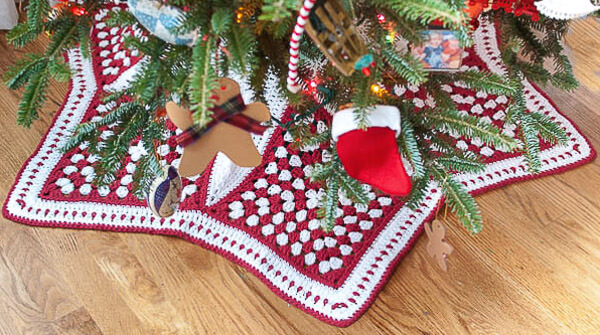
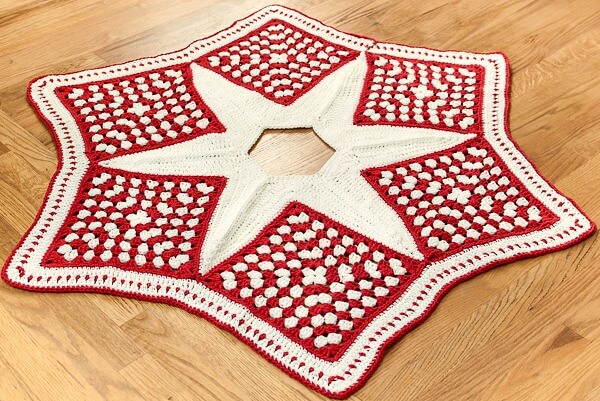
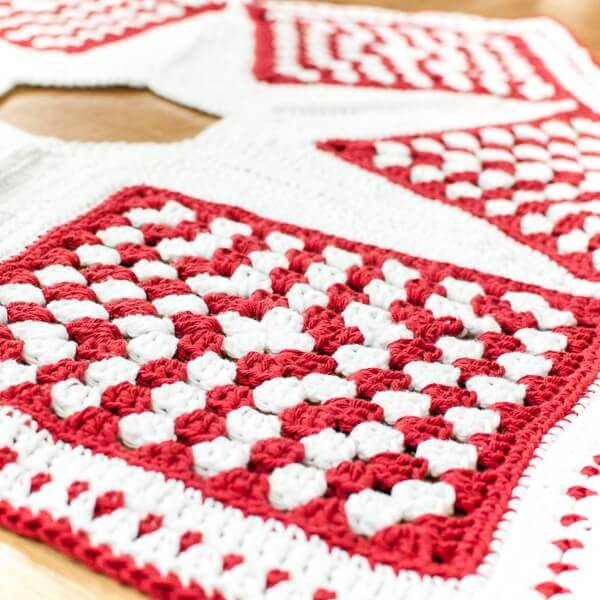
Create a festive handmade centerpiece for your tree with this free granny square Christmas tree skirt crochet pattern. Six oversized red-and-white granny squares are joined and shaped into a six-pointed skirt with a decorative star in the center.
The finished crochet tree skirt measures approximately 46 in. (117 cm) from point to opposite point. Its bold granny-square construction gives it a classic handmade look, while the red-and-white color palette makes it perfect for traditional Christmas decorating.
This complete pattern includes instructions for crocheting the six granny squares, joining them, forming the center star, and adding the decorative outer border.
Prefer a printable copy? The complete Granny Square Christmas Tree Skirt PDF is also available as a convenient, ad-free download.
Looking for a different design? You may also enjoy my Granny Hexagon Crochet Tree Skirt Pattern.
Granny Square Christmas Tree Skirt Crochet Pattern
Pattern Details
- Skill level: Intermediate
- Yarn: Worsted-weight cotton yarn
- Hook: 5 mm (US H-8)
- Finished square size: Approximately 10¼ × 10¼ in. (26 × 26 cm)
- Finished tree skirt size: Approximately 46 in. (117 cm) from point to opposite point
- Construction: Six oversized granny squares joined and shaped around a crocheted center star
- Gauge: Not essential, but all six granny squares should be the same size
Supplies
- Approximately 710 yd (649 m) red worsted-weight cotton yarn (shown here in Bernat Handicrafter)
- Approximately 710 yd (649 m) white worsted-weight cotton yarn (shown here in Bernat Handicrafter)
- 5 mm (US H-8) crochet hook
- Tapestry needle
- Scissors
- Blocking mat and rustproof pins, optional
Resources and tutorials you may find helpful in following this pattern include Crochet Abbreviations, U.S. to U.K. Crochet Conversion Chart, How to Make a Magic Ring, and How to Block Knit and Crochet Items.
❤️ Add this pattern to your Ravelry library.
Crochet Abbreviations
- beg = beginning
- ch = chain
- dc = double crochet
- hdc = half double crochet
- JAYGO = join as you go
- rep = repeat
- sc = single crochet
- sc2tog = single crochet 2 stitches together
- sl st = slip stitch
- sp(s) = space(s)
- st(s) = stitch(es)
This pattern is written in U.S. crochet terms.
Pattern Notes
- The tree skirt is made from six oversized granny squares.
- Each finished granny square measures approximately 10¼ × 10¼ in. (26 × 26 cm).
- Make all six squares the same size before joining.
- The squares are joined only at designated corner stitches.
- Leave the first and final squares unjoined at the outer edge to create the tree-skirt opening.
- The center star and outer border are worked entirely with the right side facing.
- Do not turn after completing a star or border row. Fasten off and rejoin the yarn where directed.
- Follow the accompanying schematics and stitch diagrams for joining and stitch placement.
- Block the finished skirt if desired to define the points and even the overall shape.
Making the Granny Squares
Make six granny squares according to Rounds 1 through 9 below.
With white yarn, make a magic ring (as an alternative to the magic ring method, you can ch 4 and join in the furthest ch from the hook to form a ring).
Round 1: Ch 3 (counts as dc), 2 dc in ring, ch 3, *3 dc in ring, ch 3, repeat from *twice more, join in top of beg ch, drop white — 12 sts.
Round 2: Join red in any ch-3 sp, ch 3 (counts as dc), work [2 dc, ch 3, 3 dc] in same ch-3 sp, ch 2 *[3 dc, ch 3, 3 dc] in next ch-3 sp, ch 2, rep from * twice more, join in top of beg ch, drop red — 24 sts.
Round 3: Join white yarn in any ch-3 sp, ch 3 (counts as dc), work [2 dc, ch 3, 3 dc] in same ch-3 sp, *ch 2, 3 dc in next ch-2 sp, ch 2, [3 dc, ch 3, 3 dc] in next ch-3 sp, rep from * twice more, ch 2, 3 dc in next ch-2 sp, ch 2, join in top of beg ch, drop white — 36 sts.
Round 4: Join red yarn in any ch-3 sp, ch 3 (counts as dc), work [2 dc, ch 3, 3 dc] in same ch-3 sp, *ch 2, 3 dc in next ch-2 sp, ch 2, 3 dc in next ch-2 sp, ch 2, [3 dc, ch 3, 3 dc] in next ch-3 sp, rep from * twice more, ch 2, 3 dc in next ch-2 sp, ch 2, 3 dc in next ch-2 sp, ch 2, join in top of beg ch, drop red — 48 sts.
Round 5: Join white yarn in any ch-3 sp, ch 3 (counts as dc), work [2 dc, ch 3, 3 dc] in same ch-3 sp, *ch 2, 3 dc in next ch-2 sp, ch 2, 3 dc in next ch-2 sp, ch 2, 3 dc in next ch-2 sp, ch 2, [3 dc, ch 3, 3 dc] in next ch-3 sp, rep from * twice more, ch 2, 3 dc in next ch-2 sp, ch 2, 3 dc in next ch-2 sp, ch 2, 3 dc in next ch-2 sp, ch 2, join in top of beg ch, drop white — 60 sts.
Round 6: Join red yarn in any ch-3 sp, ch 3 (counts as dc), work [2 dc, ch 3, 3 dc] in same ch-3 sp, *ch 2, 3 dc in next ch-2 sp, ch 2, 3 dc in next ch-2 sp, ch 2, 3 dc in next ch-2 sp, ch 2, 3 dc in next ch-2 sp, ch 2, [3 dc, ch 3, 3 dc] in next ch-3 sp, rep from * twice more, ch 2, 3 dc in next ch-2 sp, ch 2, 3 dc in next ch-2 sp, ch 2, 3 dc in next ch-2 sp, ch 2, 3 dc in next ch-2 sp, ch 2, join in top of beg ch, drop red — 72 sts.
Round 7: Join white yarn in any ch-3 sp, ch 3 (counts as dc), work [2 dc, ch 3, 3 dc] in same ch-3 sp, *ch 2, 3 dc in next ch-2 sp, ch 2, 3 dc in next ch-2 sp, ch 2, 3 dc in next ch-2 sp, ch 2, 3 dc in next ch-2 sp, ch 2, 3 dc in next ch-2 sp, ch 2, [3 dc, ch 3, 3 dc] in next ch-3 sp, rep from * twice more, ch 2, 3 dc in next ch-2 sp, ch 2, 3 dc in next ch-2 sp, ch 2, 3 dc in next ch-2 sp, ch 2, 3 dc in next ch-2 sp, ch 2, 3 dc in next ch-2 sp, ch 2, join in top of beg ch, drop white — 84 sts.
Round 8: Join red yarn in any ch-3 sp, ch 3 (counts as dc), work [2 dc, ch 3, 3 dc] in same ch-3 sp, *ch 1, 3 dc in next ch-2 sp, ch 1, 3 dc in next ch-2 sp, ch 1, 3 dc in next ch-2 sp, ch 1, 3 dc in next ch-2 sp, ch 1, 3 dc in next ch-2 sp, ch 1, 3 dc in next ch-2 sp, ch 1, [3 dc, ch 3, 3 dc] in next ch-3 sp, rep from * twice more, ch 1, 3 dc in next ch-2 sp, ch 1, 3 dc in next ch-2 sp, ch 1, 3 dc in next ch-2 sp, ch 1, 3 dc in next ch-2 sp, ch 1, 3 dc in next ch-2 sp, ch 1, 3 dc in next ch-2 sp, ch 1, join in top of beg ch — 96 sts.
Round 9: Continuing with red yarn, ch 1 (does not count as st), work 1 sc in same st as join and next 2 sts, *work 3 sc in corner ch-3 sp, work 1 sc in each st and in each ch-1 sp across to next corner, rep from * around, join and fasten off — 136 sts.
Repeat the instructions until you have six matching granny squares.
Joining the Granny Squares
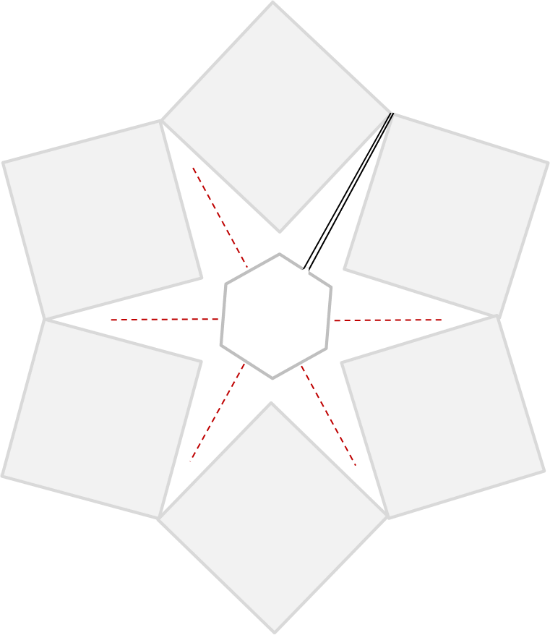
Join the squares through the center single crochet of the designated corner groupings, following the placement schematic (joins are indicated in red).
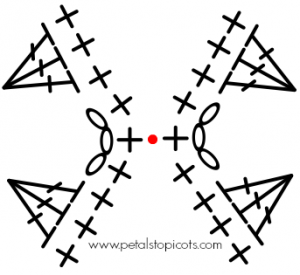
You can connect the squares with the Join-As-You-Go Granny Square Method or use a tapestry needle and red yarn to sew the designated corner stitches together.
Arrange and join all six squares as shown in the schematic, leaving the outside edges of the first and final squares unjoined to form the tree-skirt opening.
Weave in the ends.

Crocheting the Center Star
The center star is worked with the right side facing throughout. Do not turn the work after completing a row. Instead, fasten off and rejoin the yarn at the location indicated for the following row.
The first row begins on the square located at the far-right side of the joined arrangement. Refer to the placement schematic and Diagrams A through C for the exact starting point, peaks, and valleys.

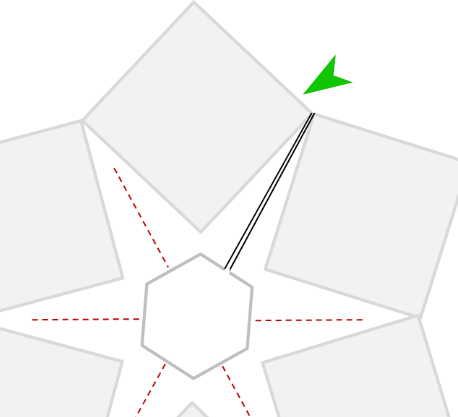
Row 1: Start with the square all the way on the right, join white yarn in the back loop of the last sc in the corner ch-3 sp (see green arrow in schematic above or blue arrow in Diagram A below), ch 1 (does not count as st here and throughout), working in back loops only across row, *work 1 sc in each of the next 32 sts, work 3 sc in corner st, work 1 sc in each of the next 32 sts, work a sc2tog in the first sc in the corner ch-3 sp of the current square and the last sc in the corner ch-3 sp of the adjoining square (see Diagram C below), rep from * across next 4 squares, work 1 sc in each of the next 32 sts, work 3 sc in corner st, work 1 sc in each of the next 32 sts, Sl st in next st and fasten off leaving last stitches of previous row unworked.
Row 2: Join white yarn in the 3rd sc from previous row, ch 1, *work 1 sc in each of the next 10 sts, work 1 hdc in next 10 sts, work 1 dc in next 10 sts, work 5 dc in corner st, work 1 dc in next 10 sts, work 1 hdc in next 10 sts, work 1 sc in each of the next 10 sts, Sl st in next st, skip next 5 sts, Sl st in next st, rep from * across next 4 squares, work 1 sc in each of the next 10 sts, work 1 hdc in next 10 sts, work 1 dc in next 10 sts, work 5 dc in corner st, work 1 dc in next 10 sts, work 1 hdc in next 10 sts, work 1 sc in each of the next 10 sts, Sl st in next st and fasten off leaving last stitches of previous row unworked.
Row 3: Join white yarn in the 3rd sc from previous row, ch 1, *work 1 sc in each of the next 10 sts, work 1 hdc in next 10 sts, work 1 dc in next 10 sts, work 5 dc in corner st, work 1 dc in next 10 sts, work 1 hdc in next 10 sts, work 1 sc in each of the next 10 sts, Sl st in next st, skip next 4 sts, Sl st in next st, rep from * across next 4 squares, work 1 sc in each of the next 10 sts, work 1 hdc in next 10 sts, work 1 dc in next 10 sts, work 5 dc in corner st, work 1 dc in next 10 sts, work 1 hdc in next 10 sts, work 1 sc in each of the next 10 sts, Sl st in next st and fasten off leaving last stitches of previous row unworked.
Row 4: Join white yarn in the 3rd sc from previous row, ch 1, *work 1 sc in each of the next 6 sts, work 1 hdc in next 7 sts, work 1 dc in next 15 sts, work 1 hdc in next st, work 1 sc in next st, work 2 dc in corner st, work 1 sc in next st, work 1 hdc in next st, work 1 dc in next 15 sts, work 1 hdc in next 7 sts, work 1 sc in each of the next 6 sts, Sl st in next st, skip next 4 sts, Sl st in next st, rep from * across next 4 squares, work 1 sc in each of the next 6 sts, work 1 hdc in next 7 sts, work 1 dc in next 15 sts, work 1 hdc in next st, work 1 sc in next st, work 2 dc in corner st, work 1 sc in next st, work 1 hdc in next st, work 1 dc in next 15 sts, work 1 hdc in next 7 sts, work 1 sc in each of the next 6 sts, Sl st in next st and fasten off leaving last stitches of previous row unworked.
Row 5: Join white yarn in the 3rd sc from previous row, ch 1, *work 1 sc in each of the next 12 sts, work 1 hdc in next 10 sts, work 1 dc in next st, work 3 dc in next st, work 1 hdc in next st, work 1 sc in next 8 sts, work 1 hdc in next st, work 3 dc in next st, work 1 dc in next st, work 1 hdc in next 10 sts, work 1 sc in each of the next 12 sts, Sl st in next st, skip next 4 sts, Sl st in next st, rep from * across next 4 squares, work 1 sc in each of the next 12 sts, work 1 hdc in next 10 sts, work 1 dc in next st, work 3 dc in next st, work 1 hdc in next st, work 1 sc in next 8 sts, work 1 hdc in next st, work 3 dc in next st, work 1 dc in next st, work 1 hdc in next 10 sts, work 1 sc in each of the next 12 sts, Sl st in next st and fasten off leaving last stitches of previous row unworked.
Center Star Diagram A: Row Starting Points
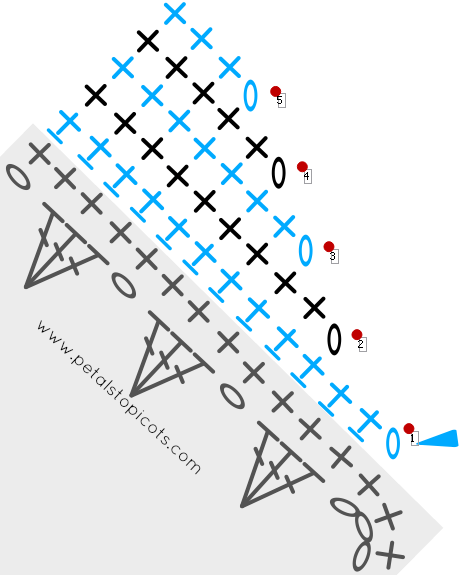
Center Star Diagram B: Peaks
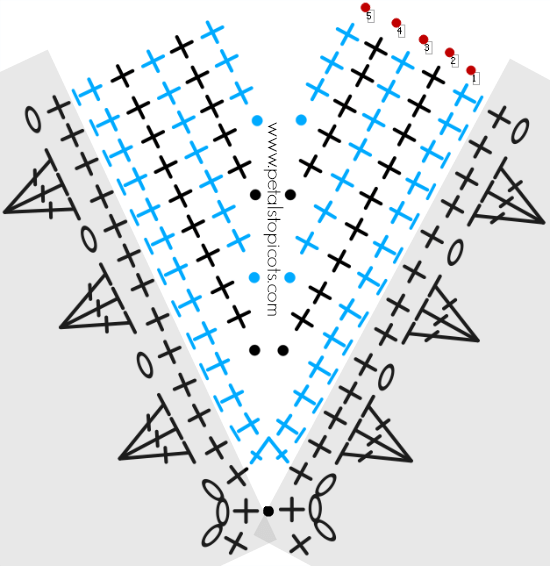
Center Star Diagram C: Valleys
Closing the Center Star
Fold the first two adjacent squares together with the wrong sides facing.
Join white yarn through the back loops of the adjacent sc stitches at the bottom of the valley. Sl st through the back loops of the next 24 pairs of adjacent stitches. The final sl st should be worked through the second dc of each corresponding 3-dc grouping from Row 5.
Fasten off.
Repeat this process for each of the remaining four valleys.
Finishing the Center Opening
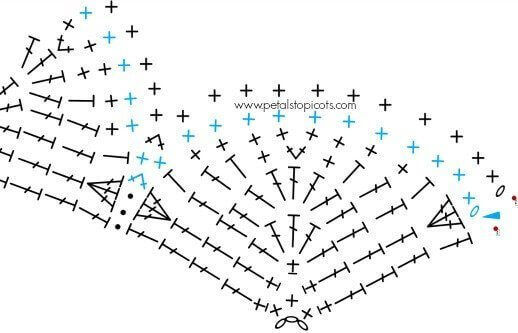
Row 6: Starting again with the square all the way to the right, join white yarn to 2nd dc of the first 3-dc grouping (see arrow in stitch Diagram D. below), ch 1, work 1 sc in same st as join and each of the next 11 sts, *sc2tog in first dc of the 3 dc grouping below of the current piece and the last dc of the 3 dc grouping below of the adjoining piece (see Diagram D below), work 1 sc in each of the next 10 sts, repeat from * four more times, work 1 sc in each of the next 2 sts, fasten off.
Row 7: Starting again with the square all the way to the right, join white yarn in the first st of Row 6, ch 1, work 1 sc in the same st as the join and each of the next 10 sts, *sc2tog, work 1 sc in each of the next 8 sts, rep from * across, work 1 sc in each of the last 2 sts, fasten off.
Weave in the ends.
Center Star Diagram D
All that’s left is the edging, and then you are ready to start your Christmas decorating.
Adding the Crochet Tree Skirt Border
Work the outer border entirely with the right side facing. Do not turn after completing a row. Fasten off and rejoin the yarn in the first stitch of the previous row where instructed.
Begin by joining white yarn in the back loop of the third sc in the corner grouping of the first square after the tree-skirt opening. Refer to the placement image and Diagram A for the starting location.
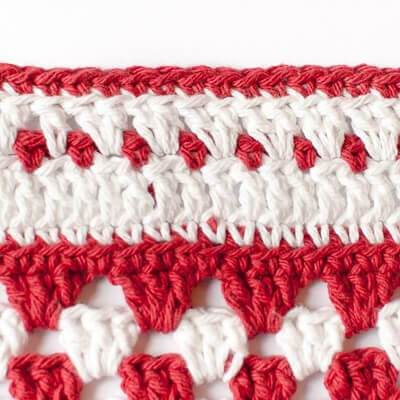
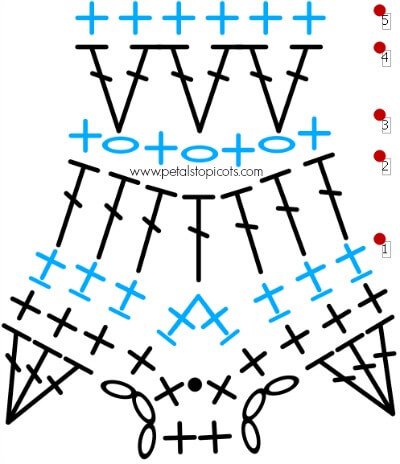
Row 1: Ch 1, working in back loops only for the entire row, *work 1 sc in each of the next 33 sts, 3 sc in center sc of corner grouping below (see Diagram B), 1 sc in next 33 sts, sc2tog in first sc of corner grouping of current square and third sc from corner grouping of next square (see Diagram C), rep from * four more times, work 1 sc in each of the next 33 sts, 3 sc in center sc of corner grouping below, 1 sc in next 33 sts, Sl st in next st and fasten off.
Row 2: Join white in first sc of Row 1, ch 3, work 1 dc in each of the next 33 sts, 5 dc in center sc of sc grouping below, *1 dc in each of the next 69 sts, 5 dc in center sc of sc grouping below, rep from * four more times, work 1 dc in each of the next 34 sts, fasten off.
Row 3: Join red in the top of the beginning ch-3 from Row 2, ch 1, work 1 sc in same ch as join, ch 1, skip next st, *work 1 sc in next st, ch 1, skip next st, rep from * 16 more times, work [1 sc, ch 3, 1 sc] in center dc of dc grouping below (see Diagram B), ch 1, skip next st, **work 1 sc in next st, ch 1, skip next st, rep from ** 35 more times, work [1 sc, ch 3, 1 sc] in center dc of dc grouping below, ch 1, skip next st +, rep from ** to + four more times, ***work 1 sc in next st, ch 1, skip next st, rep from *** 16 more times, 1 sc in last st, fasten off.
Row 4: Join white in first st of Row 3, ch 3, work 2 dc in each of the next 18 ch-1 sps, work 5 dc in ch-3 corner sp, *work 2 dc in each of the next 37 ch-1 sps, work 5 dc in ch-3 corner sp, rep from * four more times, work 2 dc in each of the next 18 ch-1 sps, work 1 dc in last st, fasten off.
Row 5: Join red in the top of the beginning ch-3 from Row 4. Work 1 sc in the same ch as the join and in each of the next 38 sts, then work 3 sc in the center dc of the dc grouping below. *Work 1 sc in each of the next 77 sts, then work 3 sc in the center dc of the dc grouping below; rep from * 4 more times. Work 1 sc in each remaining st to the end. Fasten off.
Weave in ends.
Border Diagram A: Starting Point
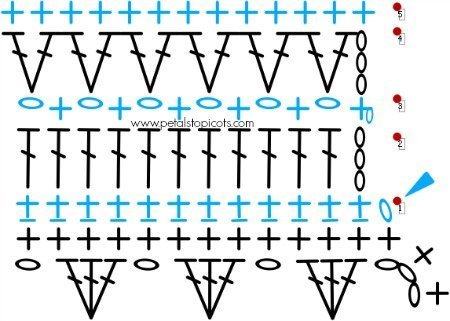
Border Diagram B: Outer Points
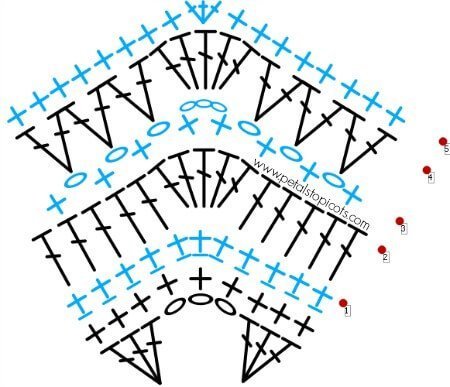
Border Diagram C: Valleys
Finishing the Christmas Tree Skirt
Weave in all remaining yarn ends.
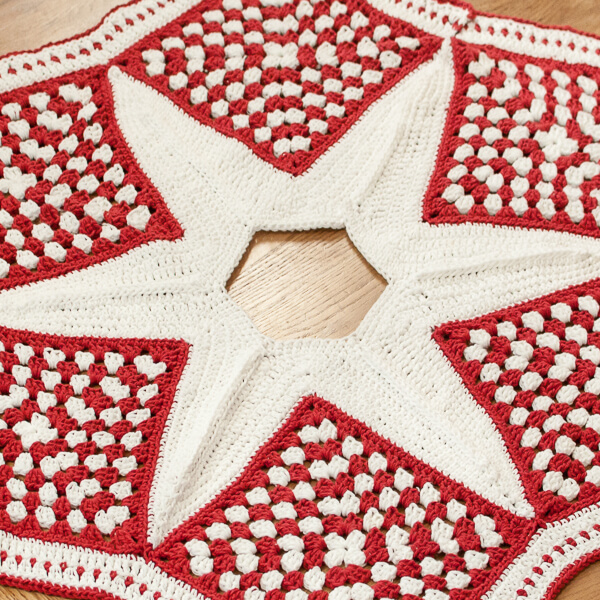
Block the finished tree skirt if desired (see my tutorial How to Block Knit and Crochet Items), using rustproof pins to define the six outer points and straighten the opening. Allow it to dry completely before removing the pins.
Your granny square Christmas tree skirt is now ready to place beneath the tree!
More Crochet Christmas Tree Patterns
- Granny Hexagon Crochet Tree Skirt Pattern
- Cone Christmas Tree Crochet Patterns
- Woodland Christmas Tree Crochet Pattern
- Mini Crochet Christmas Tree Pattern
More Christmas Crochet Patterns
- Browse More Free Christmas Crochet Patterns
- Christmas Crochet Patterns: From Dining to Décor
- Felted Santa Wine Bottle Tote Crochet Pattern
- Crochet Gift Card Holder Patterns
- Peppermint Crochet Scrubby Pattern

Grannies no problem trying to find the star
Such a pretty tree skirt! Love the granny squares.
Looking forward making this for my Church ready for Christmas 2021 but where are the instructions for part 3, please.