
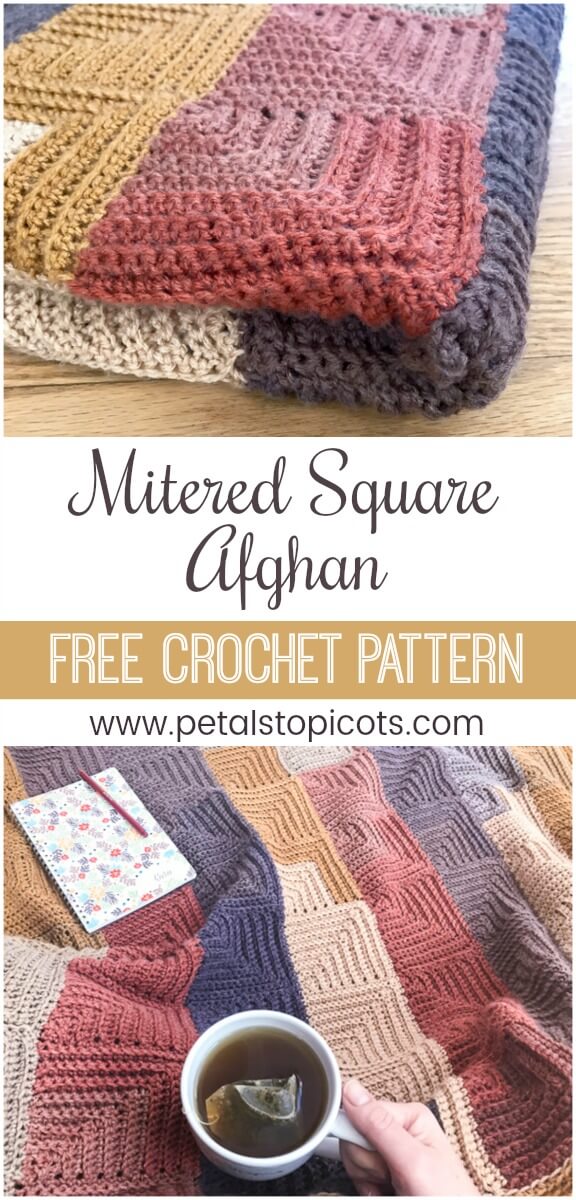
This continuous mitered square crochet afghan pattern gives you the charm of a patchwork blanket without having to crochet and join a pile of individual squares. Each mitered square is worked directly onto the previous one, so the entire blanket is crocheted continuously with no fastening off between squares … which means no zillion ends to weave in. Yay!
The pattern uses simple single crochet stitches worked in the back loops to create the textured mitered squares. A self-striping yarn does all the colorwork for you, giving each square a different look without changing yarn colors.
The finished afghan measures approximately 52 × 40 in. (132 × 102 cm), but the continuous construction makes it easy to adjust the width and length to create whatever size crochet blanket you’d like.
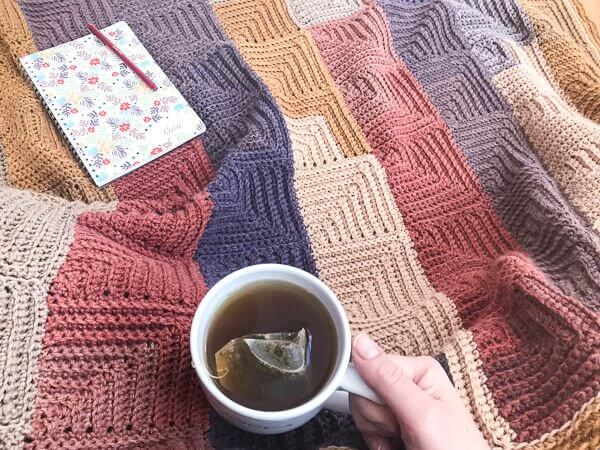
About This Mitered Square Crochet Blanket
Pattern Details
- Skill level: Intermediate
- Yarn: Lion Brand Mandala or similar DK/light worsted self-striping yarn
- Yardage: Approximately 1,770 yd (1,619 m)
- Hook: 5 mm (US H-8)
- Finished size: Approximately 52 × 40 in. (132 × 102 cm)
- Square size: Approximately 4¾ in. (12 cm)
- Construction: Mitered squares worked continuously without fastening off
- Stitch pattern: Single crochet worked in back loops only
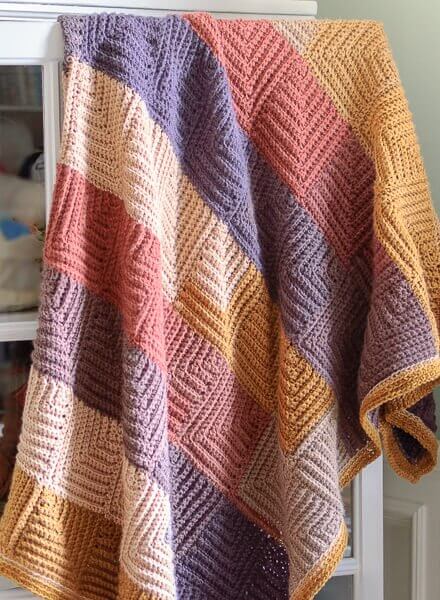
Materials
- 3 balls Lion Brand Mandala® Yarn (shown here in Centaur #214), approx. 1,770 yds (1,619 m) total
- 5 mm (US H-8) crochet hook
- Scissors and yarn needle for finishing
Abbreviations
- ch – chain
- sc – single crochet
- sc3tog – single crochet 3 stitches together
- sl st – slip stitch
- st(s) – stitch(es)
Pattern Notes
- This free crochet pattern is written in U.S. crochet terms and abbreviations. Stitch counts are provided at the end of each row to help you keep on track.
- Work in back loops only throughout the pattern
- Work continuously without fastening off between squares and rows
- Easily modified to any size you like
- 1 ball of Mandala® Yarn makes about 33 squares, so you can calculate how many balls you will need for your desired size blanket … but don’t forget to allow some extra yardage for your border
- Each square measures approximately 4¾ in. (12 cm).
- Helpful Crochet Resources: Refer to my Crochet Abbreviations and U.S. to U.K. Crochet Conversion Chart as you work through the pattern.
Add this pattern to your Ravelry library.
Available as a convenient, ad-free PDF download here.
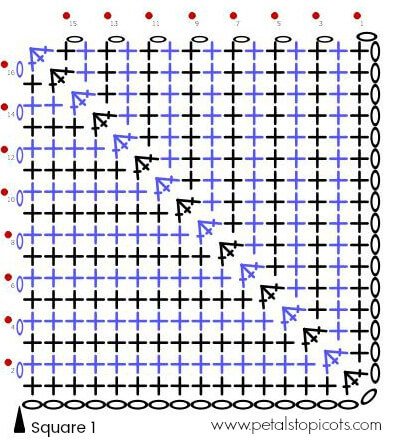
Row 1, Square 1
Ch 34.
Row 1: Work 1 sc in 2nd ch from hook and each of the next 14 ch, sc3tog, work 1 sc in each of the remaining 15 ch, turn — 31 sts.
Row 2: Ch 1 (does not count as st here and throughout), work 1 sc in each of the next 14 sts, sc3tog, 1 sc in each of the last 14 sts, turn — 29 sts.
Row 3: Ch 1, work 1 sc in each of the next 13 sts, sc3tog, 1 sc in each of the last 13 sts, turn — 27 sts.
Row 4: Ch 1, work 1 sc in each of the next 12 sts, sc3tog, 1 sc in each of the last 12 sts, turn — 25 sts.
Row 5: Ch 1, work 1 sc in each of the next 11 sts, sc3tog, 1 sc in each of the last 11 sts, turn — 23 sts.
Row 6: Ch 1, work 1 sc in each of the next 10 sts, sc3tog, 1 sc in each of the last 10 sts, turn — 21 sts.
Row 7: Ch 1, work 1 sc in each of the next 9 sts, sc3tog, 1 sc in each of the last 9 sts, turn — 19 sts.
Row 8: Ch 1, work 1 sc in each of the next 8 sts, sc3tog, 1 sc in each of the last 8 sts, turn — 17 sts.
Row 9: Ch 1, work 1 sc in each of the next 7 sts, sc3tog, 1 sc in each of the last 7 sts, turn — 15 sts.
Row 10: Ch 1, work 1 sc in each of the next 6 sts, sc3tog, 1 sc in each of the last 6 sts, turn — 13 sts.
Row 11: Ch 1, work 1 sc in each of the next 5 sts, sc3tog, 1 sc in each of the last 5 sts, turn — 11 sts.
Row 12: Ch 1, work 1 sc in each of the next 4 sts, sc3tog, 1 sc in each of the last 4 sts, turn — 9 sts.
Row 13: Ch 1, work 1 sc in each of the next 3 sts, sc3tog, 1 sc in each of the last 3 sts, turn — 7 sts.
Row 14: Ch 1, work 1 sc in each of the next 2 sts, sc3tog, 1 sc in each of the last 2 sts, turn — 5 sts.
Row 15: Ch 1, work 1 sc in each of the next 1 sts, sc3tog, 1 sc in each of the last 1 sts, turn — 3 sts.
Row 16: Ch 1, sc3tog, do not turn — 1 st.
Click here to reference Crochet Stitch Chart Symbols.
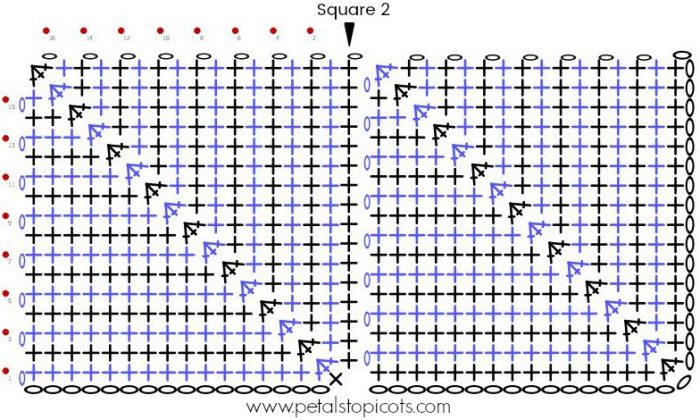
Row 1, Squares 2 through 8
Setup Row: Ch 1, working along the left edge of the previous square; work 17 sc evenly along the edge, making sure to work the last st in the very bottom corner; ch 17, turn.
Row 1: Work 1 sc in 2nd ch from hook and each of the next 14 ch, sc3tog, work 1 sc in each of the remaining 15 sts, turn — 31 sts.
Row 2: Ch 1, work 1 sc in each of the next 14 sts, sc3tog, 1 sc in each of the last 14 sts, turn — 29 sts.
Row 3: Ch 1, work 1 sc in each of the next 13 sts, sc3tog, 1 sc in each of the last 13 sts, turn — 27 sts.
Row 4: Ch 1, work 1 sc in each of the next 12 sts, sc3tog, 1 sc in each of the last 12 sts, turn — 25 sts.
Row 5: Ch 1, work 1 sc in each of the next 11 sts, sc3tog, 1 sc in each of the last 11 sts, turn — 23 sts.
Row 6: Ch 1, work 1 sc in each of the next 10 sts, sc3tog, 1 sc in each of the last 10 sts, turn — 21 sts.
Row 7: Ch 1, work 1 sc in each of the next 9 sts, sc3tog, 1 sc in each of the last 9 sts, turn — 19 sts.
Row 8: Ch 1, work 1 sc in each of the next 8 sts, sc3tog, 1 sc in each of the last 8 sts, turn — 17 sts.
Row 9: Ch 1, work 1 sc in each of the next 7 sts, sc3tog, 1 sc in each of the last 7 sts, turn — 15 sts.
Row 10: Ch 1, work 1 sc in each of the next 6 sts, sc3tog, 1 sc in each of the last 6 sts, turn — 13 sts.
Row 11: Ch 1, work 1 sc in each of the next 5 sts, sc3tog, 1 sc in each of the last 5 sts, turn — 11 sts.
Row 12: Ch 1, work 1 sc in each of the next 4 sts, sc3tog, 1 sc in each of the last 4 sts, turn — 9 sts.
Row 13: Ch 1, work 1 sc in each of the next 3 sts, sc3tog, 1 sc in each of the last 3 sts, turn — 7 sts.
Row 14: Ch 1, work 1 sc in each of the next 2 sts, sc3tog, 1 sc in each of the last 2 sts, turn — 5 sts.
Row 15: Ch 1, work 1 sc in each of the next 1 sts, sc3tog, 1 sc in each of the last 1 sts, turn — 3 sts.
Row 16: Ch 1, sc3tog, do not turn — 1 st.
Repeat for each square across for a total of 8 squares or until desired width is reached; turn work.
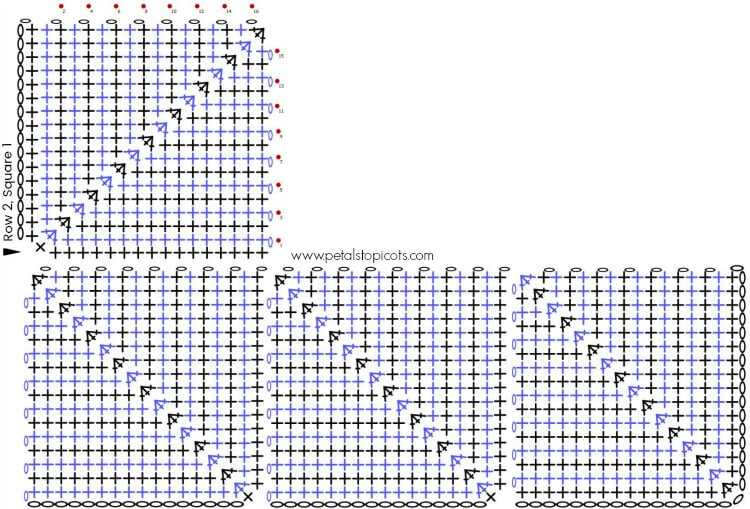
Row 2, Square 1
Setup Row: Ch 17, work 1 sc in 2nd ch from hook and each of the next 15 ch, work 1 sc in top corner of square below, work 16 sc evenly along top edge of square below, making sure to work last st in very corner of square below, turn.
Row 1: Ch 1, work 1 sc in each of the next 15 sts, sc3tog, work 1 sc in each of the remaining 15 sts, turn — 31 sts.
Row 2: Ch 1, work 1 sc in each of the next 14 sts, sc3tog, 1 sc in each of the last 14 sts, turn — 29 sts.
Row 3: Ch 1, work 1 sc in each of the next 13 sts, sc3tog, 1 sc in each of the last 13 sts, turn — 27 sts.
Row 4: Ch 1, work 1 sc in each of the next 12 sts, sc3tog, 1 sc in each of the last 12 sts, turn — 25 sts.
Row 5: Ch 1, work 1 sc in each of the next 11 sts, sc3tog, 1 sc in each of the last 11 sts, turn — 23 sts.
Row 6: Ch 1, work 1 sc in each of the next 10 sts, sc3tog, 1 sc in each of the last 10 sts, turn — 21 sts.
Row 7: Ch 1, work 1 sc in each of the next 9 sts, sc3tog, 1 sc in each of the last 9 sts, turn — 19 sts.
Row 8: Ch 1, work 1 sc in each of the next 8 sts, sc3tog, 1 sc in each of the last 8 sts, turn — 17 sts.
Row 9: Ch 1, work 1 sc in each of the next 7 sts, sc3tog, 1 sc in each of the last 7 sts, turn — 15 sts.
Row 10: Ch 1, work 1 sc in each of the next 6 sts, sc3tog, 1 sc in each of the last 6 sts, turn — 13 sts.
Row 11: Ch 1, work 1 sc in each of the next 5 sts, sc3tog, 1 sc in each of the last 5 sts, turn — 11 sts.
Row 12: Ch 1, work 1 sc in each of the next 4 sts, sc3tog, 1 sc in each of the last 4 sts, turn — 9 sts.
Row 13: Ch 1, work 1 sc in each of the next 3 sts, sc3tog, 1 sc in each of the last 3 sts, turn — 7 sts.
Row 14: Ch 1, work 1 sc in each of the next 2 sts, sc3tog, 1 sc in each of the last 2 sts, turn — 5 sts.
Row 15: Ch 1, work 1 sc in each of the next 1 sts, sc3tog, 1 sc in each of the last 1 sts, turn — 3 sts.
Row 16: Ch 1, sc3tog, do not turn — 1 st.
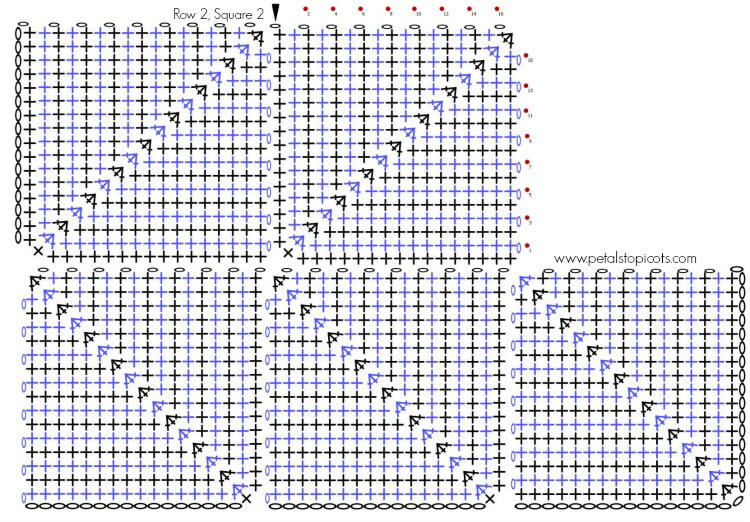
Row 2, Squares 2 through 8
Setup Row: Ch 1, working along the left edge of the previous square, work 16 sc evenly along the edge, work 1 sc in the top corner of the square below, work 16 sc evenly along the top edge of the square below, making sure to work the last st in the very corner of the square below, turn.
Row 1: Ch 1, work 1 sc in each of the next 15 sts, sc3tog, work 1 sc in each of the remaining 15 sts, turn — 31 sts.
Row 2: Ch 1, work 1 sc in each of the next 14 sts, sc3tog, 1 sc in each of the last 14 sts, turn — 29 sts.
Row 3: Ch 1, work 1 sc in each of the next 13 sts, sc3tog, 1 sc in each of the last 13 sts, turn — 27 sts.
Row 4: Ch 1, work 1 sc in each of the next 12 sts, sc3tog, 1 sc in each of the last 12 sts, turn — 25 sts.
Row 5: Ch 1, work 1 sc in each of the next 11 sts, sc3tog, 1 sc in each of the last 11 sts, turn — 23 sts.
Row 6: Ch 1, work 1 sc in each of the next 10 sts, sc3tog, 1 sc in each of the last 10 sts, turn — 21 sts.
Row 7: Ch 1, work 1 sc in each of the next 9 sts, sc3tog, 1 sc in each of the last 9 sts, turn — 19 sts.
Row 8: Ch 1, work 1 sc in each of the next 8 sts, sc3tog, 1 sc in each of the last 8 sts, turn — 17 sts.
Row 9: Ch 1, work 1 sc in each of the next 7 sts, sc3tog, 1 sc in each of the last 7 sts, turn — 15 sts.
Row 10: Ch 1, work 1 sc in each of the next 6 sts, sc3tog, 1 sc in each of the last 6 sts, turn — 13 sts.
Row 11: Ch 1, work 1 sc in each of the next 5 sts, sc3tog, 1 sc in each of the last 5 sts, turn — 11 sts.
Row 12: Ch 1, work 1 sc in each of the next 4 sts, sc3tog, 1 sc in each of the last 4 sts, turn — 9 sts.
Row 13: Ch 1, work 1 sc in each of the next 3 sts, sc3tog, 1 sc in each of the last 3 sts, turn — 7 sts.
Row 14: Ch 1, work 1 sc in each of the next 2 sts, sc3tog, 1 sc in each of the last 2 sts, turn — 5 sts.
Row 15: Ch 1, work 1 sc in each of the next 1 sts, sc3tog, 1 sc in each of the last 1 sts, turn — 3 sts.
Row 16: Ch 1, sc3tog, do not turn — 1 st.
Repeat for each square across row.
Rows 3 Through 11
Rows 3 through 11 (or until desired length is reached): Repeat pattern instructions for Row 2.
Do not fasten off.
Border
This simple border is worked in single crochet stitches around the blanket’s perimeter. For another option, check out the vertical ribbed edging used on my friend Kim’s Patchwork Throw Pattern at CrochetKim.
Round 1: Work a sl st border around the entire blanket, working approximately 16 sts across each square edge; join.
Round 2: Ch 1, work 1 sc in the same st as join and each st around, working 3 sc in each corner st.
Rounds 3 and 4: Repeat Round 2.
Fasten off, weave in ends.
Now make a cup of tea and snuggle up under your new blanket 🙂
You may also enjoy …
- Sea Glass Afghan
- Crochet Patterns for the Home
- Quick & Easy Dishcloth Patterns
- Dahlia Bloom Afghan Square
Browse my full gallery of free crochet patterns here.


Is there a full picture to get an idea of when to do colour changes. Is it every 3 and a half squares? Im not very creative so need to follow what others have done to get it to look ok.
Hi Tina 🙂 The beauty of this pattern is that is uses a self changing yarn, like Mandala yarn that I used in mine. Therefore, you don’t have to worry about when the color changes are because the yarn does it itself. If you are using a solid color yarn, I would say to just change colors whenever you feel it would look best.
Hi 🙂 LOVE this project so much. I am making this with about 24 different solid colours like a patchwork blanket. I am crocheting each new square over the tails of the previous square so that I have absolutely no ends to weave in except the very last tail (intend to do a border like yours). It is working up beautifully and it is a very relaxing and addictive project. Thanks for a lovely pattern! The construction is so clever and texture beautiful <3
Kara, loving this! You are amazing!
I would like to make the squares larger, like a 6 inch or a 10 inch square, do I need to keep my starting chain to an odd or even number? Or will any number of starting chain work?
Thank you very much! Sue
Love love love!!! Just curious: did it just happen to work out that all your edging was in the yellowy color, was it intentional, or is there part of the edging I’m not seeing in the pictures that ended up other colors. Can’t wait to get started!!!
Hello Kara! I love your pattern! So I started my project,finished first row of squares, I am now at the second square of row 2.I don’t know where to begin….I don’t get the instructions…a little help please!
Beautiful! Can’t wait to try. Thanks for sharing
Hi Kara,
I love this pattern. It’s so beautiful! I REALLY want to make it! I have one question – first I want to say that no matter how many times I rip it out, I wind up with two very different (and messy looking) size squares – then I rip! I don’t know what I’m doing wrong.
The question is, In the first instruction, after ch 34, you say “work 1 sc in 2nd ch from hook and each of the next 14 ch…Is it the same to say “15 sc, starting with the 2nd ch from hook.”? I know this sounds like a stupid question, but I’ve only done basic stuff so far and I, somehow, keep messing up my count. Can you help me? Thanks in advance!
Hi Laurie 🙂 You are correct, “work 1 sc in 2nd ch from hook and each of the next 14 ch” is the same as saying 15 sc, starting with the 2nd ch from hook.” Hope that helps!
Hi! I just figured it out. The first row will have 15 single crochet stitches and 1-3 sc together. My first three block look wonky until it got heavy enough to settle into shape lol
I just moved into a new house & I threw my shawl (made of Mandala in Centaur) on the back of my new sofa. It looked gorgeous! So imagine my delight when I saw your stunning afghan!
I started working the pattern, but I have a question before I get too far into it. Row 1 measures a little less than 3.5 inches from the first 15 sc to the sc3tog. Am I correct in thinking that it should be 4.5 inches?
Thank you for sharing your lovely pattern & for your help!
Hi Linda 🙂 Congratulations on your new home! I’m so happy you like the pattern. And yes, you are correct, my squares did measure about 4.5 in. You can have a tighter gauge than I do. The pattern will still work up just as nicely, just with smaller squares. Or you can try to go up a hook size. Hope that helps!
I don’t know what I am doing wrong but my counts don’t equal yours. I am trying to do the first block and I did the sc in the first 14 and sc 3 tog, but my last chains equal 16. Going to try it again.
Never mind
Almost finished with my blanket- I must have a tighter stitch or something because I’m on my 4th mandala ball and I still have a much smaller blanket than yours. I don’t know exact dimensions, but I’m making it a baby blanket since it definitely won’t work for an adult.
I think my squares are 4 x 4 inches maybe. But just as a heads up to everyone that may also crochet tight. I should have used a bigger hook.
Also I now count in my sleep… haha lots of stitch counting in this one. Good luck folks- the texture is worth it though.
Thanks for your info! I’m hoping to start this pattern as a stash-buster and I have pretty tight tension. I’ll plan to go up a hook size or two!