
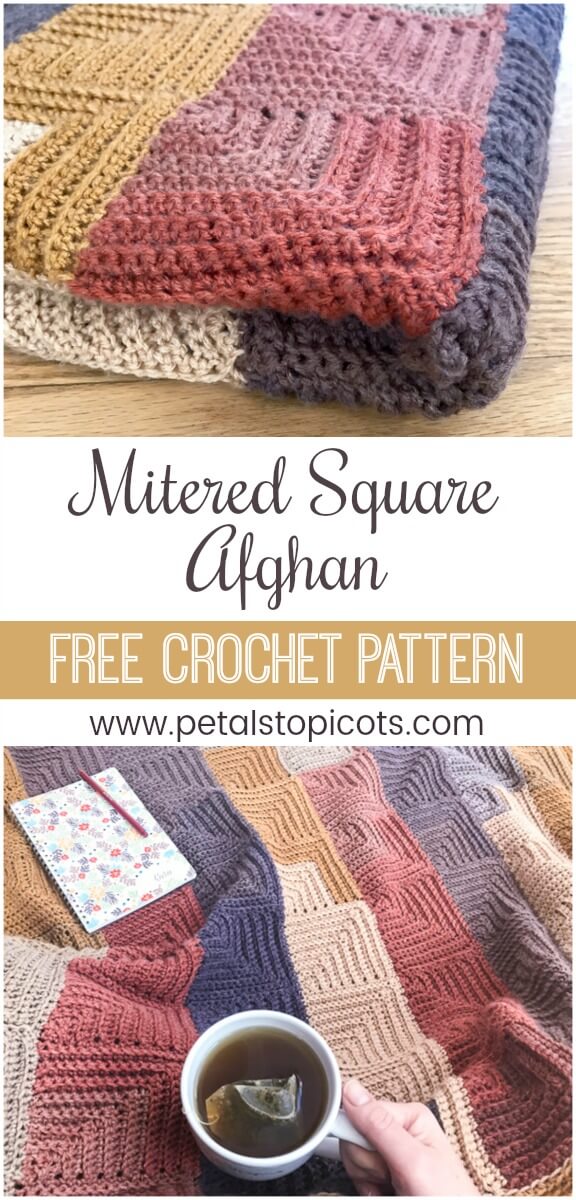
This continuous mitered square crochet afghan pattern gives you the charm of a patchwork blanket without having to crochet and join a pile of individual squares. Each mitered square is worked directly onto the previous one, so the entire blanket is crocheted continuously with no fastening off between squares … which means no zillion ends to weave in. Yay!
The pattern uses simple single crochet stitches worked in the back loops to create the textured mitered squares. A self-striping yarn does all the colorwork for you, giving each square a different look without changing yarn colors.
The finished afghan measures approximately 52 × 40 in. (132 × 102 cm), but the continuous construction makes it easy to adjust the width and length to create whatever size crochet blanket you’d like.
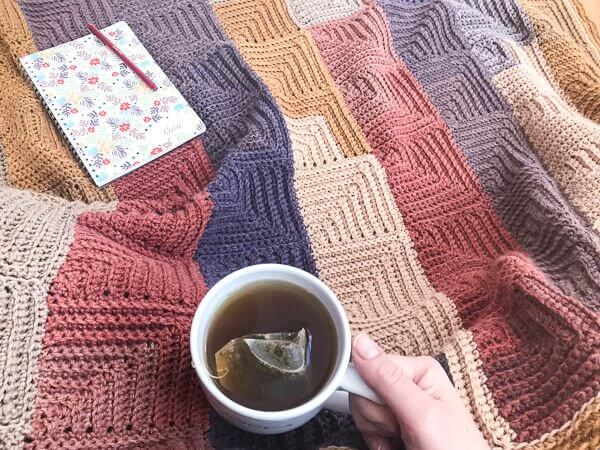
About This Mitered Square Crochet Blanket
Pattern Details
- Skill level: Intermediate
- Yarn: Lion Brand Mandala or similar DK/light worsted self-striping yarn
- Yardage: Approximately 1,770 yd (1,619 m)
- Hook: 5 mm (US H-8)
- Finished size: Approximately 52 × 40 in. (132 × 102 cm)
- Square size: Approximately 4¾ in. (12 cm)
- Construction: Mitered squares worked continuously without fastening off
- Stitch pattern: Single crochet worked in back loops only
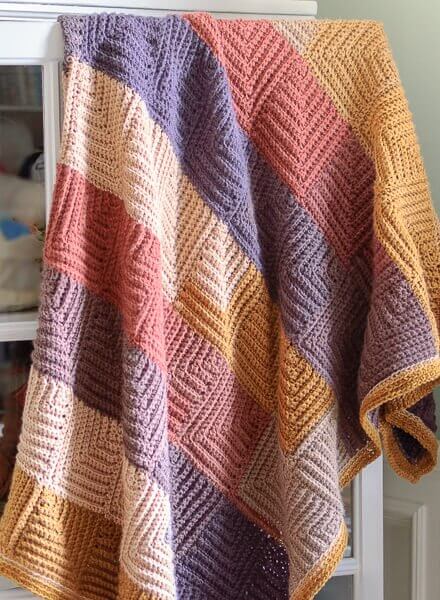
Materials
- 3 balls Lion Brand Mandala® Yarn (shown here in Centaur #214), approx. 1,770 yds (1,619 m) total
- 5 mm (US H-8) crochet hook
- Scissors and yarn needle for finishing
Abbreviations
- ch – chain
- sc – single crochet
- sc3tog – single crochet 3 stitches together
- sl st – slip stitch
- st(s) – stitch(es)
Pattern Notes
- This free crochet pattern is written in U.S. crochet terms and abbreviations. Stitch counts are provided at the end of each row to help you keep on track.
- Work in back loops only throughout the pattern
- Work continuously without fastening off between squares and rows
- Easily modified to any size you like
- 1 ball of Mandala® Yarn makes about 33 squares, so you can calculate how many balls you will need for your desired size blanket … but don’t forget to allow some extra yardage for your border
- Each square measures approximately 4¾ in. (12 cm).
- Helpful Crochet Resources: Refer to my Crochet Abbreviations and U.S. to U.K. Crochet Conversion Chart as you work through the pattern.
Add this pattern to your Ravelry library.
Available as a convenient, ad-free PDF download here.
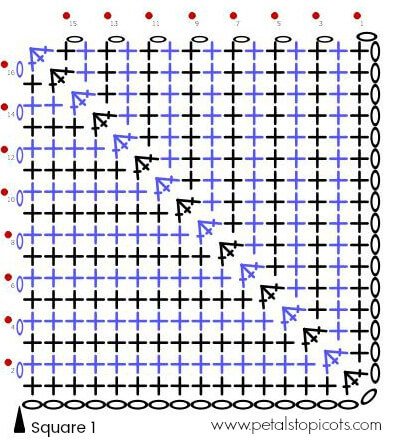
Row 1, Square 1
Ch 34.
Row 1: Work 1 sc in 2nd ch from hook and each of the next 14 ch, sc3tog, work 1 sc in each of the remaining 15 ch, turn — 31 sts.
Row 2: Ch 1 (does not count as st here and throughout), work 1 sc in each of the next 14 sts, sc3tog, 1 sc in each of the last 14 sts, turn — 29 sts.
Row 3: Ch 1, work 1 sc in each of the next 13 sts, sc3tog, 1 sc in each of the last 13 sts, turn — 27 sts.
Row 4: Ch 1, work 1 sc in each of the next 12 sts, sc3tog, 1 sc in each of the last 12 sts, turn — 25 sts.
Row 5: Ch 1, work 1 sc in each of the next 11 sts, sc3tog, 1 sc in each of the last 11 sts, turn — 23 sts.
Row 6: Ch 1, work 1 sc in each of the next 10 sts, sc3tog, 1 sc in each of the last 10 sts, turn — 21 sts.
Row 7: Ch 1, work 1 sc in each of the next 9 sts, sc3tog, 1 sc in each of the last 9 sts, turn — 19 sts.
Row 8: Ch 1, work 1 sc in each of the next 8 sts, sc3tog, 1 sc in each of the last 8 sts, turn — 17 sts.
Row 9: Ch 1, work 1 sc in each of the next 7 sts, sc3tog, 1 sc in each of the last 7 sts, turn — 15 sts.
Row 10: Ch 1, work 1 sc in each of the next 6 sts, sc3tog, 1 sc in each of the last 6 sts, turn — 13 sts.
Row 11: Ch 1, work 1 sc in each of the next 5 sts, sc3tog, 1 sc in each of the last 5 sts, turn — 11 sts.
Row 12: Ch 1, work 1 sc in each of the next 4 sts, sc3tog, 1 sc in each of the last 4 sts, turn — 9 sts.
Row 13: Ch 1, work 1 sc in each of the next 3 sts, sc3tog, 1 sc in each of the last 3 sts, turn — 7 sts.
Row 14: Ch 1, work 1 sc in each of the next 2 sts, sc3tog, 1 sc in each of the last 2 sts, turn — 5 sts.
Row 15: Ch 1, work 1 sc in each of the next 1 sts, sc3tog, 1 sc in each of the last 1 sts, turn — 3 sts.
Row 16: Ch 1, sc3tog, do not turn — 1 st.
Click here to reference Crochet Stitch Chart Symbols.
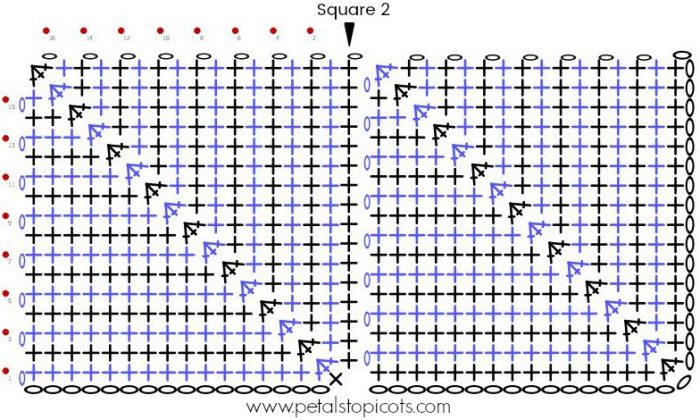
Row 1, Squares 2 through 8
Setup Row: Ch 1, working along the left edge of the previous square; work 17 sc evenly along the edge, making sure to work the last st in the very bottom corner; ch 17, turn.
Row 1: Work 1 sc in 2nd ch from hook and each of the next 14 ch, sc3tog, work 1 sc in each of the remaining 15 sts, turn — 31 sts.
Row 2: Ch 1, work 1 sc in each of the next 14 sts, sc3tog, 1 sc in each of the last 14 sts, turn — 29 sts.
Row 3: Ch 1, work 1 sc in each of the next 13 sts, sc3tog, 1 sc in each of the last 13 sts, turn — 27 sts.
Row 4: Ch 1, work 1 sc in each of the next 12 sts, sc3tog, 1 sc in each of the last 12 sts, turn — 25 sts.
Row 5: Ch 1, work 1 sc in each of the next 11 sts, sc3tog, 1 sc in each of the last 11 sts, turn — 23 sts.
Row 6: Ch 1, work 1 sc in each of the next 10 sts, sc3tog, 1 sc in each of the last 10 sts, turn — 21 sts.
Row 7: Ch 1, work 1 sc in each of the next 9 sts, sc3tog, 1 sc in each of the last 9 sts, turn — 19 sts.
Row 8: Ch 1, work 1 sc in each of the next 8 sts, sc3tog, 1 sc in each of the last 8 sts, turn — 17 sts.
Row 9: Ch 1, work 1 sc in each of the next 7 sts, sc3tog, 1 sc in each of the last 7 sts, turn — 15 sts.
Row 10: Ch 1, work 1 sc in each of the next 6 sts, sc3tog, 1 sc in each of the last 6 sts, turn — 13 sts.
Row 11: Ch 1, work 1 sc in each of the next 5 sts, sc3tog, 1 sc in each of the last 5 sts, turn — 11 sts.
Row 12: Ch 1, work 1 sc in each of the next 4 sts, sc3tog, 1 sc in each of the last 4 sts, turn — 9 sts.
Row 13: Ch 1, work 1 sc in each of the next 3 sts, sc3tog, 1 sc in each of the last 3 sts, turn — 7 sts.
Row 14: Ch 1, work 1 sc in each of the next 2 sts, sc3tog, 1 sc in each of the last 2 sts, turn — 5 sts.
Row 15: Ch 1, work 1 sc in each of the next 1 sts, sc3tog, 1 sc in each of the last 1 sts, turn — 3 sts.
Row 16: Ch 1, sc3tog, do not turn — 1 st.
Repeat for each square across for a total of 8 squares or until desired width is reached; turn work.
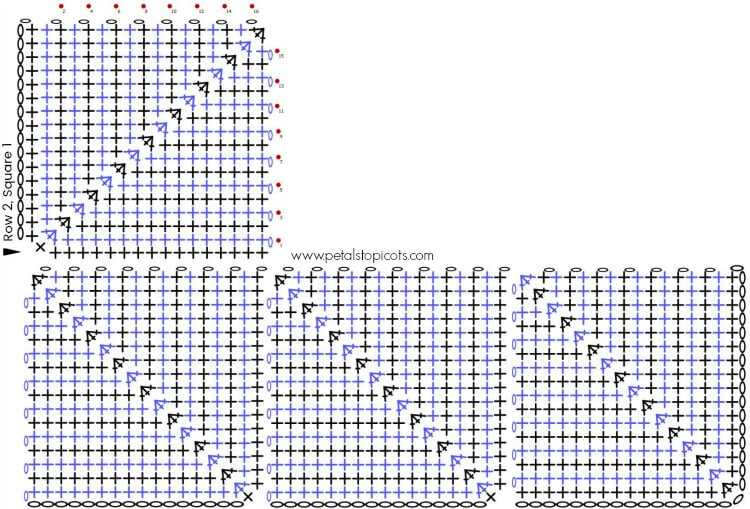
Row 2, Square 1
Setup Row: Ch 17, work 1 sc in 2nd ch from hook and each of the next 15 ch, work 1 sc in top corner of square below, work 16 sc evenly along top edge of square below, making sure to work last st in very corner of square below, turn.
Row 1: Ch 1, work 1 sc in each of the next 15 sts, sc3tog, work 1 sc in each of the remaining 15 sts, turn — 31 sts.
Row 2: Ch 1, work 1 sc in each of the next 14 sts, sc3tog, 1 sc in each of the last 14 sts, turn — 29 sts.
Row 3: Ch 1, work 1 sc in each of the next 13 sts, sc3tog, 1 sc in each of the last 13 sts, turn — 27 sts.
Row 4: Ch 1, work 1 sc in each of the next 12 sts, sc3tog, 1 sc in each of the last 12 sts, turn — 25 sts.
Row 5: Ch 1, work 1 sc in each of the next 11 sts, sc3tog, 1 sc in each of the last 11 sts, turn — 23 sts.
Row 6: Ch 1, work 1 sc in each of the next 10 sts, sc3tog, 1 sc in each of the last 10 sts, turn — 21 sts.
Row 7: Ch 1, work 1 sc in each of the next 9 sts, sc3tog, 1 sc in each of the last 9 sts, turn — 19 sts.
Row 8: Ch 1, work 1 sc in each of the next 8 sts, sc3tog, 1 sc in each of the last 8 sts, turn — 17 sts.
Row 9: Ch 1, work 1 sc in each of the next 7 sts, sc3tog, 1 sc in each of the last 7 sts, turn — 15 sts.
Row 10: Ch 1, work 1 sc in each of the next 6 sts, sc3tog, 1 sc in each of the last 6 sts, turn — 13 sts.
Row 11: Ch 1, work 1 sc in each of the next 5 sts, sc3tog, 1 sc in each of the last 5 sts, turn — 11 sts.
Row 12: Ch 1, work 1 sc in each of the next 4 sts, sc3tog, 1 sc in each of the last 4 sts, turn — 9 sts.
Row 13: Ch 1, work 1 sc in each of the next 3 sts, sc3tog, 1 sc in each of the last 3 sts, turn — 7 sts.
Row 14: Ch 1, work 1 sc in each of the next 2 sts, sc3tog, 1 sc in each of the last 2 sts, turn — 5 sts.
Row 15: Ch 1, work 1 sc in each of the next 1 sts, sc3tog, 1 sc in each of the last 1 sts, turn — 3 sts.
Row 16: Ch 1, sc3tog, do not turn — 1 st.
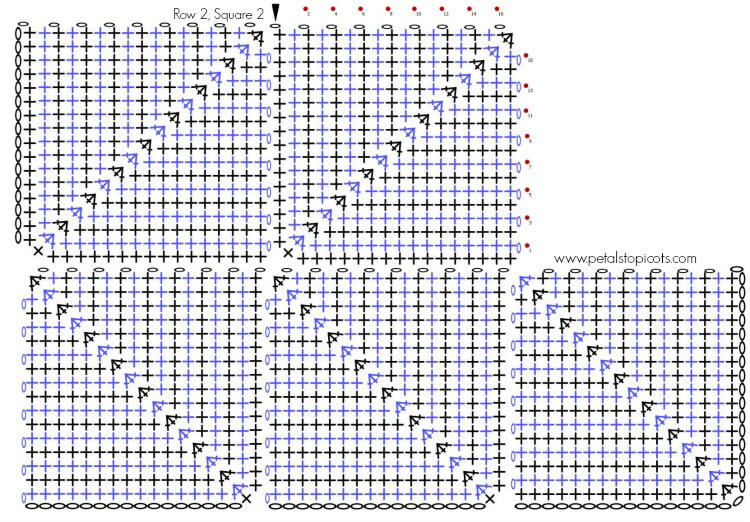
Row 2, Squares 2 through 8
Setup Row: Ch 1, working along the left edge of the previous square, work 16 sc evenly along the edge, work 1 sc in the top corner of the square below, work 16 sc evenly along the top edge of the square below, making sure to work the last st in the very corner of the square below, turn.
Row 1: Ch 1, work 1 sc in each of the next 15 sts, sc3tog, work 1 sc in each of the remaining 15 sts, turn — 31 sts.
Row 2: Ch 1, work 1 sc in each of the next 14 sts, sc3tog, 1 sc in each of the last 14 sts, turn — 29 sts.
Row 3: Ch 1, work 1 sc in each of the next 13 sts, sc3tog, 1 sc in each of the last 13 sts, turn — 27 sts.
Row 4: Ch 1, work 1 sc in each of the next 12 sts, sc3tog, 1 sc in each of the last 12 sts, turn — 25 sts.
Row 5: Ch 1, work 1 sc in each of the next 11 sts, sc3tog, 1 sc in each of the last 11 sts, turn — 23 sts.
Row 6: Ch 1, work 1 sc in each of the next 10 sts, sc3tog, 1 sc in each of the last 10 sts, turn — 21 sts.
Row 7: Ch 1, work 1 sc in each of the next 9 sts, sc3tog, 1 sc in each of the last 9 sts, turn — 19 sts.
Row 8: Ch 1, work 1 sc in each of the next 8 sts, sc3tog, 1 sc in each of the last 8 sts, turn — 17 sts.
Row 9: Ch 1, work 1 sc in each of the next 7 sts, sc3tog, 1 sc in each of the last 7 sts, turn — 15 sts.
Row 10: Ch 1, work 1 sc in each of the next 6 sts, sc3tog, 1 sc in each of the last 6 sts, turn — 13 sts.
Row 11: Ch 1, work 1 sc in each of the next 5 sts, sc3tog, 1 sc in each of the last 5 sts, turn — 11 sts.
Row 12: Ch 1, work 1 sc in each of the next 4 sts, sc3tog, 1 sc in each of the last 4 sts, turn — 9 sts.
Row 13: Ch 1, work 1 sc in each of the next 3 sts, sc3tog, 1 sc in each of the last 3 sts, turn — 7 sts.
Row 14: Ch 1, work 1 sc in each of the next 2 sts, sc3tog, 1 sc in each of the last 2 sts, turn — 5 sts.
Row 15: Ch 1, work 1 sc in each of the next 1 sts, sc3tog, 1 sc in each of the last 1 sts, turn — 3 sts.
Row 16: Ch 1, sc3tog, do not turn — 1 st.
Repeat for each square across row.
Rows 3 Through 11
Rows 3 through 11 (or until desired length is reached): Repeat pattern instructions for Row 2.
Do not fasten off.
Border
This simple border is worked in single crochet stitches around the blanket’s perimeter. For another option, check out the vertical ribbed edging used on my friend Kim’s Patchwork Throw Pattern at CrochetKim.
Round 1: Work a sl st border around the entire blanket, working approximately 16 sts across each square edge; join.
Round 2: Ch 1, work 1 sc in the same st as join and each st around, working 3 sc in each corner st.
Rounds 3 and 4: Repeat Round 2.
Fasten off, weave in ends.
Now make a cup of tea and snuggle up under your new blanket 🙂
You may also enjoy …
- Sea Glass Afghan
- Crochet Patterns for the Home
- Quick & Easy Dishcloth Patterns
- Dahlia Bloom Afghan Square
Browse my full gallery of free crochet patterns here.


So I am looking to do this blanket, but I was wanting to make it bigger…. I have a couch blanket that is about 63in by 48in, so I was wanting to make it similar to that size, give or take. How would I do that? Am I just making more squares? Thank you for your help! Hannah
Thank you for sharing this pattern! Sewing in a million ends once finshed has always put me off of making a mitre blanket. I’m looking forward to trying this way.
I nauseous dumb but I’m stuck on the 2nd square. Where do I start ? I ended the last square of 9 and I’m thinking I’m going the opposite of what I was doing but the instructions say to go along too edge then along left edge? Help p!ease?
Hi ya. Love this blanket pattern and am really enjoying making it. How do you get each square so flat? I am up to row 3 and still each square looks like it is turned. When I pull it out it’s all aligned but then goes back to being all punched up. Is my tension too tight?
I love this pattern however I need a little help,
I am on row 3 but can’t figure out how to get the square to go up and not next to the square below thus making it wider. I’ve pulled it out numerous times but wind up with the same result. Help please!!!
Love this pattern and so thankful for your instructions and diagrams. I am new to crochet and am just confused on what to do with the border? I understand the slip stitch part, it’s the multiple rounds I’m not sure I understand. Are we still working through the back loops or is there something I’m missing? Thanks in advance for your help!
Thank you so much for sharing this wonderful pattern 💕 Making a larger one with the Magic Moon skeins my hubby got me 😊 I love the texture this pattern creates, and how light yet warm it is.
Fantastic pattern, very easy to follow.
Just a note to say my squares came out at a consistent 4 inches and so I needed a lot more yarn to complete the project. I weighed my first square and it was 5 grams, I weighed again when I had completed 5 squares and it was 25 grams, I hope this helps people work out how much yarn is needed 🙂
Thank you for sharing!
So glad that it wasn’t just me! My squares are 4 inches every time. Sad thing is, I only have three skeins. May have to settle for a baby blanket instead of a throw.
wonderful pattern! Can you offer some guidance on how to make the squares bigger, and if this would affect the overall dimensions of the blanket. Thank you!
Hi Maureen 🙂 To make the squares larger you would need to increase the beginning chain in increments of two. You would also, then, have an additional row added to each square. And yes, if you were planning to do the same number of squares as I did your overall blanket will be bigger.
For those who are avoiding this pattern because of all the counting, there is an easy way to avoid it. After you complete the first row’s 3tog corner of each square, place a stitch marker. The marked loop is the first of the 3 corner stitches on the way back across. And if you put stitch markers on the ch1 at each end, you will not have to count at all after each first row (though I recommend counting once in a while, just to be sure of your work).