
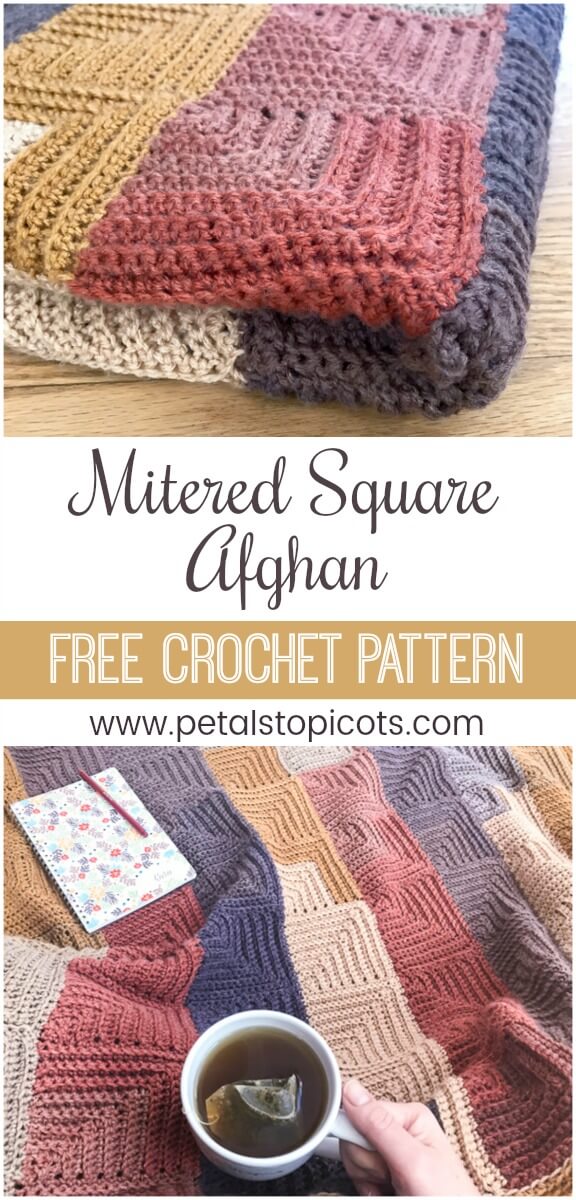
This continuous mitered square crochet afghan pattern gives you the charm of a patchwork blanket without having to crochet and join a pile of individual squares. Each mitered square is worked directly onto the previous one, so the entire blanket is crocheted continuously with no fastening off between squares … which means no zillion ends to weave in. Yay!
The pattern uses simple single crochet stitches worked in the back loops to create the textured mitered squares. A self-striping yarn does all the colorwork for you, giving each square a different look without changing yarn colors.
The finished afghan measures approximately 52 × 40 in. (132 × 102 cm), but the continuous construction makes it easy to adjust the width and length to create whatever size crochet blanket you’d like.
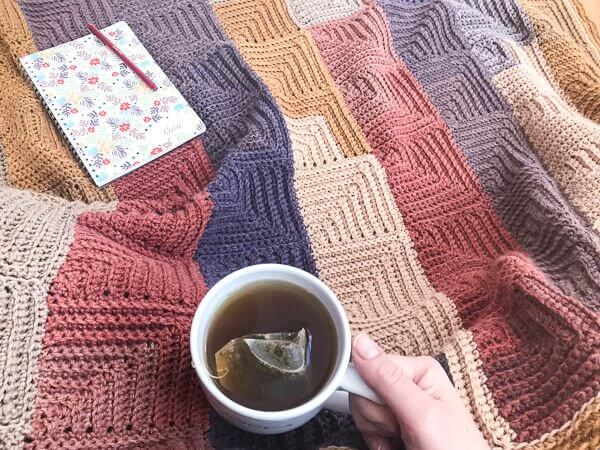
About This Mitered Square Crochet Blanket
Pattern Details
- Skill level: Intermediate
- Yarn: Lion Brand Mandala or similar DK/light worsted self-striping yarn
- Yardage: Approximately 1,770 yd (1,619 m)
- Hook: 5 mm (US H-8)
- Finished size: Approximately 52 × 40 in. (132 × 102 cm)
- Square size: Approximately 4¾ in. (12 cm)
- Construction: Mitered squares worked continuously without fastening off
- Stitch pattern: Single crochet worked in back loops only
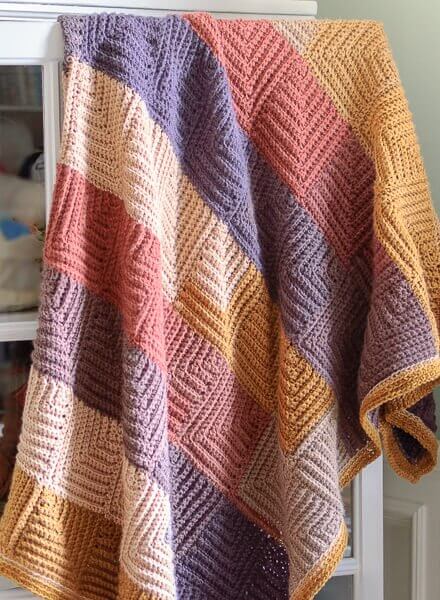
Materials
- 3 balls Lion Brand Mandala® Yarn (shown here in Centaur #214), approx. 1,770 yds (1,619 m) total
- 5 mm (US H-8) crochet hook
- Scissors and yarn needle for finishing
Abbreviations
- ch – chain
- sc – single crochet
- sc3tog – single crochet 3 stitches together
- sl st – slip stitch
- st(s) – stitch(es)
Pattern Notes
- This free crochet pattern is written in U.S. crochet terms and abbreviations. Stitch counts are provided at the end of each row to help you keep on track.
- Work in back loops only throughout the pattern
- Work continuously without fastening off between squares and rows
- Easily modified to any size you like
- 1 ball of Mandala® Yarn makes about 33 squares, so you can calculate how many balls you will need for your desired size blanket … but don’t forget to allow some extra yardage for your border
- Each square measures approximately 4¾ in. (12 cm).
- Helpful Crochet Resources: Refer to my Crochet Abbreviations and U.S. to U.K. Crochet Conversion Chart as you work through the pattern.
Add this pattern to your Ravelry library.
Available as a convenient, ad-free PDF download here.
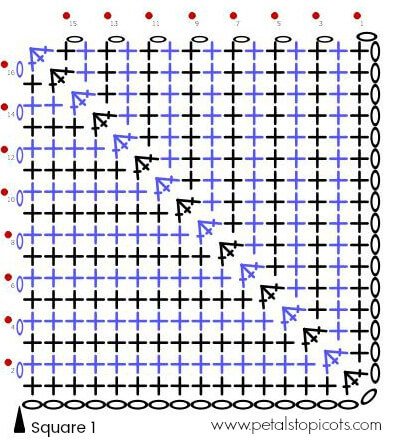
Row 1, Square 1
Ch 34.
Row 1: Work 1 sc in 2nd ch from hook and each of the next 14 ch, sc3tog, work 1 sc in each of the remaining 15 ch, turn — 31 sts.
Row 2: Ch 1 (does not count as st here and throughout), work 1 sc in each of the next 14 sts, sc3tog, 1 sc in each of the last 14 sts, turn — 29 sts.
Row 3: Ch 1, work 1 sc in each of the next 13 sts, sc3tog, 1 sc in each of the last 13 sts, turn — 27 sts.
Row 4: Ch 1, work 1 sc in each of the next 12 sts, sc3tog, 1 sc in each of the last 12 sts, turn — 25 sts.
Row 5: Ch 1, work 1 sc in each of the next 11 sts, sc3tog, 1 sc in each of the last 11 sts, turn — 23 sts.
Row 6: Ch 1, work 1 sc in each of the next 10 sts, sc3tog, 1 sc in each of the last 10 sts, turn — 21 sts.
Row 7: Ch 1, work 1 sc in each of the next 9 sts, sc3tog, 1 sc in each of the last 9 sts, turn — 19 sts.
Row 8: Ch 1, work 1 sc in each of the next 8 sts, sc3tog, 1 sc in each of the last 8 sts, turn — 17 sts.
Row 9: Ch 1, work 1 sc in each of the next 7 sts, sc3tog, 1 sc in each of the last 7 sts, turn — 15 sts.
Row 10: Ch 1, work 1 sc in each of the next 6 sts, sc3tog, 1 sc in each of the last 6 sts, turn — 13 sts.
Row 11: Ch 1, work 1 sc in each of the next 5 sts, sc3tog, 1 sc in each of the last 5 sts, turn — 11 sts.
Row 12: Ch 1, work 1 sc in each of the next 4 sts, sc3tog, 1 sc in each of the last 4 sts, turn — 9 sts.
Row 13: Ch 1, work 1 sc in each of the next 3 sts, sc3tog, 1 sc in each of the last 3 sts, turn — 7 sts.
Row 14: Ch 1, work 1 sc in each of the next 2 sts, sc3tog, 1 sc in each of the last 2 sts, turn — 5 sts.
Row 15: Ch 1, work 1 sc in each of the next 1 sts, sc3tog, 1 sc in each of the last 1 sts, turn — 3 sts.
Row 16: Ch 1, sc3tog, do not turn — 1 st.
Click here to reference Crochet Stitch Chart Symbols.
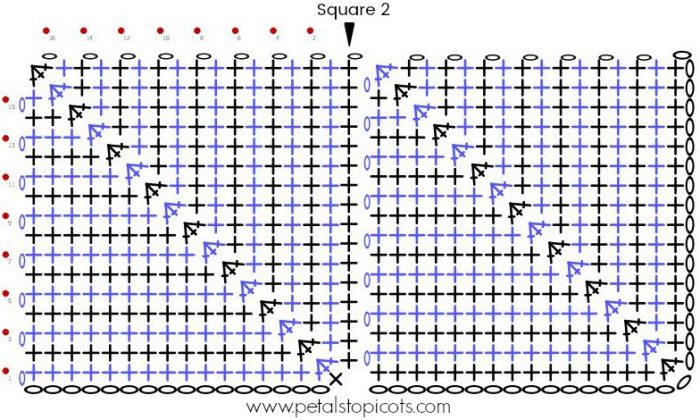
Row 1, Squares 2 through 8
Setup Row: Ch 1, working along the left edge of the previous square; work 17 sc evenly along the edge, making sure to work the last st in the very bottom corner; ch 17, turn.
Row 1: Work 1 sc in 2nd ch from hook and each of the next 14 ch, sc3tog, work 1 sc in each of the remaining 15 sts, turn — 31 sts.
Row 2: Ch 1, work 1 sc in each of the next 14 sts, sc3tog, 1 sc in each of the last 14 sts, turn — 29 sts.
Row 3: Ch 1, work 1 sc in each of the next 13 sts, sc3tog, 1 sc in each of the last 13 sts, turn — 27 sts.
Row 4: Ch 1, work 1 sc in each of the next 12 sts, sc3tog, 1 sc in each of the last 12 sts, turn — 25 sts.
Row 5: Ch 1, work 1 sc in each of the next 11 sts, sc3tog, 1 sc in each of the last 11 sts, turn — 23 sts.
Row 6: Ch 1, work 1 sc in each of the next 10 sts, sc3tog, 1 sc in each of the last 10 sts, turn — 21 sts.
Row 7: Ch 1, work 1 sc in each of the next 9 sts, sc3tog, 1 sc in each of the last 9 sts, turn — 19 sts.
Row 8: Ch 1, work 1 sc in each of the next 8 sts, sc3tog, 1 sc in each of the last 8 sts, turn — 17 sts.
Row 9: Ch 1, work 1 sc in each of the next 7 sts, sc3tog, 1 sc in each of the last 7 sts, turn — 15 sts.
Row 10: Ch 1, work 1 sc in each of the next 6 sts, sc3tog, 1 sc in each of the last 6 sts, turn — 13 sts.
Row 11: Ch 1, work 1 sc in each of the next 5 sts, sc3tog, 1 sc in each of the last 5 sts, turn — 11 sts.
Row 12: Ch 1, work 1 sc in each of the next 4 sts, sc3tog, 1 sc in each of the last 4 sts, turn — 9 sts.
Row 13: Ch 1, work 1 sc in each of the next 3 sts, sc3tog, 1 sc in each of the last 3 sts, turn — 7 sts.
Row 14: Ch 1, work 1 sc in each of the next 2 sts, sc3tog, 1 sc in each of the last 2 sts, turn — 5 sts.
Row 15: Ch 1, work 1 sc in each of the next 1 sts, sc3tog, 1 sc in each of the last 1 sts, turn — 3 sts.
Row 16: Ch 1, sc3tog, do not turn — 1 st.
Repeat for each square across for a total of 8 squares or until desired width is reached; turn work.
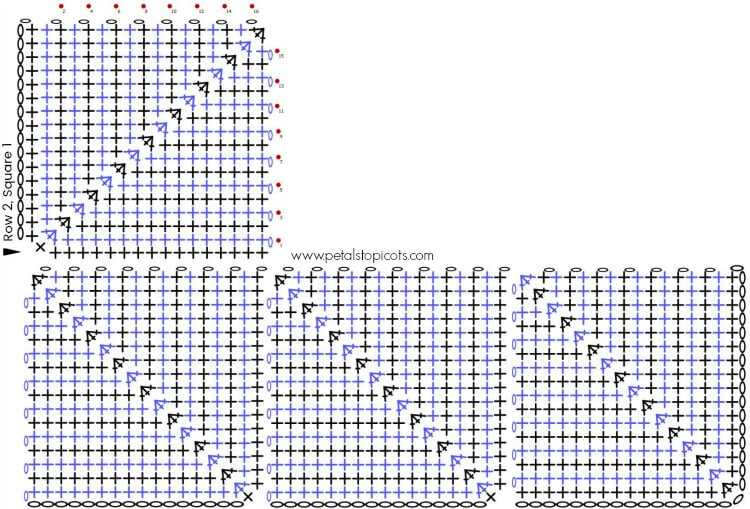
Row 2, Square 1
Setup Row: Ch 17, work 1 sc in 2nd ch from hook and each of the next 15 ch, work 1 sc in top corner of square below, work 16 sc evenly along top edge of square below, making sure to work last st in very corner of square below, turn.
Row 1: Ch 1, work 1 sc in each of the next 15 sts, sc3tog, work 1 sc in each of the remaining 15 sts, turn — 31 sts.
Row 2: Ch 1, work 1 sc in each of the next 14 sts, sc3tog, 1 sc in each of the last 14 sts, turn — 29 sts.
Row 3: Ch 1, work 1 sc in each of the next 13 sts, sc3tog, 1 sc in each of the last 13 sts, turn — 27 sts.
Row 4: Ch 1, work 1 sc in each of the next 12 sts, sc3tog, 1 sc in each of the last 12 sts, turn — 25 sts.
Row 5: Ch 1, work 1 sc in each of the next 11 sts, sc3tog, 1 sc in each of the last 11 sts, turn — 23 sts.
Row 6: Ch 1, work 1 sc in each of the next 10 sts, sc3tog, 1 sc in each of the last 10 sts, turn — 21 sts.
Row 7: Ch 1, work 1 sc in each of the next 9 sts, sc3tog, 1 sc in each of the last 9 sts, turn — 19 sts.
Row 8: Ch 1, work 1 sc in each of the next 8 sts, sc3tog, 1 sc in each of the last 8 sts, turn — 17 sts.
Row 9: Ch 1, work 1 sc in each of the next 7 sts, sc3tog, 1 sc in each of the last 7 sts, turn — 15 sts.
Row 10: Ch 1, work 1 sc in each of the next 6 sts, sc3tog, 1 sc in each of the last 6 sts, turn — 13 sts.
Row 11: Ch 1, work 1 sc in each of the next 5 sts, sc3tog, 1 sc in each of the last 5 sts, turn — 11 sts.
Row 12: Ch 1, work 1 sc in each of the next 4 sts, sc3tog, 1 sc in each of the last 4 sts, turn — 9 sts.
Row 13: Ch 1, work 1 sc in each of the next 3 sts, sc3tog, 1 sc in each of the last 3 sts, turn — 7 sts.
Row 14: Ch 1, work 1 sc in each of the next 2 sts, sc3tog, 1 sc in each of the last 2 sts, turn — 5 sts.
Row 15: Ch 1, work 1 sc in each of the next 1 sts, sc3tog, 1 sc in each of the last 1 sts, turn — 3 sts.
Row 16: Ch 1, sc3tog, do not turn — 1 st.
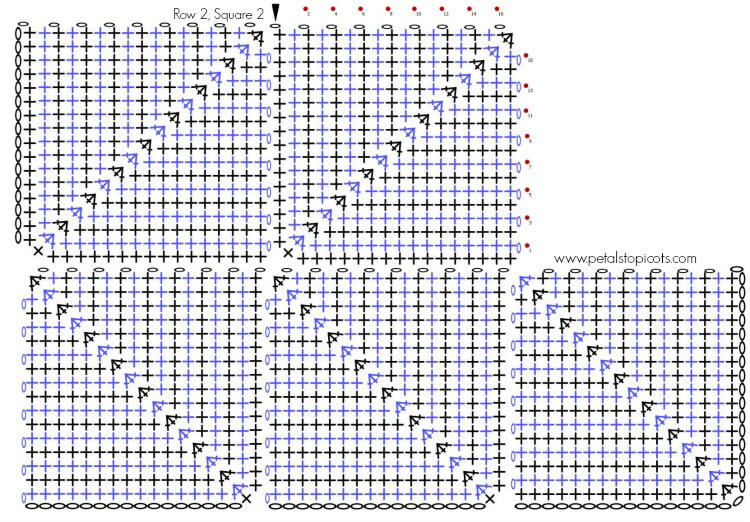
Row 2, Squares 2 through 8
Setup Row: Ch 1, working along the left edge of the previous square, work 16 sc evenly along the edge, work 1 sc in the top corner of the square below, work 16 sc evenly along the top edge of the square below, making sure to work the last st in the very corner of the square below, turn.
Row 1: Ch 1, work 1 sc in each of the next 15 sts, sc3tog, work 1 sc in each of the remaining 15 sts, turn — 31 sts.
Row 2: Ch 1, work 1 sc in each of the next 14 sts, sc3tog, 1 sc in each of the last 14 sts, turn — 29 sts.
Row 3: Ch 1, work 1 sc in each of the next 13 sts, sc3tog, 1 sc in each of the last 13 sts, turn — 27 sts.
Row 4: Ch 1, work 1 sc in each of the next 12 sts, sc3tog, 1 sc in each of the last 12 sts, turn — 25 sts.
Row 5: Ch 1, work 1 sc in each of the next 11 sts, sc3tog, 1 sc in each of the last 11 sts, turn — 23 sts.
Row 6: Ch 1, work 1 sc in each of the next 10 sts, sc3tog, 1 sc in each of the last 10 sts, turn — 21 sts.
Row 7: Ch 1, work 1 sc in each of the next 9 sts, sc3tog, 1 sc in each of the last 9 sts, turn — 19 sts.
Row 8: Ch 1, work 1 sc in each of the next 8 sts, sc3tog, 1 sc in each of the last 8 sts, turn — 17 sts.
Row 9: Ch 1, work 1 sc in each of the next 7 sts, sc3tog, 1 sc in each of the last 7 sts, turn — 15 sts.
Row 10: Ch 1, work 1 sc in each of the next 6 sts, sc3tog, 1 sc in each of the last 6 sts, turn — 13 sts.
Row 11: Ch 1, work 1 sc in each of the next 5 sts, sc3tog, 1 sc in each of the last 5 sts, turn — 11 sts.
Row 12: Ch 1, work 1 sc in each of the next 4 sts, sc3tog, 1 sc in each of the last 4 sts, turn — 9 sts.
Row 13: Ch 1, work 1 sc in each of the next 3 sts, sc3tog, 1 sc in each of the last 3 sts, turn — 7 sts.
Row 14: Ch 1, work 1 sc in each of the next 2 sts, sc3tog, 1 sc in each of the last 2 sts, turn — 5 sts.
Row 15: Ch 1, work 1 sc in each of the next 1 sts, sc3tog, 1 sc in each of the last 1 sts, turn — 3 sts.
Row 16: Ch 1, sc3tog, do not turn — 1 st.
Repeat for each square across row.
Rows 3 Through 11
Rows 3 through 11 (or until desired length is reached): Repeat pattern instructions for Row 2.
Do not fasten off.
Border
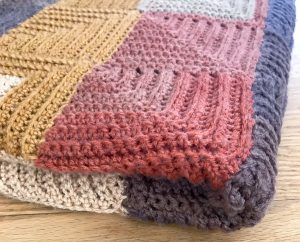
This simple border is worked in single crochet stitches around the blanket’s perimeter. For another option, check out the vertical ribbed edging used on my friend Kim’s Patchwork Throw Pattern at CrochetKim.
Round 1: Work a sl st border around the entire blanket, working approximately 16 sts across each square edge; join.
Round 2: Ch 1, work 1 sc in the same st as join and each st around, working 3 sc in each corner st.
Rounds 3 and 4: Repeat Round 2.
Fasten off, weave in ends.
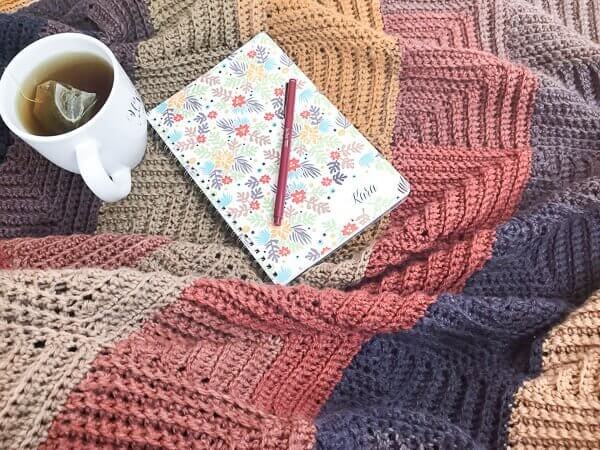
Now make a cup of tea and snuggle up under your new blanket 🙂
You may also enjoy …
- Sea Glass Afghan
- Crochet Patterns for the Home
- Quick & Easy Dishcloth Patterns
- Dahlia Bloom Afghan Square
Browse my full gallery of free crochet patterns here.


Love this pattern. Using 3 different colors instead of the mandala, so I will be weaving in loose ends, but love how it’s going! Also using 5.5mm since I tend to crochet on the tight side. Working up really quickly! Already have 2 other people who would like me to make one for them. 😀
Loving this pattern so far! This is my first crochet project in years! Do you have any recommendations for changing to a new ball of yarn? Do you leave a tail that you sew/weave back in or do you trim your ends really short?
I found this comment from the color changing tutorial. “…in order to ‘anchor’ your tails, take a darning needle and weave the loose tails in on the back side securely with a back stitch. What is a back stitch? It’s an embroidery stitch. No amount of crocheting over any loose tail will secure it from coming loose and unraveled. Any good crocheter or knitter knows to weave their tails in with a needle.”
This doesn’t mention knotting the yarn. Do you do a square knot before weaving the ends?
Hello 🙂 I do not knot my tails but instead leave a long tail and weave it in as described in your comment.
Really glorious!! And gorgeous color shades as well! Pinned! Have a wonderful day, dear! 💕🍃🌸🍃
Thanks so much for sharing this beautiful pattern.
I have a quick question about the pattern, your notes say that one ball will make 33 squares, is that correct? I just finished my first ball and only have about 12 squares.
Yes, that is correct. I just recounted to make sure and 1 ball got me through 33 squares. Are you using Mandala for this?
Oh darn, I’ve been using Bernat Pop, I didn’t even realize they had different yardages. But I appreciate you taking time to double check that for me!
Hi Kara:
I have the same question as Chris Eskenazi…. Is there a YouTube tutorial on this technique for those of us who sometimes find a visual tutorial easier than written instructions, especially with a technique that is new to us? If so, that would be great! I love your designs and your patterns are so easy to follow….it’s just this technique that I would love to see demonstrated on video. Thanks!
Hi – lovely pattern!
I’m finding that my squares aren’t really square – I think because after the first one there is the joined sc row. Should I try ss instead?
Is there a Youtube Video on this pattern?? Would like to see how it is made in real time. Thank you
This pattern is beautiful. I had the exact yarn in my collection so I started immediately. I found that it has a few pitfalls, if you are a tight crocheter it will cause problems, the squares begin to pull in the mitered corners. I changed hooks but still had problems. So finally I frogged 2 rows in and put the yarn away. It is not a relaxing crochet project, i loved it but just tired of all the counting. It is an advanced crocheting project.s
Thanks – yes it does. I found my silly mistake!
I’m not sure what I’m doing wrong – I’m starting the second square – row 1. It looks like the second square is left of the first one – I’m not exactly sure where exactly row 1 is. I don’t see where the chains get added.
Hi Barb 🙂 you are correct that the second square of row 1 gets added to the left of the first. You should be working Row 1 along the edge of the rows from the first square and then when you reach the bottom corner, add on your chains. Hope that helps!
I love this pattern, but I am having trouble with square two, do you have a video on starting it?