
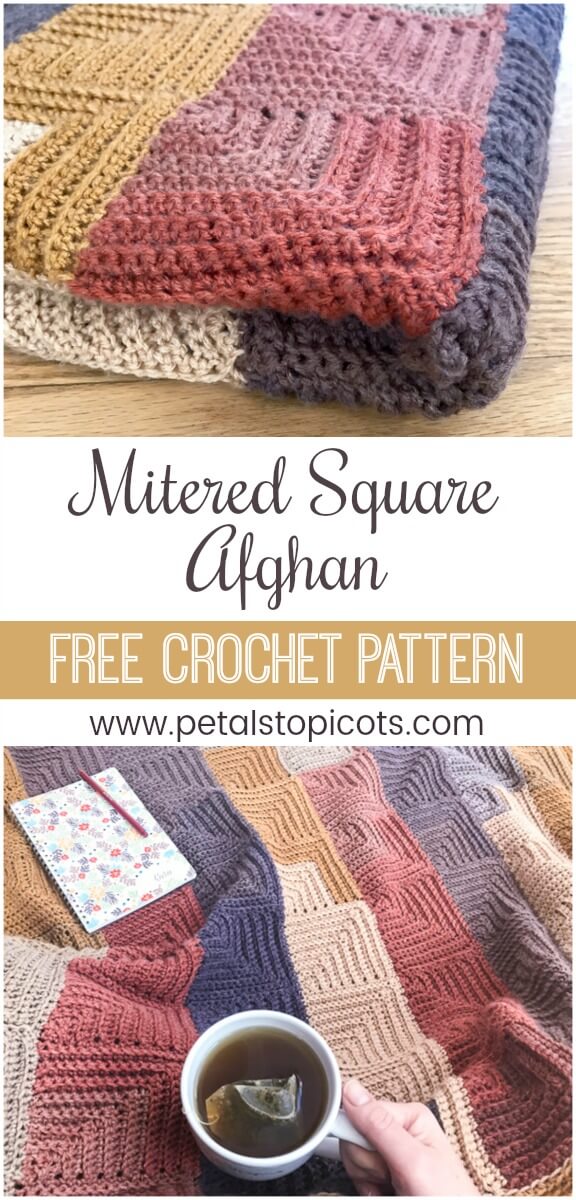
This continuous mitered square crochet afghan pattern gives you the charm of a patchwork blanket without having to crochet and join a pile of individual squares. Each mitered square is worked directly onto the previous one, so the entire blanket is crocheted continuously with no fastening off between squares … which means no zillion ends to weave in. Yay!
The pattern uses simple single crochet stitches worked in the back loops to create the textured mitered squares. A self-striping yarn does all the colorwork for you, giving each square a different look without changing yarn colors.
The finished afghan measures approximately 52 × 40 in. (132 × 102 cm), but the continuous construction makes it easy to adjust the width and length to create whatever size crochet blanket you’d like.
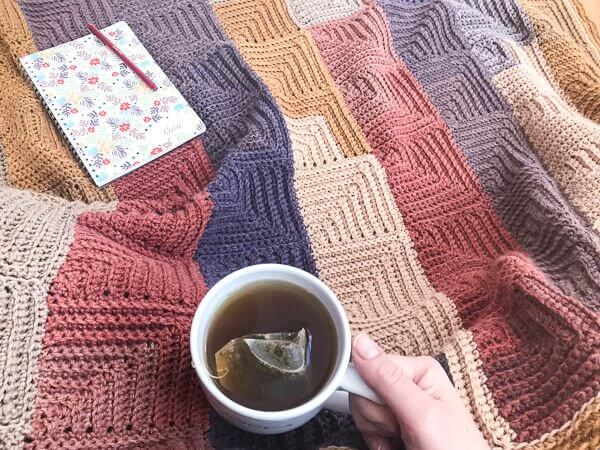
About This Mitered Square Crochet Blanket
Pattern Details
- Skill level: Intermediate
- Yarn: Lion Brand Mandala or similar DK/light worsted self-striping yarn
- Yardage: Approximately 1,770 yd (1,619 m)
- Hook: 5 mm (US H-8)
- Finished size: Approximately 52 × 40 in. (132 × 102 cm)
- Square size: Approximately 4¾ in. (12 cm)
- Construction: Mitered squares worked continuously without fastening off
- Stitch pattern: Single crochet worked in back loops only
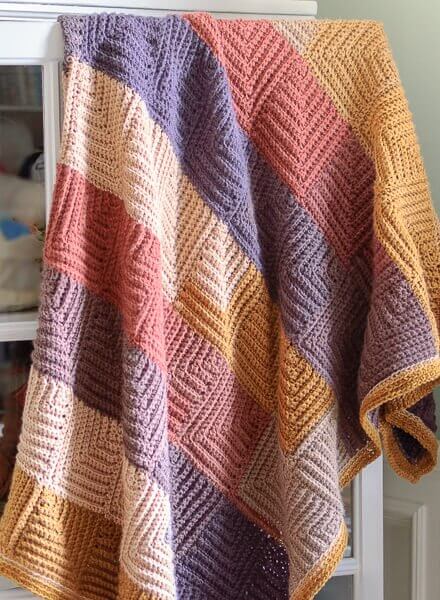
Materials
- 3 balls Lion Brand Mandala® Yarn (shown here in Centaur #214), approx. 1,770 yds (1,619 m) total
- 5 mm (US H-8) crochet hook
- Scissors and yarn needle for finishing
Abbreviations
- ch – chain
- sc – single crochet
- sc3tog – single crochet 3 stitches together
- sl st – slip stitch
- st(s) – stitch(es)
Pattern Notes
- This free crochet pattern is written in U.S. crochet terms and abbreviations. Stitch counts are provided at the end of each row to help you keep on track.
- Work in back loops only throughout the pattern
- Work continuously without fastening off between squares and rows
- Easily modified to any size you like
- 1 ball of Mandala® Yarn makes about 33 squares, so you can calculate how many balls you will need for your desired size blanket … but don’t forget to allow some extra yardage for your border
- Each square measures approximately 4¾ in. (12 cm).
- Helpful Crochet Resources: Refer to my Crochet Abbreviations and U.S. to U.K. Crochet Conversion Chart as you work through the pattern.
Add this pattern to your Ravelry library.
Available as a convenient, ad-free PDF download here.
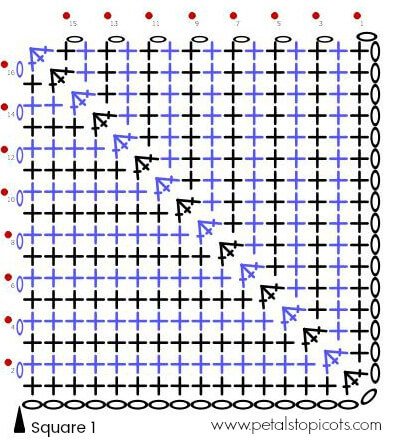
Row 1, Square 1
Ch 34.
Row 1: Work 1 sc in 2nd ch from hook and each of the next 14 ch, sc3tog, work 1 sc in each of the remaining 15 ch, turn — 31 sts.
Row 2: Ch 1 (does not count as st here and throughout), work 1 sc in each of the next 14 sts, sc3tog, 1 sc in each of the last 14 sts, turn — 29 sts.
Row 3: Ch 1, work 1 sc in each of the next 13 sts, sc3tog, 1 sc in each of the last 13 sts, turn — 27 sts.
Row 4: Ch 1, work 1 sc in each of the next 12 sts, sc3tog, 1 sc in each of the last 12 sts, turn — 25 sts.
Row 5: Ch 1, work 1 sc in each of the next 11 sts, sc3tog, 1 sc in each of the last 11 sts, turn — 23 sts.
Row 6: Ch 1, work 1 sc in each of the next 10 sts, sc3tog, 1 sc in each of the last 10 sts, turn — 21 sts.
Row 7: Ch 1, work 1 sc in each of the next 9 sts, sc3tog, 1 sc in each of the last 9 sts, turn — 19 sts.
Row 8: Ch 1, work 1 sc in each of the next 8 sts, sc3tog, 1 sc in each of the last 8 sts, turn — 17 sts.
Row 9: Ch 1, work 1 sc in each of the next 7 sts, sc3tog, 1 sc in each of the last 7 sts, turn — 15 sts.
Row 10: Ch 1, work 1 sc in each of the next 6 sts, sc3tog, 1 sc in each of the last 6 sts, turn — 13 sts.
Row 11: Ch 1, work 1 sc in each of the next 5 sts, sc3tog, 1 sc in each of the last 5 sts, turn — 11 sts.
Row 12: Ch 1, work 1 sc in each of the next 4 sts, sc3tog, 1 sc in each of the last 4 sts, turn — 9 sts.
Row 13: Ch 1, work 1 sc in each of the next 3 sts, sc3tog, 1 sc in each of the last 3 sts, turn — 7 sts.
Row 14: Ch 1, work 1 sc in each of the next 2 sts, sc3tog, 1 sc in each of the last 2 sts, turn — 5 sts.
Row 15: Ch 1, work 1 sc in each of the next 1 sts, sc3tog, 1 sc in each of the last 1 sts, turn — 3 sts.
Row 16: Ch 1, sc3tog, do not turn — 1 st.
Click here to reference Crochet Stitch Chart Symbols.
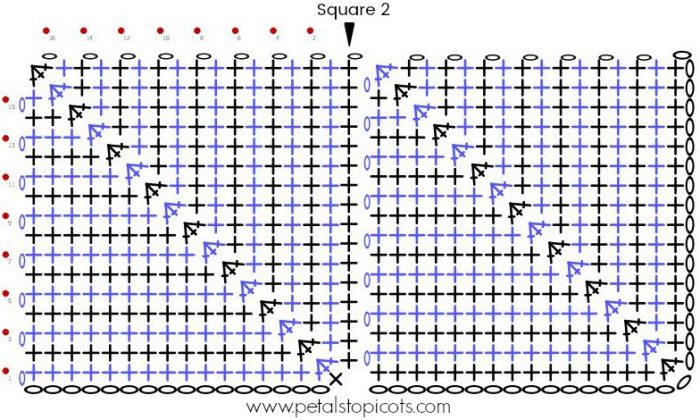
Row 1, Squares 2 through 8
Setup Row: Ch 1, working along the left edge of the previous square; work 17 sc evenly along the edge, making sure to work the last st in the very bottom corner; ch 17, turn.
Row 1: Work 1 sc in 2nd ch from hook and each of the next 14 ch, sc3tog, work 1 sc in each of the remaining 15 sts, turn — 31 sts.
Row 2: Ch 1, work 1 sc in each of the next 14 sts, sc3tog, 1 sc in each of the last 14 sts, turn — 29 sts.
Row 3: Ch 1, work 1 sc in each of the next 13 sts, sc3tog, 1 sc in each of the last 13 sts, turn — 27 sts.
Row 4: Ch 1, work 1 sc in each of the next 12 sts, sc3tog, 1 sc in each of the last 12 sts, turn — 25 sts.
Row 5: Ch 1, work 1 sc in each of the next 11 sts, sc3tog, 1 sc in each of the last 11 sts, turn — 23 sts.
Row 6: Ch 1, work 1 sc in each of the next 10 sts, sc3tog, 1 sc in each of the last 10 sts, turn — 21 sts.
Row 7: Ch 1, work 1 sc in each of the next 9 sts, sc3tog, 1 sc in each of the last 9 sts, turn — 19 sts.
Row 8: Ch 1, work 1 sc in each of the next 8 sts, sc3tog, 1 sc in each of the last 8 sts, turn — 17 sts.
Row 9: Ch 1, work 1 sc in each of the next 7 sts, sc3tog, 1 sc in each of the last 7 sts, turn — 15 sts.
Row 10: Ch 1, work 1 sc in each of the next 6 sts, sc3tog, 1 sc in each of the last 6 sts, turn — 13 sts.
Row 11: Ch 1, work 1 sc in each of the next 5 sts, sc3tog, 1 sc in each of the last 5 sts, turn — 11 sts.
Row 12: Ch 1, work 1 sc in each of the next 4 sts, sc3tog, 1 sc in each of the last 4 sts, turn — 9 sts.
Row 13: Ch 1, work 1 sc in each of the next 3 sts, sc3tog, 1 sc in each of the last 3 sts, turn — 7 sts.
Row 14: Ch 1, work 1 sc in each of the next 2 sts, sc3tog, 1 sc in each of the last 2 sts, turn — 5 sts.
Row 15: Ch 1, work 1 sc in each of the next 1 sts, sc3tog, 1 sc in each of the last 1 sts, turn — 3 sts.
Row 16: Ch 1, sc3tog, do not turn — 1 st.
Repeat for each square across for a total of 8 squares or until desired width is reached; turn work.
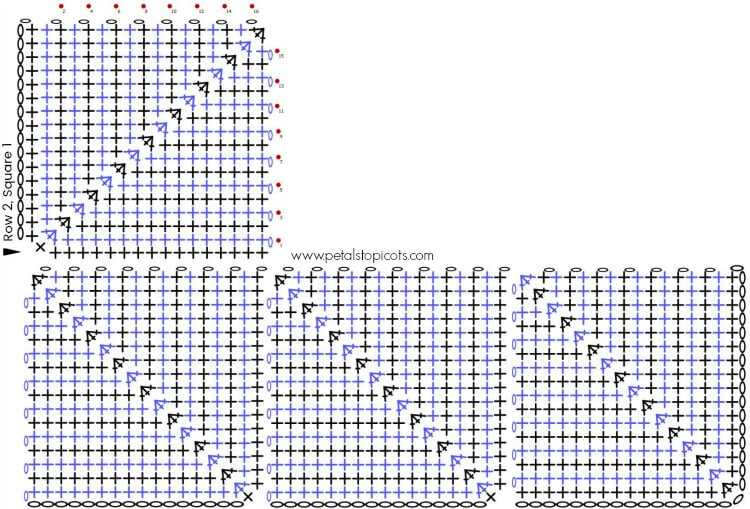
Row 2, Square 1
Setup Row: Ch 17, work 1 sc in 2nd ch from hook and each of the next 15 ch, work 1 sc in top corner of square below, work 16 sc evenly along top edge of square below, making sure to work last st in very corner of square below, turn.
Row 1: Ch 1, work 1 sc in each of the next 15 sts, sc3tog, work 1 sc in each of the remaining 15 sts, turn — 31 sts.
Row 2: Ch 1, work 1 sc in each of the next 14 sts, sc3tog, 1 sc in each of the last 14 sts, turn — 29 sts.
Row 3: Ch 1, work 1 sc in each of the next 13 sts, sc3tog, 1 sc in each of the last 13 sts, turn — 27 sts.
Row 4: Ch 1, work 1 sc in each of the next 12 sts, sc3tog, 1 sc in each of the last 12 sts, turn — 25 sts.
Row 5: Ch 1, work 1 sc in each of the next 11 sts, sc3tog, 1 sc in each of the last 11 sts, turn — 23 sts.
Row 6: Ch 1, work 1 sc in each of the next 10 sts, sc3tog, 1 sc in each of the last 10 sts, turn — 21 sts.
Row 7: Ch 1, work 1 sc in each of the next 9 sts, sc3tog, 1 sc in each of the last 9 sts, turn — 19 sts.
Row 8: Ch 1, work 1 sc in each of the next 8 sts, sc3tog, 1 sc in each of the last 8 sts, turn — 17 sts.
Row 9: Ch 1, work 1 sc in each of the next 7 sts, sc3tog, 1 sc in each of the last 7 sts, turn — 15 sts.
Row 10: Ch 1, work 1 sc in each of the next 6 sts, sc3tog, 1 sc in each of the last 6 sts, turn — 13 sts.
Row 11: Ch 1, work 1 sc in each of the next 5 sts, sc3tog, 1 sc in each of the last 5 sts, turn — 11 sts.
Row 12: Ch 1, work 1 sc in each of the next 4 sts, sc3tog, 1 sc in each of the last 4 sts, turn — 9 sts.
Row 13: Ch 1, work 1 sc in each of the next 3 sts, sc3tog, 1 sc in each of the last 3 sts, turn — 7 sts.
Row 14: Ch 1, work 1 sc in each of the next 2 sts, sc3tog, 1 sc in each of the last 2 sts, turn — 5 sts.
Row 15: Ch 1, work 1 sc in each of the next 1 sts, sc3tog, 1 sc in each of the last 1 sts, turn — 3 sts.
Row 16: Ch 1, sc3tog, do not turn — 1 st.
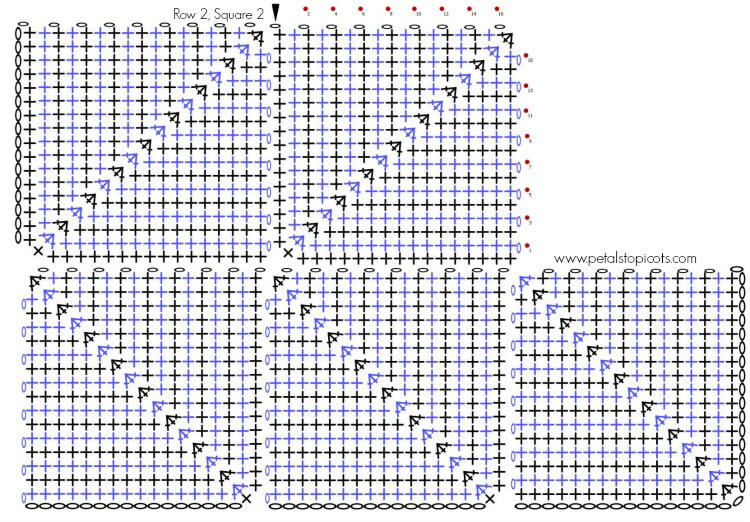
Row 2, Squares 2 through 8
Setup Row: Ch 1, working along the left edge of the previous square, work 16 sc evenly along the edge, work 1 sc in the top corner of the square below, work 16 sc evenly along the top edge of the square below, making sure to work the last st in the very corner of the square below, turn.
Row 1: Ch 1, work 1 sc in each of the next 15 sts, sc3tog, work 1 sc in each of the remaining 15 sts, turn — 31 sts.
Row 2: Ch 1, work 1 sc in each of the next 14 sts, sc3tog, 1 sc in each of the last 14 sts, turn — 29 sts.
Row 3: Ch 1, work 1 sc in each of the next 13 sts, sc3tog, 1 sc in each of the last 13 sts, turn — 27 sts.
Row 4: Ch 1, work 1 sc in each of the next 12 sts, sc3tog, 1 sc in each of the last 12 sts, turn — 25 sts.
Row 5: Ch 1, work 1 sc in each of the next 11 sts, sc3tog, 1 sc in each of the last 11 sts, turn — 23 sts.
Row 6: Ch 1, work 1 sc in each of the next 10 sts, sc3tog, 1 sc in each of the last 10 sts, turn — 21 sts.
Row 7: Ch 1, work 1 sc in each of the next 9 sts, sc3tog, 1 sc in each of the last 9 sts, turn — 19 sts.
Row 8: Ch 1, work 1 sc in each of the next 8 sts, sc3tog, 1 sc in each of the last 8 sts, turn — 17 sts.
Row 9: Ch 1, work 1 sc in each of the next 7 sts, sc3tog, 1 sc in each of the last 7 sts, turn — 15 sts.
Row 10: Ch 1, work 1 sc in each of the next 6 sts, sc3tog, 1 sc in each of the last 6 sts, turn — 13 sts.
Row 11: Ch 1, work 1 sc in each of the next 5 sts, sc3tog, 1 sc in each of the last 5 sts, turn — 11 sts.
Row 12: Ch 1, work 1 sc in each of the next 4 sts, sc3tog, 1 sc in each of the last 4 sts, turn — 9 sts.
Row 13: Ch 1, work 1 sc in each of the next 3 sts, sc3tog, 1 sc in each of the last 3 sts, turn — 7 sts.
Row 14: Ch 1, work 1 sc in each of the next 2 sts, sc3tog, 1 sc in each of the last 2 sts, turn — 5 sts.
Row 15: Ch 1, work 1 sc in each of the next 1 sts, sc3tog, 1 sc in each of the last 1 sts, turn — 3 sts.
Row 16: Ch 1, sc3tog, do not turn — 1 st.
Repeat for each square across row.
Rows 3 Through 11
Rows 3 through 11 (or until desired length is reached): Repeat pattern instructions for Row 2.
Do not fasten off.
Border
This simple border is worked in single crochet stitches around the blanket’s perimeter. For another option, check out the vertical ribbed edging used on my friend Kim’s Patchwork Throw Pattern at CrochetKim.
Round 1: Work a sl st border around the entire blanket, working approximately 16 sts across each square edge; join.
Round 2: Ch 1, work 1 sc in the same st as join and each st around, working 3 sc in each corner st.
Rounds 3 and 4: Repeat Round 2.
Fasten off, weave in ends.
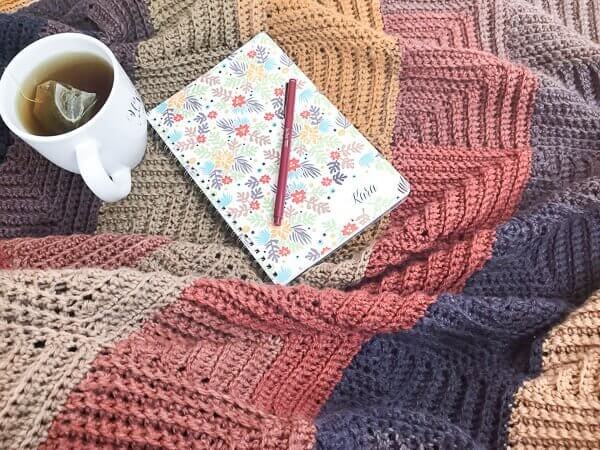
Now make a cup of tea and snuggle up under your new blanket 🙂
You may also enjoy …
- Sea Glass Afghan
- Crochet Patterns for the Home
- Quick & Easy Dishcloth Patterns
- Dahlia Bloom Afghan Square
Browse my full gallery of free crochet patterns here.


have 3 mandalas had to start…thank you for your pattern.
This is a fantastic pattern, and your instructions are so clear. It’s unlike anything I have found in the yarn-iverse. I will certainly be trying this when I can get my hands on some of the self striping, Mandala yarn. Thank you for sharing your creation. It’s inspiring for new crocheters, like myself.
Great pattern Kara. Thank you for sharing. Can ‘t wait to try this afghan in the Mandala yarn, my new favorite .Recently finished a rectangular granny square afghan with Mandala, it feels and drapes beautifully.
I LOVE this design! It seems so simple but I don’t think it would bore me like so many other blankets I’ve tried.
Question: Would this work up ok with a heavier weight yarn? I realize it would be larger but is that all?
Hi Tina 🙂 Yep, you can work it up in another weight yarn … just be sure to change your hooks size accordingly too.
Love the pattern!! Do you think the pattern would work using green hdc instead of sc? Thanks for the advice 😀
Hi Kate 🙂 I’m not sure if that would work since the stitches would be taller.
Thank you this is beautiful. love that it is worked continuously with each square..
Hi Kara!
Thanks You for this Absolutely Awesome and Gorgeous pattern! Your pattern is so very clear and easy to follow. I love your diagrams! Your blanket turned out just beautiful.
Thank You for sharing your creativity with us.
Kind Regards, Susan
Genius design! This is a blanket I would enjoy crocheting! Well done!
Wow! That looks great, Kara! And the color combinations are lovely:)
This is a wonderful pattern. How large is the blanket when using 3 cakes of the Mandala yarn?
Finished afghan as written measures approximately 52 in. x 40 in. but can be easily adjusted to any size.
Thank you!
Hello! I just started this blanket and have a quick question – Do you work in the back loops only if the foundation chains or the entire V stitch?
Hi, I have started to work this pattern myself and I go through the back bumps of the chain so the V of the chain create a neater edge. Otherwise on the foundation chain I will work through one chain if adding an additional border to it.