
This free lace angel crochet pattern creates a delicate three-dimensional angel using Size 10 crochet thread. Although the finished angel looks intricate, the pattern uses familiar crochet stitches and is easier to make than its lacy design might suggest.
The finished crochet angel measures approximately 5 in. (12.7 cm) high × 3½ in. (8.9 cm) wide. Display it on a mantel or holiday table, add a hanging loop to make a Christmas tree ornament, or use it as a tree topper for a small tabletop tree.
After crocheting the angel, shape and stiffen it over a homemade wax-paper cone so it can stand on its own.
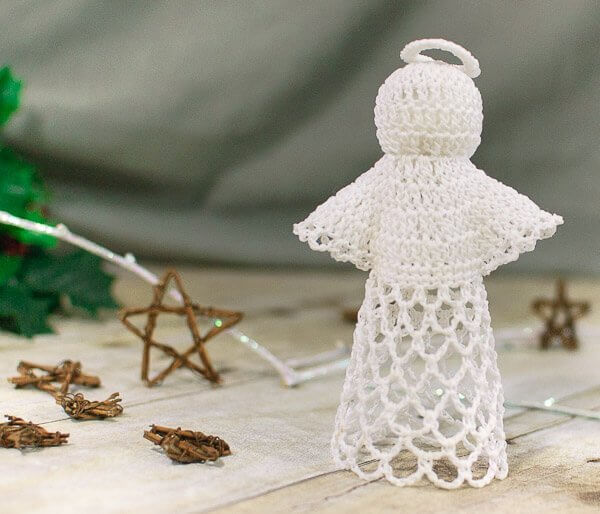
Lace Angel Crochet Pattern
Pattern Details
- Skill level: Intermediate
- Yarn: Size 10 crochet thread
- Hook: 1.75 mm steel crochet hook
- Finished size: Approximately 5 in. (12.7 cm) high × 3½ in. (8.9 cm) wide
- Construction: Worked from the top of the head down
- Halo: Crocheted separately and sewn in place
- Gauge: Not essential
Supplies
- Size 10 crochet thread, such as Aunt Lydia’s
- 1.75 mm steel crochet hook
- Cotton ball or fiberfill stuffing
- T-pin or another sturdy pin
- Fabric stiffener
- Sewing needle
- Stitch marker
- Scissors
- Wax paper for shaping
Resources and tutorials you may find helpful in following this crochet pattern: Crochet Abbreviations, U.S. to U.K. Crochet Conversion Chart, and Crochet Stitch Chart Symbols.
Prefer a printable copy? Purchase the ad-free Lace Angel Crochet Pattern PDF from my pattern shop.
Crochet Abbreviations
- ch = chain
- dc = double crochet
- dc2tog = double crochet 2 stitches together
- rep = repeat
- sc = single crochet
- sl st = slip stitch
- sp(s) = space(s)
- st(s) = stitch(es)
This pattern is written in U.S. crochet terms.
Pattern Notes
- The angel is worked from the top of the head down.
- The halo is crocheted separately and sewn to the head.
- Rounds 1 through 11 are joined unless otherwise indicated.
- Beginning with Round 12, work in a continuous spiral without joining.
- Place a stitch marker in the first stitch of each spiral round and move it up as you work.
- The beginning ch-3 counts as a dc where indicated.
- The beginning ch-1 or ch-2 does not count as a stitch where indicated.
- Add a small amount of stuffing to the head after completing Round 5.
- The open chain sections in Round 10 form the angel’s wings.
- Block and stiffen the finished angel so it holds its shape.
Crochet Angel Instructions
Ch 4.
Round 1: Work 11 dc in the farthest ch from the hook. The skipped chs count as the first dc. Join in the top of the beginning ch — 12 sts.
Round 2: Ch 3 (counts as a dc here and throughout), work 1 dc in the same st as the join, work 2 dc in each remaining st around, join — 24 sts.
Round 3: Ch 3, work 1 dc in the next st and in each st around, join — 24 sts.
Round 4: Ch 3, work 1 dc in the next st and in each st around, join — 24 sts.
Round 5: Ch 2 (does not count as a st), dc2tog beginning in the same st as the join and around, join — 12 sts.
Add a small amount of fiberfill or part of a cotton ball to the head. Do not overstuff.
Round 6: Ch 3, work 1 dc in the same st as the join, work 2 dc in each st around, join — 24 sts.
Round 7: Ch 3, work 1 dc in the same st as the join, work 1 dc in the next st, *work 2 dc in the next st, work 1 dc in the next st; rep from * around, join — 36 sts.
Round 8: Ch 3, work 1 dc in the same st as the join, work 1 dc in each of the next 2 sts, *work 2 dc in the next st, work 1 dc in each of the next 2 sts; rep from * around, join — 48 sts.
Round 9: Ch 3, work 1 dc in the same st as the join, work 1 dc in each of the next 3 sts, *work 2 dc in the next st, work 1 dc in each of the next 3 sts; rep from * around, join — 60 sts.
Round 10: Ch 1 (does not count as a st), work 1 sc in the same st as the join and in each of the next 5 sts, *ch 3, skip the next st, work 1 sc in the next st; rep from * 8 more times, work 1 sc in each of the next 12 sts, **ch 3, skip the next st, work 1 sc in the next st; rep from ** 8 more times, work 1 sc in each of the final 6 sts, join — 42 sc and 18 ch-3 loops.
Round 11: Ch 1 (does not count as a st), work 1 sc in the same st as the join and in each of the next 5 sts. Skip the first group of 9 ch-3 loops and the 8 sc located between those loops. Work 1 sc in the sc immediately following the final ch-3 loop. Work 1 sc in each of the next 12 sts. Skip the second group of 9 ch-3 loops and the 8 sc located between those loops. Work 1 sc in the sc immediately following the final ch-3 loop. Work 1 sc in each of the final 6 sts, join — 26 sts.
Stitch Diagram for Rounds 9 Through 11
The stitch diagram below shows the placement of the wing loops and the stitches worked in Round 11.
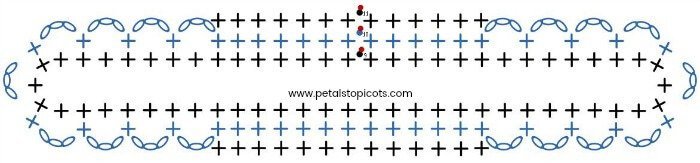
Beginning with Round 12, do not join the rounds. Work in a continuous spiral and use a stitch marker to identify the beginning of each round.
Round 12: Ch 1, work 1 sc in the same st as the join, ch 3, skip the next st, *work 1 sc in the next st, ch 3, skip the next st; rep from * around — 13 ch-3 loops.
Round 13: Ch 1, *work 1 sc in the next ch-3 sp, ch 4; rep from * around — 13 ch-4 loops.
Round 14: *Work 1 sc in the next ch-4 sp, ch 4; rep from * around — 13 ch-4 loops.
Round 15: Ch 1, *work 1 sc in the next ch-4 sp, ch 5; rep from * around — 13 ch-5 loops.
Round 16: *Work 1 sc in the next ch-5 sp, ch 5; rep from * around — 13 ch-5 loops.
Rounds 17 and 18: Repeat Round 16 — 13 ch-5 loops.
Sl st in the next ch-5 sp. Fasten off and weave in the ends.
Crochet Angel Halo
Ch 18 and join with a sl st in the farthest ch from the hook to form a ring. Be careful not to twist the chain.
Round 1: Ch 1 (does not count as a st), work 30 sc in the ring, join in the first sc — 30 sts.
Fasten off, leaving a long tail for sewing the halo to the angel’s head. Weave in the beginning tail.
Shaping and Stiffening the Crochet Angel
Use the long yarn tail to sew the halo securely to the back of the angel’s head.
Create a cone from wax paper, or wrap wax paper around a cone-shaped object. Place the angel over the cone and arrange the skirt and wings evenly.
Use a T-pin to hold the halo upright above the head. Apply fabric stiffener according to the manufacturer’s directions, shaping the wings and skirt as needed.
Allow the angel to dry completely before removing the pin and wax-paper form.
Add a thread loop if you would like to hang the finished angel on your Christmas tree.
More Lace Christmas Crochet Patterns
- Lace Crochet Christmas Baubles
- Woodland Christmas Tree Crochet Pattern
- Four Free Crochet Snowflake Patterns
- Star of Bethlehem Crochet Pattern
More Christmas Crochet Patterns
- Crochet Christmas Tree Skirt Pattern
- Peppermint Crochet Scrubby Pattern
- Fair Isle Snowflake Christmas Stocking Crochet Pattern
- Felted Santa Wine Bottle Tote Crochet Pattern
Find Community
I would love to see your finished projects; share them with me on Instagram, Facebook, or the Petals to Picots Community.


Since it appears both the head and ‘shawl’ instructions are correct. I’m going to try going that far then designing the bottom to fit over a toilet paper roll (painted white).
This pattern is way way off. If you can’t see the error, perhaps you should have someone else look at it
There appears to be an error on on row 11. If you skip over the chan 3 loops, the pattern looses the lovely chains. Could you please re look at your pattern and advise. Thank you
Flaws in the pattern. Starting with row 11. Needs to be looked at and rewritten. Maybe have testers fo the pattern before publishing.
Hi Deb, I reviewed the pattern from Row 11 on and I don’t see an error. What is it that isn’t adding up for you?
It’s round 10 that is the problem. When you first make the chain loops 8 times and sc in next 12 sts. That part is ok but after making the next 8 chain loops you only work in last 6 sts when round 11 has you working sc in next 12sts which there are not enough sts to do that.
I love the pattern and appreciate all the work you put in to design it. I am having trouble with Round 10 & 11. I have made the angel top several ties and cannot seem to make it look like her wings. Please help if possible. Blessings and thank you.