
I am ready to say goodbye to these cold dark winter days and hello to the Spring! So today I have a fun Springy Easter basket crochet pattern for you … a pretty flower basket to add a little color to your days or to decorate for Easter baskets for your little loves. Fill it with colorful crochet eggs or yummy Easter treats.
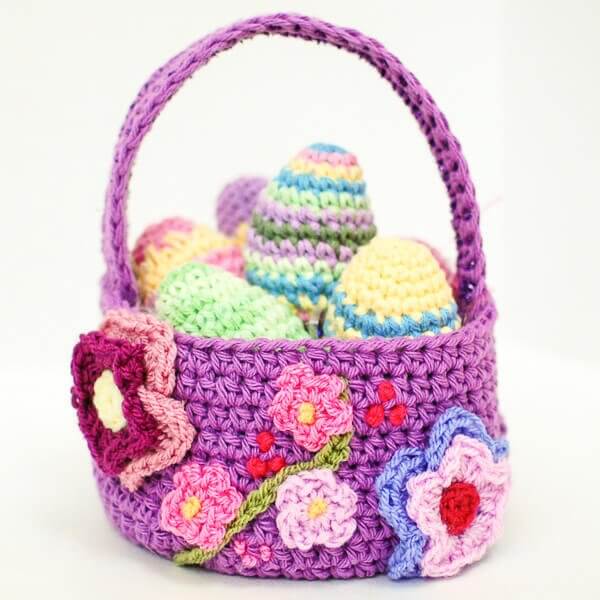
Spring Easter Basket Crochet Pattern
Here’s what you need:
- Worsted weight yarn for basket. Various colors from your stash for flowers
- H hook
- 3 pipe cleaners
- tapestry needle
Resources and tutorials you may find helpful in following this crochet pattern: Crochet Abbreviations, U.S. to U.K. Crochet Conversion Chart, How to Make a Magic Ring {photo & video tutorial}.
Add this pattern to your Ravelry library.
Basket is approx 6 in. wide × 3 in. tall. Handle length can be worked to your preference.
Basket
Make a magic ring (as an alternative to the magic ring, you can ch 4 and join with a slip stitch in furthest chain from hook to form a ring).
Round 1: Ch 2 (count as hdc here and throughout), work 7 hdc in ring, join — 8 sts.
Round 2: Ch 2, work 1 hdc in same st as join, work 2 hdc in next st and each st around, join — 16 sts.
Round 3: Ch 2, work 1 hdc in same st as join, 1 hdc in next, *2 hdcc in next st, 1 hdc in next, rep from * around, join — 24 sts.
Round 4: Ch 2, work 1 hdc in same st as join, 1 hdc in each of the next 2 stitches, *2 hdc in next st, 1 hdc in each of the next 2 sts, rep from * around, join — 32 sts.
Round 5: Ch 2, work 1 hdc in same st as join, 1 hdc in each of the next 3 stitches, *2 hdc in next st, 1 hdc in each of the next 3 sts, rep from * around, join— 40 sts.
Round 6: Ch 2, work 1 hdc in same st as join, 1 hdc in each of the next 4 stitches, *2 hdc in next st, 1 hdc in each of the next 4 sts, rep from * around, join — 48 sts.
Round 7: Ch 2, work 1 hdc in same st as join, 1 hdc in each of the next 5 stitches, *2 hdc in next st, 1 hdc in each of the next 5 sts, rep from * around, join — 56 sts.
Round 8: Ch 2, work 1 hdc in the back loop of the next st and each st around, join — 56 sts.
Rounds 9 through 16: Ch 2, working through both loops again, work 1 hdc in the next st and each st around, join — 56 sts.
Fasten off, weave in ends.
Handle
Sometimes handles can get floppy and for this project I didn’t want a droopy handle. So, to help achieve a nicely shaped handle, I crocheted over pipe cleaners that can be gently bent into shape and will keep that shape. Below I show you step by step how to do this. Of course you can also follow the same directions to make the handle without the pipe cleaners …
Start with a slip knot on your hook. Holding the knot at the top of the pipe cleaner, insert your hook under the pipe cleaner, pull the yarn to the front and up to the top of the pipe cleaner, yarn over and pull through both loops.
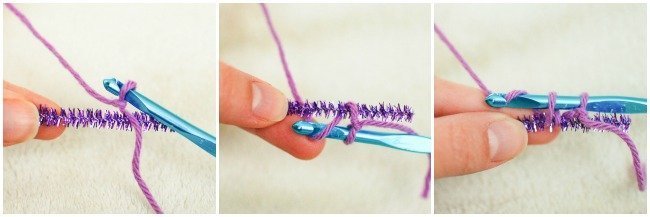
Continue crocheting across pipe cleaner until you reach the end. This is essentially our foundation chain. If you are not using the pipe cleaners, just chain the number of stitches that you want the length of your handle to be.
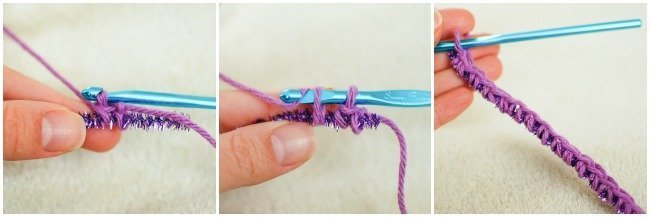
Round 1: Ch 1, turn, and work 1 sc in the back loop of each st across (see photo below), work 3 sc in the last st, do not turn; now work along opposite side working 1 sc in each unused loop across, work 2 sc in last loop and join to 1st sc of round.
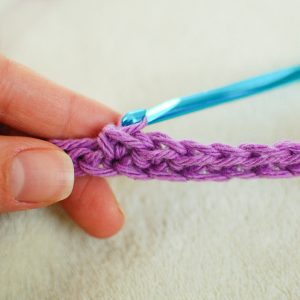
Round 2: Ch 1, work 2 sc in same st as join, line up another pipe cleaner on top of the stitches from the previous round and working over the pipe cleaner (see photo below), work 1 sc in each st across, work 2 sc, 1 sc, 2 sc around the corner; repeat for other side of round, work 2 sc, 1 sc around corner, join in 1st sc of round.
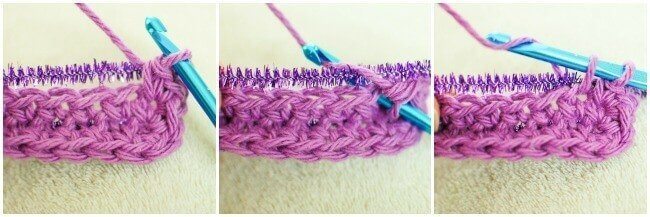
Now for my favorite part … decorating!
Layered Flower
Make a magic ring.
Round 1: Ch 1 (does not count as st here and throughout), work 10 sc in ring, join — 10 sts.
Round 2: Ch 1, beginning in same st as join work *1 sc, ch 2, skip next st, rep from * around, join — 5 ch-2 loops.
Round 3: *Work [2 hdc, 3 dc, 2 hdc] in ch-2 loop, Sl st in sc, rep from * around, ch 1, do not join — 5 back petals.
Round 4: If desired join new color, work [1 hdc, 3 dc, 1 hdc] in each skipped st from Round 2, join in 1st hdc of round — 5 front petals.
Fasten off leaving a long enough tail to sew flower to basket.
Round Center Accents
Make a magic ring.
Round 1: Ch 1, work 6 sc in ring, join — 10 sts.
Fasten off leaving a long enough tail to sew accent to flower.
Small Flower
Make a magic ring.
Round 1: Ch 1, *work 1 sc in ring, ch 3, repeat from * 4 more times, join — 5 ch-3 loop petals.
Fasten off leaving a long enough tail to sew flower to basket.

Your Easter basket is so cute – great idea with the pipe cleaners in the handle. Thanks for sharing your pattern. 🙂
Dear Kara, such a sweet cute and colorful basket! Would love to try the pipe cleaner idea..thanks a lot for that 🙂
So cute ! Thank you for the pattern !
If I could crochet, I’d have a go at making this ever so cute basket for a little Miss, Kara.
Hi Kara, What a lovely colourful, cheerful, happy basket!! I don’t have pipe cleaners, I think I will crochet around plastic tubing.
Regards.
Good Morning Kara, I’m hoping you have a bright, sunny, warm, and spring-like day in your neck of the woods! 🙂 Thank you so much for the basket pattern. I’ve just finished up several projects and was at a loss for what to start next. Your basket is the perfect solution. It’s so sweet! Pipe cleaners??? Who knew?? What a super idea! Thank you again, take care, penny x
I love when I see that someone is named Penny! I am making this basket for my 2 year old Penny Lane! : )
And yes, the pipe cleaners is genius!!!
Very nice!!! Thanks a lot for sharing the pattern :o)
Cute basket! Thanks for sharing! The idea of using pipe cleaners is very good:) I can use this idea for one of my WIPs where I was looking for firmness yet flexibility.
Kara, this is supercute!!! I must do it!
I need some colours after this winter. This basket is beautiful.
Lisa