
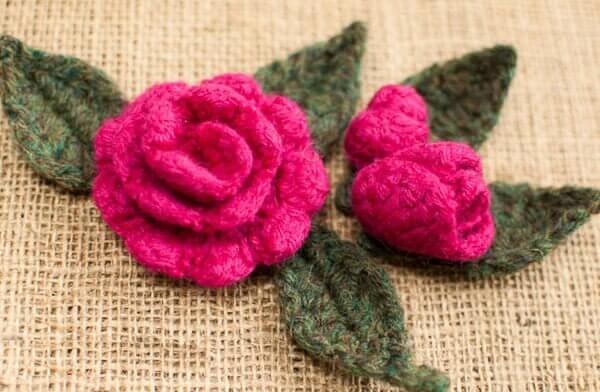
These easy crochet rosebud and leaf patterns are perfect for adding a handmade touch to wreaths, hats, bags, and other crochet projects. The pattern includes instructions for both a large and small rosebud, along with a simple crochet leaf.
I used my rosebuds and leaves to embellish this rustic burlap wreath along with the larger flower from my Crochet Rose Pattern. I love how the soft texture of the flowers looks against the natural burlap!
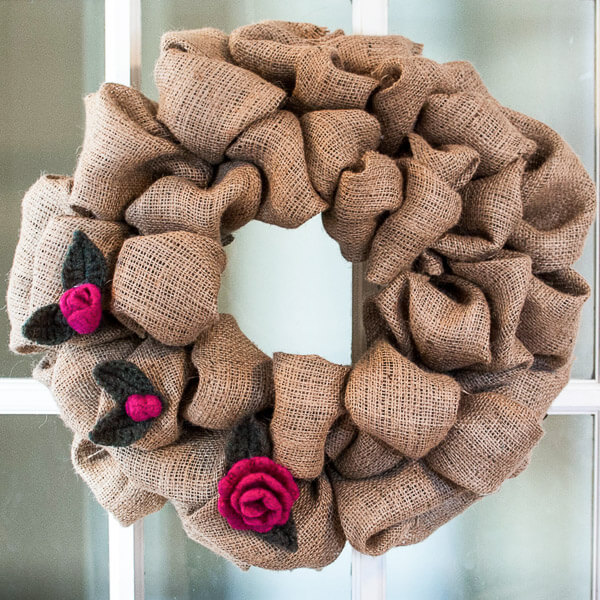
For my wreath, I crocheted the flowers with Cascade 220 wool yarn and felted them after crocheting. Felting gives the flowers a soft, dense texture and also helps them hold their shape.
You can use the rosebuds and leaves just as they are, though, so don’t worry if you don’t want to felt them!
Crochet Rosebud and Leaf Pattern
Pattern Details
- Skill level: Easy
- Yarn: Worsted-weight yarn
- Hook: 5 mm (US H-8)
- Construction: Rosebuds are worked flat and rolled into shape; leaf is worked around both sides of the foundation chain
- Optional: Use a feltable wool yarn if you would like to felt your finished flowers
Materials
- Worsted-weight yarn (wool yarn such as Cascade 220 if you want to felt your flowers)
- 5 mm (US H-8) crochet hook
- Yarn needle
- Scissors
See my Crochet Abbreviations Chart if you need help with any of the abbreviations used in this pattern.
Add this pattern to your Ravelry library.
Want a larger, open flower to go with your rosebuds? You can find the free Crochet Rose Pattern here.
Large Crochet Rosebud
Ch 15.
Row 1: Work 1 sc in 2nd ch from hook and each ch across — 14 sts.
Row 2: Ch 1 (does not count as st), work 2 sc in first st, 1 sc in next, 2 sc in next, 1 sc in next, 2 hdc in next, 1 hdc in next, 2 hdc in next, 1 hdc in next, 2 hdc in next, 1 hdc in next, 2 dc in next, 1 dc in next, 2 dc in next, 1 dc in last, turn — 21 sts.
Row 3: Ch 1 (does not count as st), work *1 sc in first st, 1 dc in next, 2 tr in next, 1 dc in next, 1 sc in next, rep from * across, work 1 sc in last st — 25 sts.
Fasten off, leaving a tail about 6 inches (15 cm) long. Now, roll the strip so it resembles a bud, and use a tapestry needle to weave the yarn tail through the bottom of your flower, making sure to go through all layers.
Small Crochet Rosebud
To make the small rosebud, follow Rows 1 and 2 of the Large Crochet Rosebud pattern.
Fasten off, leaving a tail about 6 inches (15 cm) long. Roll the strip into a small bud and use the yarn tail to secure all the layers together at the bottom.
Crochet Leaf
Ch 8.
Round 1: Work 1 sc in 2nd ch from hook, 1 hdc in next, 1 dc in next, 1 tr in next, 1 dc in next, 1 hdc in next, 1 sc in last ch, ch 4; working back along ch 4 just made, work 1 sl st in 2nd ch from hook and each of the next 3 ch; working along opposite side of foundation ch, work 1 sc, 1 hdc, 1 dc, 1 tr, 1 dc, 1 hdc, 1 sc in last ch, ch 2, sl st into 1st ch made to join.
Fasten off and weave in ends.
How to Make the Burlap Wreath
To make a simple burlap wreath like mine, you’ll need a wire wreath form and a roll of burlap ribbon. Gather the burlap into loose loops and work it around the wire wreath form, keeping the loops full and close together to create the fluffy, gathered look.
Once the wreath is covered, secure the ends of the burlap to the back of the frame. Arrange your crochet rosebuds, leaves, and large crochet rose where you’d like them, then securely attach them to the burlap or wire frame.
Felting Your Crochet Flowers
If you’d like the same soft, felted look as my flowers, be sure to crochet them with a feltable wool yarn. You can follow my How to Felt Knitting and Crochet tutorial for step-by-step instructions.
More Crochet Flower Patterns
- Crochet Rose Pattern: Learn How to Crochet a Rose Wreath!
- Sweet and Simple Crochet Flower Pattern
- Stacked Flower Crochet Pattern
- Swirl Flower Crochet Pattern – Embellish Anything!
- Spiral Flower Crochet Pattern


This is so gorgeous! I just cannot envision a burlap wreath coming out that pretty if I attempt it, though… I HATE working with that stuff! Haha. But seriously, I LOVE this!
Kara,
You always make such beautiful things and are so generous with your ideas! Thanks so much! I have been wanting a classy yet inexpensive wreath for my door for ages now. This is perfect–especially since it will do well in the weather!
Love your burlap wreath! Very pretty!
great job on your wreath. Came out pretty. Thanks for linking back my tutorial.
you are so talented and creative! You inspire me and I decided to follow you!
-nico
http://www.SatinAndSalt.com
Lovely rose buds, beautiful 🙂
I love the wreath, I love the rose bud! I am on a burlap craze right now and I must make one of these! Thank you so much for sharing this with everyone! I have a link party for recipes, crafts and Etsy shops – I would love it if you would bring this and any other crafts you would like to share! Thanks so much, see you there!Cynthia at
What a great combination! Nice job.
Would love to try this rosebud pattern. Thanks!
Kara, es fantástica, me encanta, me encanta.
Besos.