
Add a little vintage charm to your dining table with this free Retro-Chic Crochet Table Runner Pattern! Featuring a modern twist on the classic granny square, this design combines an open, lacy stitch pattern with two coordinating colors for a fresh take on retro style.
The runner is made from six crochet squares arranged in a 2-by-3 layout, then joined and finished with a simple three-round edging. It’s a lovely handmade accent for your dining room, kitchen table, or sideboard.
You can also customize the size by adding more squares or changing the arrangement to suit your space.
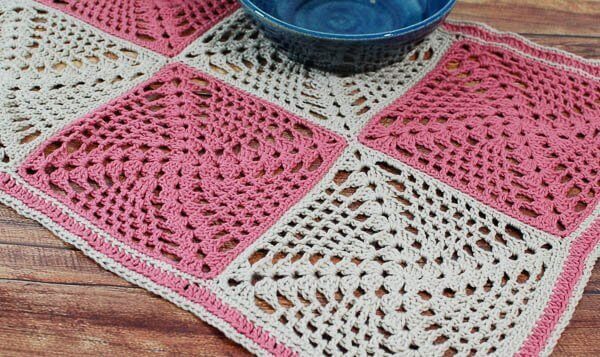
Free Crochet Table Runner Pattern
Pattern Details
- Skill level: Intermediate
- Yarn: Sport-weight cotton yarn in two colors
- Hook: US E / 3.5 mm crochet hook
- Finished size: Approximately 24 × 16 in. (61 × 41 cm)
- Construction: Six granny squares joined in a 2-by-3 arrangement, followed by a three-round edging
- Techniques: Working in the round, granny square construction, joining motifs, and back-loop-only stitches
Add this pattern to your Ravelry library.
Materials
- Sport-weight cotton yarn in two colors, approximately 136 yd (124 m) / 50 g of each color. I used Knit Picks Comfy Sport in Parchment and Peony.
- US E / 3.5 mm crochet hook
- Yarn needle
- Scissors
- Stitch markers (optional)
Color A (CA): Parchment
Color B (CB): Peony
Helpful Crochet Resources: See my Crochet Abbreviations, U.S. to U.K. Crochet Conversion Chart, and How to Crochet a Magic Ring tutorials for additional guidance.
Crochet Abbreviations
- CA = color A
- CB = color B
- ch = chain
- ch-sp = chain space
- dc = double crochet
- rep = repeat
- sc = single crochet
- sl st = slip stitch
- st(s) = stitch(es)
- BLO = back loop only
This pattern is written in U.S. crochet terms.
Pattern Notes
- Make three granny squares in each color for the six-square runner shown.
- You can make additional squares to create a longer or wider runner.
- Each square is worked in joined rounds.
- The beginning ch-3 counts as a double crochet in Round 1.
- In Rounds 2–8, the beginning sc and ch-2 together count as a double crochet.
- Follow the stitch diagram below for additional visual guidance.
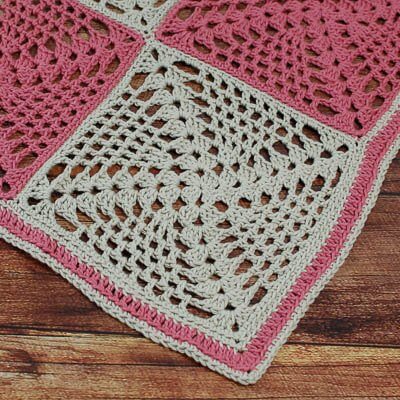
Retro-Chic Granny Square Instructions
Make 3 squares in CA and 3 squares in CB.
Make a magic ring. Alternatively, ch 4 and join with a sl st in the farthest chain from the hook to form a ring.
Round 1: Ch 3 (counts as dc), work 2 dc in ring, ch 3, *3 dc in ring, ch 3; rep from * twice more, join in top of beginning ch — 12 dc.
Round 2: Sl st in next 2 sts, work 1 sc in corner ch-sp and ch 2 (counts as dc here and throughout), work [2 dc, ch 3, 3 dc] in same corner ch-sp, ch 2, *work [3 dc, ch 3, 3 dc] in next corner ch-sp, ch 2; rep from * twice more, join in top of beginning ch — 24 dc.
Round 3: Sl st in next 2 sts, work 1 sc in corner ch-sp and ch 2, work [2 dc, ch 3, 3 dc] in same corner ch-sp, ch 2, work 3 dc in next ch-2sp, ch 2, *work [3 dc, ch 3, 3 dc] in next corner ch-sp, ch 2, work 3 dc in next ch-2sp, ch 2; rep from * twice more, join in top of beginning ch — 36 dc.
Round 4: Sl st in next 2 sts, work 1 sc in corner ch-sp and ch 2, work [2 dc, ch 3, 3 dc] in same corner ch-sp, ch 2, work 1 dc in next ch-2sp, ch 1, work 1 dc between the posts of the first 2 dc below, ch 1, work 1 dc between the posts of the last 2 dc below, ch 1, work 1 dc in next ch-2sp, ch 2, *work [3 dc, ch 3, 3 dc] in next corner ch-sp, ch 2, work 1 dc in next ch-2sp, ch 1, work 1 dc between the posts of the first 2 dc below, ch 1, work 1 dc between the posts of the last 2 dc below, ch 1, work 1 dc in next ch-2sp, ch 2; rep from * twice more, join in top of beginning ch — 40 dc.
Round 5: Sl st in next 2 sts, work 1 sc in corner ch-sp and ch 2, work [2 dc, ch 3, 3 dc] in same corner ch-sp, ch 2, work 1 dc in next ch-2sp, ch 1, *work 1 dc in next ch-1sp, ch 1; rep from * twice more, work 1 dc in next ch-2sp, ch 2, **work [3 dc, ch 3, 3 dc] in next corner ch-sp, ch 2, work 1 dc in next ch-2sp, ch 1, work 1 dc in next ch-1sp, ch 1 three times, work 1 dc in next ch-2sp, ch 2; rep from ** twice more, join in top of beginning ch — 44 dc.
Round 6: Sl st in next 2 sts, work 1 sc in corner ch-sp and ch 2, work [2 dc, ch 3, 3 dc] in same corner ch-sp, ch 2, work 1 dc in next ch-2sp, ch 1, *work 1 dc in next ch-1sp, ch 1; rep from * three more times, work 1 dc in next ch-2sp, ch 2, **work [3 dc, ch 3, 3 dc] in next corner ch-sp, ch 2, work 1 dc in next ch-2sp, ch 1, work 1 dc in next ch-1sp, ch 1 four times, work 1 dc in next ch-2sp, ch 2; rep from ** twice more, join in top of beginning ch — 48 dc.
Round 7: Sl st in next 2 sts, work 1 sc in corner ch-sp and ch 2, work [2 dc, ch 3, 3 dc] in same corner ch-sp, ch 2, work 1 dc in next ch-2sp, ch 1, *work 1 dc in next ch-1sp, ch 1; rep from * four more times, work 1 dc in next ch-2sp, ch 2, **work [3 dc, ch 3, 3 dc] in next corner ch-sp, ch 2, work 1 dc in next ch-2sp, ch 1, work 1 dc in next ch-1sp, ch 1 five times, work 1 dc in next ch-2sp, ch 2; rep from ** twice more, join in top of beginning ch — 52 dc.
Round 8: Sl st in next 2 sts, work 1 sc in corner ch-sp and ch 2, work [2 dc, ch 3, 3 dc] in same corner ch-sp, ch 2, work 1 dc in next ch-2sp, ch 1, *work 1 dc in next ch-1sp, ch 1; rep from * five more times, work 1 dc in next ch-2sp, ch 2, **work [3 dc, ch 3, 3 dc] in next corner ch-sp, ch 2, work 1 dc in next ch-2sp, ch 1, work 1 dc in next ch-1sp, ch 1 six times, work 1 dc in next ch-2sp, ch 2; rep from ** twice more, join in top of beginning ch — 56 dc.
Round 9: Ch 1 (does not count as st here and throughout), *work 1 sc in each of the next 3 dc, 3 sc in next corner ch-sp, 1 sc in each of the next 3 dc, 3 sc in next ch-2sp, 1 sc in each dc and ch-1sp across to next ch-2sp, 3 sc in next ch-2sp; rep from * three more times, join in top of first st — 120 sc.
Fasten off and weave in ends.
Retro-Chic Granny Square Stitch Diagram
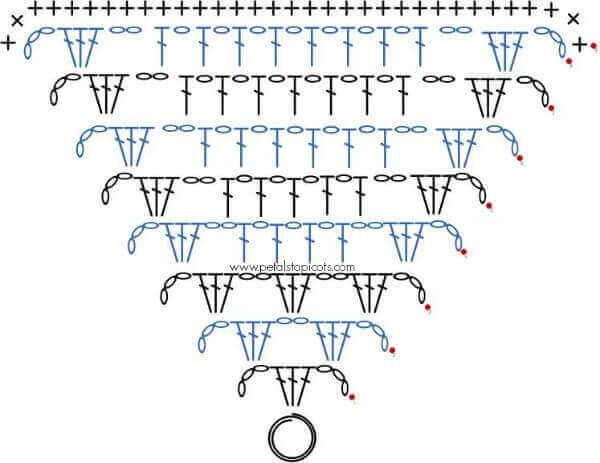
The stitch diagram shows a section of the granny square and can be used alongside the written instructions to follow stitch placement. If you’re new to reading crochet diagrams, refer to my Crochet Stitch Chart Symbols guide for help understanding the symbols.
Joining Your Granny Squares
Once you’ve completed all six squares, arrange them in two rows of three, alternating the colors for a staggered effect.
You can use your preferred joining method. For my runner, I held two squares together with right sides facing and slip stitched them together through the top loops only.
For step-by-step photos of this technique, see my Joining Crochet Squares tutorial.
Continue joining the squares until your runner is two squares high and three squares across, or use a different arrangement if you’re making a custom size.
Crochet Table Runner Edging
The edging is worked around the outside of the joined runner, alternating colors for a decorative finish.
Round 1: With right side facing, join CA in the back loop only of any stitch, ch 1, work 1 sc in the back loop only of each stitch around, working 3 sc in each corner space, join and fasten off.
Round 2: Join CB in the back loop of any st, ch 3, work 1 dc in the back loop only of each st around, working 3 dc in each corner space, join and fasten off.
Round 3: Join CA in the back loop only of any stitch, ch 1, work 1 sc in the back loop only of each stitch around, working 3 sc in each corner space, join and fasten off.
Weave in all remaining ends.
Block your finished runner if desired to help the squares lie flat and give the edges a neat, even appearance. See my How to Block Knit and Crochet Items tutorial for helpful tips.
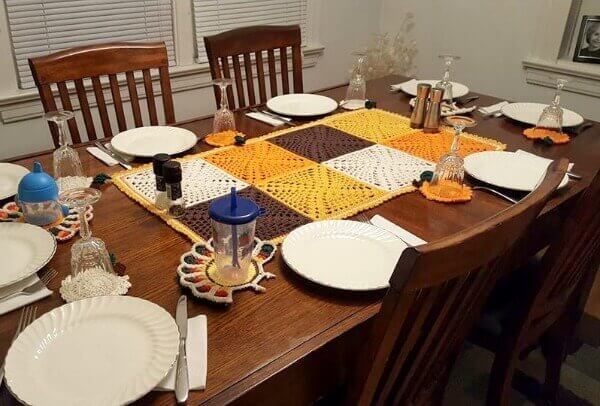
Reader-Made Retro-Chic Table Runner
Gorgeous finished runner by reader T. Duncan-Free. Photo shared with permission.
More Crochet Patterns for Dining & Decor
Looking for more handmade touches for your table? You might also enjoy these free patterns and projects:
- Crochet Centerpiece – Crochet Ball Pattern Included
- Free Crochet Potholder Pattern in 2 Sizes
- Crochet Edged Tea Towel Pattern
- Burlap and Crochet Place Settings

Any idea what kind of thread was used by T. Duncan on the table runner, would love to make this for fall.
What is the size of each square? Mine look so much smaller.
This is such a neat idea for a table runner – I love the twisted look of the afghan square! Made all in one color, two as you have done or multiple colors, this would be easy to make for any season or holiday and looks like it’ll work up fairly quickly. Pinned.
I am running a year long Granny-Spiration Challenge, and would love if you came and linked up with us 🙂 There’s also a crochet magazine giveaway going on right now. It can be found here: https://eyeloveknots.blogspot.com/2017/08/granny-square-tank-top-happily-hooked.html
I really like this AND I need a table runner!
Thank you for sharing this pattern.