
Transform an inexpensive pair of flip-flops into a one-of-a-kind accessory with this crochet flip-flops pattern and tutorial.
You will need a pair of inexpensive flip flops from your local pharmacy, dollar store, or even online, and then just grab some leftover yarn from your scrap pile and your hook and get started with the free crochet pattern below.
These crochet flip flops make for a super quick crochet project … you’ll be wearing your new flip flops in no time at all!

Crochet Flip Flops Pattern
Here’s what you need:
- a pair of inexpensive flip flops
- small amounts of worsted weight yarn (I prefer cotton yarn; see notes below)
- US H-8 / 5 mm crochet hook
- yarn needle and scissors for finishing
This free crochet pattern is written in U.S. crochet terms and abbreviations. Stitch counts are provided throughout the pattern to help you keep on track.
Helpful Crochet Resources: Refer to my Crochet Abbreviations and U.S. to U.K. Crochet Conversion Chart as you work through the pattern.
Notes:
- Although you can use any type of yarn to crochet the flip flops, I prefer using cotton yarn because it is cooler and more breathable in warmer weather.
- A reader emailed me with a great idea … she crocheted a back strap to her flips flops to create more of a sandal style! If you would like to give it a try too, here is what she said “join yarn to the third or fourth stitch from the flip flop sole on either side of the strap. Chain across (using your foot to get the correct length across back of your heel) and join in corresponding stitch on our side of strap.”
Add this pattern to your Ravelry library.
Crocheting the Flip Flop Strap
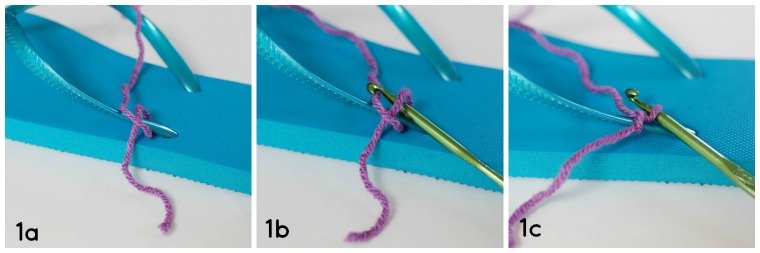
Step 1
To start, with the outer part of the flip flop facing you, wrap the yarn around the flip flop strap with the tail end facing you and underneath the skein end, forming a loop (a). Insert your hook through the loop (b) and pull the yarn through (c).
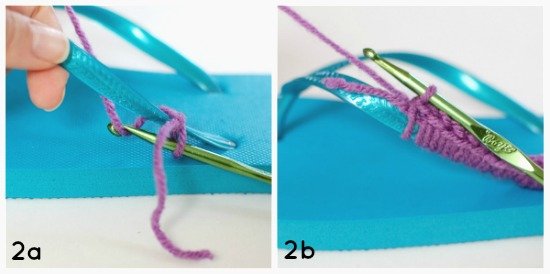
Step 2
To begin crocheting around the band of the flip flop, insert your hook under the band, pull the yarn to the front and up to the top of the band, yarn over and pull through both loops (a). Continue crocheting across band, working over the tail as you go (b).
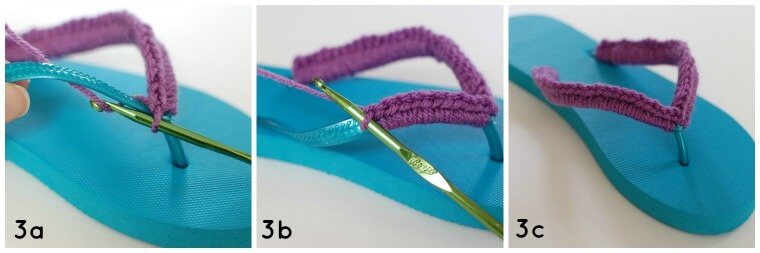
Step 3
When you reach the center, simply start again on the other side of the toe (a). Continue crocheting along other side until you reach the end of the band (b). Fasten off and weave in end (c).
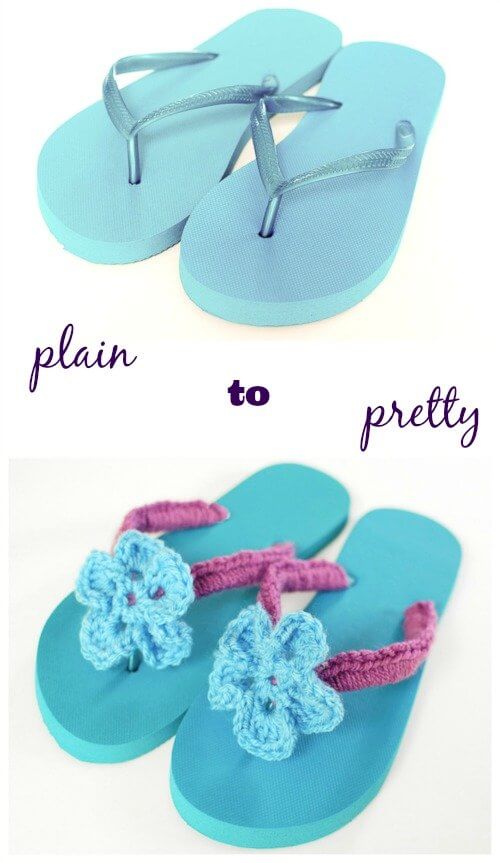
Lastly, show off your personal style by adorning your new flip flops to your taste. Try adding one of these free crochet flower patterns, glue on some shimmery rhinestones, or follow wherever your creativity leads.
Here is the pattern for the flower shown on the crochet flip flops above …
Flower
Ch 6, join in furthest chain from hook to form a ring.
Round 1: Ch 1 (not a stitch), *work 1 sc in ring, ch 4, rep from * 4 more times, join in 1st sc of round — 5 ch-4 spaces.
Round 2: Ch 3 (counts as dc here and throughout), work 5 dc in ch-4 space, ch 3, *Sl st in next sc, ch 3, 5 dc in ch-4 space, ch 3, rep from * 3 more times, join with a Sl st in same ch-4 space as last dc made. — 5 petals.
Fasten off, weave in ends.
Using a tapestry needle, sew flower to front of flip flop.
You may also enjoy …
- Free Crochet Slipper Pattern
- Easy Summer Crochet Bag
- Summer Spiral Crochet Coasters
- Solomon’s Knot Whisper Wrap Shawl


Oh my how cute and clever!! I LOVE it!! Totally featuring this at our party tomorrow morning. BTW I LOVE your media buttons! Cute grannies!
This is one of the cutest crochet ideas ever. Thanks for sharing at DIYbyDesign. I will be featuring this tonight at my Sizzle into Summer party (if you’re not okay with that, please let me know right away). Otherwise, please stop by and pick up an I’ve Been Featured button. Thanks so much.
Love this! Liz
Oh my goodness. Cutest floppy floppies I have seen in a while! Nice job!
So cute!
I love this project, so cute. Thanks for sharing the tutorial. Smiles, Paula
These are adorable!! I want to try this for my daughter!
Your Flip Flops are GORGEOUS!!!Saw it on Craft Junkie!!!
Migdalia
VERY stylish!! I would gladly sport these!
Thanks so much for sharing this at The DIY Dreamer.. From Dream To Reality!
You know I love that turquoise color!