
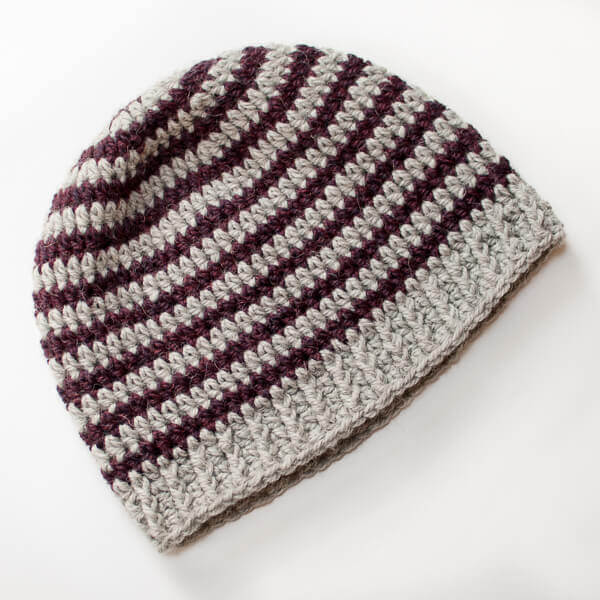
When I teach my Beyond Basics crochet classes, I like to incorporate fun projects to help students learn the techniques I cover. This basic striped crochet hat pattern is worked in half double crochets (hdc) and helps give my students a better understanding of gauge, working in the round, clean color changes, increasing, and creating a ribbed effect with post stitches. They get to learn all this while also creating something they can actually wear or give as a gift!
So whether you are trying to build on your basic crochet knowledge or just want a cute striped crochet hat, give this hdc hat pattern a go. The finished hat has a classic beanie-style fit with a simple ribbed edge. You may also like my one-color easy crochet hat pattern here.
About This Striped Crochet Hat Pattern
Pattern Details
- Skill level: Easy
- Yarn: Worsted-weight yarn in 2 colors
- Hook: 5 mm (US H-8)
- Gauge: 13 hdc × 11 rows = 4 in. (10 cm)
- Finished size: Approximately 20 in. (51 cm) circumference × 8 in. (20 cm) crown to brim
- Stitches: Half double crochet and front post double crochet
- Construction: Worked in the round from the crown down
- Size: Adult; easily adjusted using my Hat Sizing Guide
Supplies
- 2 colors worsted-weight yarn (shown here in Cascade 220)
- US H-8 / 5 mm crochet hook
- Tapestry needle and scissors
Helpful Crochet Resources: Refer to my Crochet Abbreviations and U.S. to U.K. Crochet Conversion Chart as you work through the pattern.
Add this pattern to your Ravelry library.
Notes
- I prefer starting rounds with a ch-1 followed by the first st of the round because I feel it leaves a less obvious “seam”; however, if you prefer the more traditional ch-2 start, count the ch-2 as a stitch and use it in place of the ch-1 and the first hdc (end-of-round stitch counts should remain the same).
- Choose one yarn as Color A (CA) and the second yarn as Color B (CB). Alternate colors as indicated throughout the pattern.
Abbreviations
CA = color A
CB = color B
ch = chain
FPdc = front post double crochet
hdc = half double crochet
rep = repeat
st(s) = stitch(es)
Special Stitch
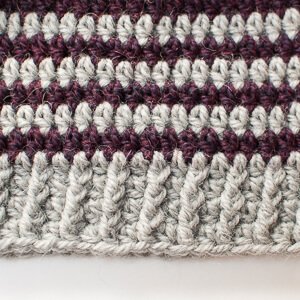
Front Post Double Crochet (FPdc): Yarn over and insert hook from the front around the back and to the front again around the post of the stitch in the previous round. Complete as a regular double crochet.
Striped Crochet Hat Instructions
With CA, make a magic ring (or, as an alternative to the magic ring, you can ch 2 and work Round 1 in the second ch from hook).
Round 1: Continuing with CA, ch 1 and work 8 hdc in ring; join in top of 1st hdc with CB, and tug tail gently to close the hole — 8 sts.
Round 2: Continuing with CB, ch 1 (does not count as st here and throughout; see note), work 2 hdc in same st as join and in each st around, join with CA — 16 sts.
Round 3: Continuing with CA, ch 1, work 2 hdc in same st as join, 1 hdc in next st, *2 hdc in next st, 1 hdc in next st, rep from * around, join with CB — 24 sts.
Round 4: Continuing with CB, ch 1, work 2 hdc in same st as join, 1 hdc in each of the next 2 sts, *2 hdc in next st, 1 hdc in each of the next 2 sts, rep from * around, join with CA — 32 sts.
Round 5: Continuing with CA, ch 1, work 2 hdc in same st as join, 1 hdc in each of the next 3 sts, *2 hdc in next st, 1 hdc in each of the next 3 sts, rep from * around, join with CB — 40 sts.
Round 6: Continuing with CB, ch 1, work 2 hdc in same st as join, 1 hdc in each of the next 4 sts, *2 hdc in next st, 1 hdc in each of the next 4 sts, rep from * around, join with CA — 48 sts.
Round 7: Continuing with CA, ch 1, work 2 hdc in same st as join, 1 hdc in each of the next 5 sts, *2 hdc in next st, 1 hdc in each of the next 5 sts, rep from * around, join with CB — 56 sts.
Round 8: Continuing with CB, ch 1, work 2 hdc in same st as join, 1 hdc in each of the next 6 sts, *2 hdc in next st, 1 hdc in each of the next 6 sts, rep from * around, join with CA — 64 sts.
Round 9: Continuing with CA, ch 1, work 1 hdc in the same st as the join and in each st around, join with CB — 64 sts.
Round 10: Continuing with CB, ch 1, work 1 hdc in same st as join and each st around, join with CA — 64 sts.
Rounds 11 through 18: Repeat Rounds 9 and 10. After completing Round 18, fasten off CB only.
Round 19: Continuing with CA, ch 1, work 1 hdc in same st as join and each st around, join — 64 sts.
Round 20: Ch 1, work 1 hdc in same st as join, 1 FPdc around next hdc, *1 hdc in next st, 1 FPdc around next, rep from * around, join — 64 sts.
Rounds 21 and 22: Ch 1, work 1 hdc in same st as join, 1 FPdc around next FPdc, *1 hdc in next st, 1 FPdc around next FPdc, rep from * around, join — 64 sts.
Fasten off and weave in ends.
More Crochet Hat Patterns
- Easy Crochet Hat Pattern for Beginners
- Little Sweetheart Child Hat Pattern
- Mod Cluster Stitch Crochet Hat Pattern
- O’Hara Hat Crochet Pattern
More Crochet Tutorials
Find Community
I would love to see your finished projects; share them with me on Instagram, Facebook, or the Petals to Picots Community.


Is there a video tutorial for the ribbing on the bottom…confused on where the stitches go
Never mind. …took me a couple tries but figured it out!
what did you do to figure it out?mine is still not right??
What is CB and CB?
Just finished this hat. It was easy quick and fun to make.I plan to make a few more for my daughters. I love wearing this of course I made a matching scarf
So glad you liked it, Debra 🙂
Thanks for this pattern! It’s my first time crocheting a hat and I used a wool yarn to make a nice beanie for my husband. I think I might make one for myself too 🙂
So glad you like it!
Thank you for the beautiful pattern, I featured it on my blog 🙂
Thanks so much for featuring me! I will be sure to share your post on my social media outlets!!
I just completed a hat from this pattern. It’s so cute, and I’m wearing it right now. I found an error, though, in the pattern. In the last 2 rows, you do fpdc around each fpdc and hdc in each hdc in order to get the ribbed look as shown in the picture. Otherwise, the stiches are staggered, which I don’t think is the intent.
You are correct … I updated the pattern to correct it 🙂 Thank you!
Where is the updated pattern shown then?
Cute pattern. I did change the ribbing tho’ I did fpdc around ea. fpdc and hdc in ea. hdc to get my ribs to line up.
I love this hat design, it’s just what I’ve been looking for. I’d really love to make a newborn size version of this hat, don’t suppose you have any tips for me on how best to do this? Thank you 🙂
Hi Rosie 🙂 This guide will help you work the pattern in any size you like. Just stop increases once your beginning circle measures what is indicated on the chart for newborns. Hope this helps! … http://www.petalstopicots.com/2015/09/hat-size-chart-for-preemie-through-adult-free-printable/
It waves as I crochet it
I take it you’re just carrying the two strands along the inside seam, rather than cutting the yarn for each transition? Every time I try this I end up with a very, VERY obvious seam, I’m not sure what I’m doing wrong…I take you have a guide for this sort of thing already, though, so I’m going to investigate!
Great pattern, my favorite hats are simple and clean like this one!
This is a lovely pattern ~ thanx for the generous share!!! My husband adores this sort of cap and though Ive tried several attempts in the past this one has exactly the look he prefers!!!!