
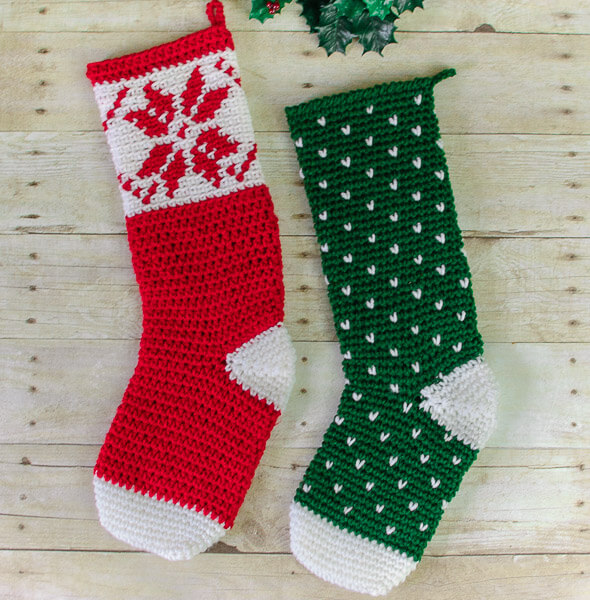
This free Fair Isle crochet Christmas stocking pattern features a festive snowflake design worked in red and white worsted-weight yarn. The colorwork pattern is created from a chart using simple single crochet stitches worked through the back loops.
The finished stocking measures approximately 18½ in. (47 cm) long × 5½ in. (14 cm) wide. It is designed to hang neatly from a mantel rather than fit like a conventional sock, making it a beautiful handmade addition to your Christmas decorations.
Make one snowflake stocking as a holiday keepsake or pair it with my coordinating Evergreen Crochet Christmas Stocking Pattern for a matching mantel display.

Fair Isle Snowflake Christmas Stocking Crochet Pattern
Pattern Details
- Skill level: Intermediate
- Yarn: Worsted-weight yarn
- Yardage: Approximately 218 yd (199 m) of each color
- Hook: 5 mm (US H-8)
- Finished size: Approximately 18½ in. (47 cm) long × 5½ in. (14 cm) wide
- Gauge: 14 hdc and 9 rounds = approximately 4 in. (10 cm)
- Construction: Worked from the toe upward in joined rounds, with the heel added afterward
- Colorwork: Worked from a Fair Isle snowflake chart
Supplies
- Approximately 218 yd (199 m) white worsted-weight yarn
- Approximately 218 yd (199 m) red worsted-weight yarn, such as Knit Picks Brava Worsted
- 5 mm (US H-8) crochet hook
- Stitch markers, optional
- Tapestry needle
- Scissors
Resources and tutorials you may find helpful in following this crochet pattern: Crochet Abbreviations, U.S. to U.K. Crochet Conversion Chart, and How to Seamlessly Change Colors in Crochet.
Crochet Abbreviations
- BLO = back loop only
- CA = color A
- CB = color B
- ch = chain
- hdc = half double crochet
- rep = repeat
- rev sc = reverse single crochet
- sc = single crochet
- sc2tog = single crochet 2 stitches together
- sc3tog = single crochet 3 stitches together
- sl st = slip stitch
- st(s) = stitch(es)
This pattern is written in U.S. crochet terms.
Color Key
- CA: White
- CB: Red
Pattern Notes
- The stocking is designed to lie neatly when hung and is not shaped like a conventional wearable sock.
- The stocking begins at the toe and is worked upward in joined rounds.
- The heel opening is created in Round 20, and the heel is completed after the stocking body.
- The beginning ch-1 does not count as a stitch.
- The beginning ch-2 counts as the first hdc where indicated.
- Join each round with a sl st unless otherwise instructed.
- Work the Fair Isle section in the back loops only.
- Change colors during the final yarn over of the stitch immediately before the new color begins.
- Carry the unused color loosely along the inside of the stocking. Avoid pulling the carried strand tightly because this can distort the snowflake design.
- Stitch counts are provided at the end of each round.
Crochet Stocking Instructions
Toe
With CA, ch 11.
Round 1: Work 2 sc in the 2nd ch from the hook, work 1 sc in each of the next 8 chs, and work 4 sc in the final ch. Rotate the work to continue along the opposite side of the foundation ch. Work 1 sc in each of the next 8 chs and 2 sc in the final ch. Join with a sl st in the first sc — 24 sts.
Round 2: Ch 1, work 2 sc in the first st, work 1 sc in each of the next 10 sts, work 2 sc in each of the next 2 sts, work 1 sc in each of the next 10 sts, and work 2 sc in the final st. Join — 28 sts.
Round 3: Ch 1, work 1 sc in each st around, join — 28 sts.
Round 4: Ch 1, work 2 sc in the first st, work 1 sc in each of the next 12 sts, work 2 sc in each of the next 2 sts, work 1 sc in each of the next 12 sts, and work 2 sc in the final st. Join — 32 sts.
Round 5: Ch 1, work 1 sc in each st around, join — 32 sts.
Round 6: Ch 1, work 2 sc in the first st, work 1 sc in each of the next 14 sts, work 2 sc in each of the next 2 sts, work 1 sc in each of the next 14 sts, and work 2 sc in the final st. Join — 36 sts.
Round 7: Ch 1, work 1 sc in each st around, join — 36 sts.
Drop CA but do not fasten off. Carry CA upward inside the stocking.
Foot
Round 8: Join CB, ch 2 (counts as the first hdc), work 1 hdc in each of the next 35 sts, join in the top of the beginning ch-2 — 36 sts.
Rounds 9 through 19: Ch 2, work 1 hdc in each of the next 35 sts, join in the top of the beginning ch-2 — 36 sts.
Heel Opening
Round 20: Ch 1, work 1 sc in the first st, ch 18, skip the next 18 sts for the heel opening, work 1 sc in the next st, and work 1 hdc in each of the remaining 16 sts. Join — 36 sts and chs.
Leg
Leave the skipped heel stitches unworked for now. Continue around the stitches and chains from Round 20.
Round 21: Ch 2 (counts as the first hdc), work 1 hdc in each of the next 35 sts and chs, join in the top of the beginning ch-2 — 36 sts.
Rounds 22 through 33: Ch 2, work 1 hdc in each of the next 35 sts, join in the top of the beginning ch-2 — 36 sts.
Drop CB but do not fasten off. Carry CB upward inside the stocking.
Fair Isle Snowflake Chart
Work all stitches in the colorwork section through the back loops only. Change colors during the final yarn over of the stitch before the new color begins.
Round 34: Join CA in the center stitch on the back of the stocking. Ch 1, work 1 sc in each st around, join — 36 sts.
Rounds 35 through 47: Work 1 sc in the BLO of each st around, following the color changes shown in the chart — 36 sts.
Read the chart from the bottom upward, working one horizontal chart row for each round. Because the snowflake design is symmetrical, you may read each row from right to left or left to right. Choose one direction and use it consistently.

Round 48: With CA, ch 1, work 1 sc in the BLO of each st around, join — 36 sts. Fasten off CA.
Round 49: Join CB, ch 2 (counts as the first hdc), work 1 hdc in each of the next 35 sts, join in the top of the beginning ch-2 — 36 sts.
Round 50: Working backward in the opposite direction from the previous round, work 1 rev sc in each st around — 36 sts.
Fasten off and weave in the ends.
Crochet Stocking Heel
Join CA in the first skipped stitch from Round 20.
Heel Round 1: Ch 1, sc2tog, work 1 sc in each of the next 14 sts, and sc2tog. Rotate to work in the unused bottom loops of the ch-18 from Round 20. Sc2tog, work 1 sc in each of the next 14 chs, and sc2tog. Join in the first st — 32 sts.
Heel Round 2: Ch 1, sc2tog, work 1 sc in each of the next 12 sts, sc2tog, sc2tog, work 1 sc in each of the next 12 sts, and sc2tog. Join — 28 sts.
Heel Round 3: Ch 1, sc2tog, work 1 sc in each of the next 4 sts, sc2tog, work 1 sc in each of the next 4 sts, sc2tog, sc2tog, work 1 sc in each of the next 4 sts, sc2tog, work 1 sc in each of the next 4 sts, and sc2tog. Join — 22 sts.
Heel Round 4: Ch 1, sc2tog, work 1 sc in each of the next 7 sts, sc2tog, sc2tog, work 1 sc in each of the next 7 sts, and sc2tog. Join — 18 sts.
Heel Round 5: Ch 1, sc2tog, work 1 sc in each of the next 5 sts, sc2tog, sc2tog, work 1 sc in each of the next 5 sts, and sc2tog. Join — 14 sts.
Heel Round 6: Ch 1, sc2tog, sc3tog, sc2tog, sc2tog, sc3tog, and sc2tog. Join — 6 sts.
Fasten off, leaving a long yarn tail. Thread the tail onto a tapestry needle and sew the remaining heel opening closed. Secure the yarn and weave in the ends.
Hanging Loop
Join CB at the top corner of the stocking. Ch 10 and sl st in the same st where the yarn was joined to form the hanging loop.
Fasten off and weave in the ends securely.

Make a Coordinating Christmas Stocking Set
Pair your red-and-white snowflake stocking with the Evergreen Crochet Christmas Stocking Pattern for a coordinating handmade display.
More Christmas Crochet Patterns
- Cone Christmas Tree Crochet Patterns
- Christmas Crochet Patterns: From Dining to Décor
- Felted Santa Wine Bottle Tote Crochet Pattern
- Crochet Gift Card Holder Patterns
- Peppermint Crochet Scrubby Pattern


Row 34,35 and 36 were repeated and did not make sense. I finally figured out that the last three rows should be numbered 48,49 and 50. Beautiful pattern though.
Which way are we suppose to follow the chart?
I followed it from left to right but it should work out fine from either way.
It’s a little confusing. I’m right handed, so I go right to left and I just wanted to know what to do.