
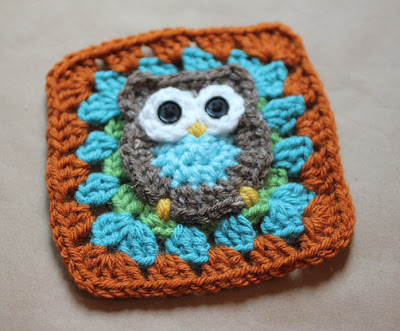
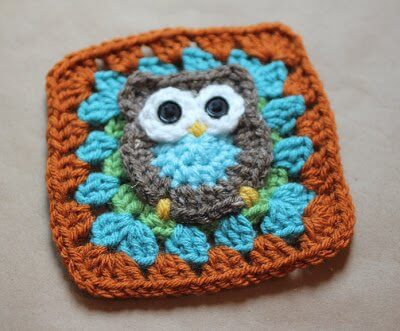
This free owl granny square pattern combines a cute crochet owl with a traditional granny-square border. Use the finished squares to make an owl blanket, pillow, tote bag, bunting, or other colorful crochet project.
The owl is crocheted first as a round appliqué with pointed ears. Chain spaces are then added to the back of the motif so the granny-stitch border can be worked around it. Finish the owl with crocheted eyes and embroidered feet and beak.
This guest pattern was designed by Sarah of Repeat Crafter Me, who generously shared it here during Granny Square Month.
About This Guest Crochet Pattern
Sarah originally designed this owl granny square after searching for a similar pattern and deciding to create her own. The owl can also be used by itself as a crochet appliqué.
Sarah later used her finished squares to make an adorable crochet owl bunting.
The pattern instructions below are Sarah’s original design, shared here with permission. I have added headings, pattern details, and a few explanatory notes to make the post easier to follow.
Owl Granny Square Pattern
Pattern Details
- Skill level: Intermediate
- Yarn: Worsted-weight yarn
- Hook: 4.25 mm (US G-6)
- Finished size: Varies depending on yarn, hook, and tension
- Construction: The owl is crocheted first, followed by granny-stitch rounds worked from chain spaces attached to the back
- Gauge: Not specified
Supplies
- Worsted-weight yarn in your desired colors; the original sample used Vanna’s Choice
- 4.00 mm (US G-6) crochet hook
- Yarn needle
- Small black buttons no larger than ½ in. (1.3 cm) for the eyes
- Small amount of yellow yarn for the beak and feet
- Scissors
- Blocking mat and rustproof pins, optional
Resources and tutorials you may find helpful in following this crochet pattern include Crochet Abbreviations, the U.S. to U.K. Crochet Conversion Chart, and How to Make a Magic Ring.
Crochet Abbreviations
- ch = chain
- dc = double crochet
- hdc = half double crochet
- sc = single crochet
- sl st = slip stitch
- sp(s) = space(s)
- st(s) = stitch(es)
- tc = triple crochet
This pattern is written in U.S. crochet terms.
Pattern Notes
- The owl motif is made first.
- Round 4 forms the owl’s ears and the top of its head. It is worked across only part of Round 3 rather than all the way around.
- The chain spaces for the granny-square border are attached to the back of the owl.
- Work clockwise when adding the chain spaces.
- Block the owl motif before adding the square border if it begins to curl.
- The original design uses small black buttons for the eyes. If the finished project is intended for a baby or young child, embroider the eyes securely with black yarn instead of using buttons.
Crochet Owl Motif
Start by making your owl. This pattern would also make a great appliqué!
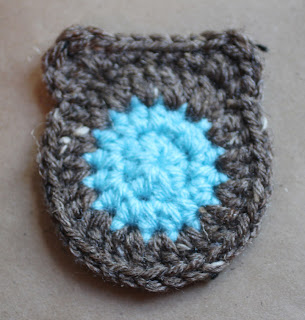
Round 1: Magic Ring, Chain 1, 8 HDC in magic ring, join to first HDC, chain 1
Round 2: 2 HDC in each around, join to first HDC, change color (16 HDC)
Round 3: Chain 2, 2 DC in each around, join to first DC, chain 1 (32 DC)
Round 4: HDC, in next stitch: DC – TC – DC, SC in next 5, in next stitch: DC – TC – DC, HDC in next, slip stitch to join.
Fasten off, weave in ends.
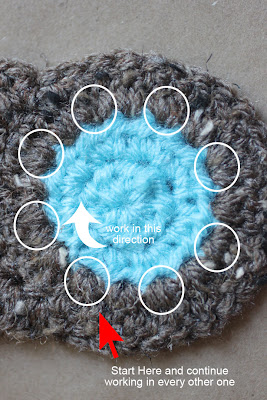
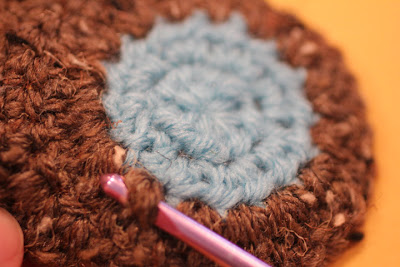
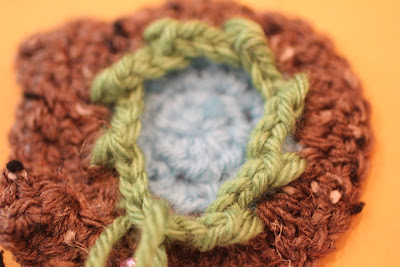
Turn owl over. You are going to be attaching a series of chain 3s where the brown DCs join the pink (see picture). It’s best to start to the right of the ear. Be sure to work clockwise (see photo). To start, draw your hook under the bottom of the DC, chain 3. Now skip every other DC. So your pattern should look like this:
SC and chain 3, skip one, SC and chain 3, skip one, SC and chain 3, all the way around. In the end, you will end up with 8 places where you have connected with SC’s and 8 chain-3 spaces. Slip stitch to join to the bottom of the first chain 3.
Editor’s note: The original instruction says to skip every other dc, but Round 3 contains 32 dc and this step requires 8 ch-3 spaces. To create the stated count, distribute the 8 sc and ch-3 attachments evenly around the circle—one attachment every 4 dc.
Adding the Granny Square Border
First Granny Square Round
Now working inside your chain 3 spaces…
Chain 3 – 2 DC – Chain 1 – 3 DC all in same space, Chain 1, 3 DC in next space, Chain 1, *3 DC – Chain 1 – 3 DC all in same space, Chain 1, 3 DC in next space, Chain 1, *Around, slip stitch to join to the top of the first chain 3, fasten off.
Second Granny Square Round
With new color and starting in corner space…
Chain 3 – 2 DC – Chain 1 – 3 DC all in same space, Chain 1, 3 DC in next space, Chain 1, 3 DC in next space, Chain 1, *3 DC – Chain 1 – 3 DC all in same space, Chain 1, 3 DC in next space, Chain 1, 3 DC in next space, Chain 1, rep from * around, slip stitch to join to the top of the first chain 3, fasten off.
Third Granny Square Round
With new color and starting in corner space…
Chain 3 – 2 DC – Chain 1 – 3 DC all in same space, Chain 1, 3 DC in next space, Chain 1, 3 DC in next space, Chain 1, 3 DC in next space, Chain 1, *3 DC – Chain 1 – 3 DC all in same space, Chain 1, 3 DC in next space, Chain 1, 3 DC in next space, Chain 1, 3 DC in next space, Chain 1, rep from * around, slip stitch to join to the top of the first chain 3, fasten off, weave in all ends.
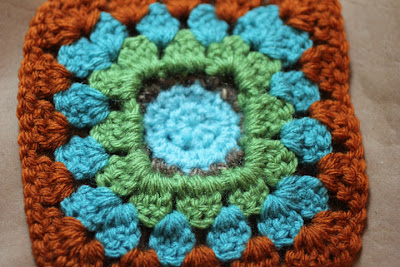
This is what the backside of your granny square should look like:
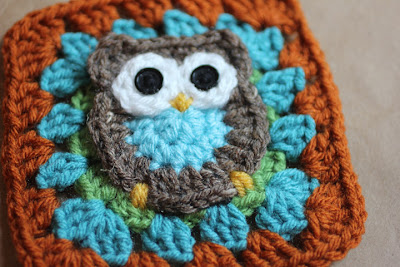
Now you can add the embellishments to the owl.
Adding the Owl’s Eyes
Magic Ring, Chain 1, 8HDC in magic ring, join to first HDC, fasten off leaving a long tail to sew on.
Sew on no larger than 1/2″ black buttons in the middle for eyes.
Embroidering the Beak and Feet
Sew on yellow yarn with tapestry needle. Loop the yarn through 3 times to make both the feet and beak.
Finishing the Granny Square
Weave in any remaining yarn ends securely.
Gently shape the owl and the surrounding granny-square border. Block the finished square if desired so the corners lie evenly.
How to Use Your Finished Owl Square
Use your finished owl granny square to make:
- A crochet owl blanket
- A decorative pillow
- An owl bunting or garland
- A tote bag
- A wall hanging
- A nursery decoration
- An appliqué for another crochet project
Many thanks to Sarah of Repeat Crafter Me for designing this adorable owl granny square and sharing it with Petals to Picots! The pattern and photographs are Sarah’s original work and are used with permission.
If you have questions about the original design, visit the Owl Granny Square Crochet Pattern on Repeat Crafter Me.
More Crochet Square Patterns
- Classic Crochet Granny Square Pattern
- Cluster Burst Granny Square Pattern
- Daisy Afghan Square Crochet Pattern
- Dahlia Bloom Afghan Square Crochet Pattern
- Aubrieta Bloom Afghan Square Crochet Pattern
- Caterpillar Square Crochet Pattern
- Heart Granny Square Crochet Pattern
- Browse More Crochet Square Patterns


I LOVE owls and this pattern is very cute. My first square turned out amazing! I’m gonna add it to the hippie granny square curtain I’m making for my kitchen window. Just a tiny bit of critique:
The instruction on where exactly to start the first row on the backside of the owl could have been clearer, the photo doesn’t help either. I just tried until I got it right. And I recommend blocking the owl before attatching, it curled up a lot.
Thanks so much for giving us this sweet pattern for free!
Hi, please can anyone help me with round 4?
If I understand right, there is 1 hdc, then (1dc, 1 tr, 1dc)in next st, then 5 sc, then again (1dc 1 tr 1 dc) in a st, then 1 hdc. This makes 9 stitches total, out of the 32 of previous round. What am I missing?
Thank you!
It looks to me that round 4 are the ears of the owl so you won’t be going all the way around the circle.
I love this pattern. My sister collects owls and I am anxious to make something for her with this pattern. Maybe a tote bag or kitchen set. Thank you so much for sharing you talent. It is beautiful.
So cute! This is going to become a pocket on a knit cardigan I bought before noticing it lacked pockets. I think sewing on some squares with happy little owls on them should serve. I might end up having to add a few rows to get it the size I need, but that shouldn’t be an issue
I really like this its really good creativity thanks for sharing
Hey I love this pattern but not sure on how to make it because I can’t understand the instructions and just starting to learn so are the any ways on how to do the stitches and an easier way to make this.
Just practice with easier patterns until you are comfortable with intermediate patterns like this one. It’s really just a matter of practice. 🙂
I would love to make a blanket for my grandchild. The baby is due in December. Please consider making a video. That’s the only way I can learn.
I’m sorry … I don’t think there is a video as of yet 🙂
Just LOVE this owl! I took the owl part of the pattern and made them in 3 sizes for magnet toppers, and key chains add-ons on a fob for Christmas for all my female family and friends! They were very well received… And then their friends wanted some! Lol I can make that owl in my sleep now ..Ha! My last adaption was a precious baby toy. I made it 3 dementional and added short interwoven rings above head for baby to grab ahold of, and sewed inside jingle bells for added charm!
Thank you so much for sharing this adorable pattern!!!
Awww … such cute ideas!
I have just made a pillow using this beautiful granny square, and it turned out pretty cute. Thanks to Sarah for this fabulous tutorial! 🙂
You can see my pillow here: http://dada4you.blogspot.com/2013/09/crochet-owl-pillow.html
It is so beautiful!
So cute!