
These easy crochet rosebud and leaf patterns are perfect for adding a handmade touch to wreaths, hats, bags, and other crochet projects. The pattern includes instructions for both a large and small rosebud, along with a simple crochet leaf.
I used my rosebuds and leaves to embellish this rustic burlap wreath along with the larger flower from my Crochet Rose Pattern. I love how the soft texture of the flowers looks against the natural burlap!
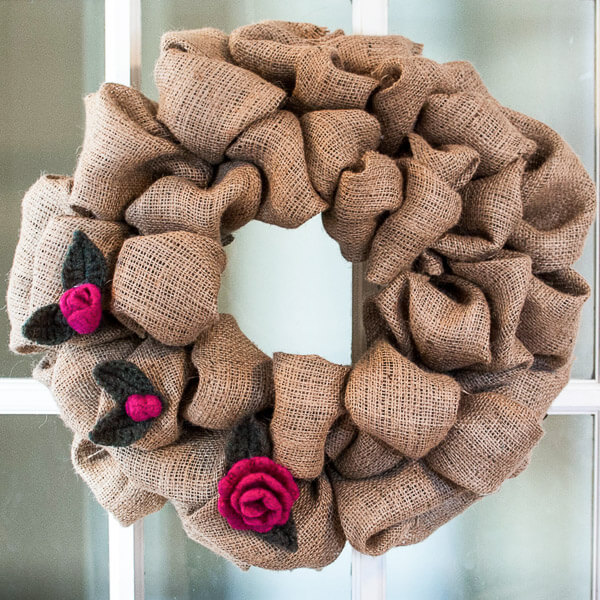
For my wreath, I crocheted the flowers with Cascade 220 wool yarn and felted them after crocheting. Felting gives the flowers a soft, dense texture and also helps them hold their shape.
You can use the rosebuds and leaves just as they are, though, so don’t worry if you don’t want to felt them!
Crochet Rosebud and Leaf Pattern
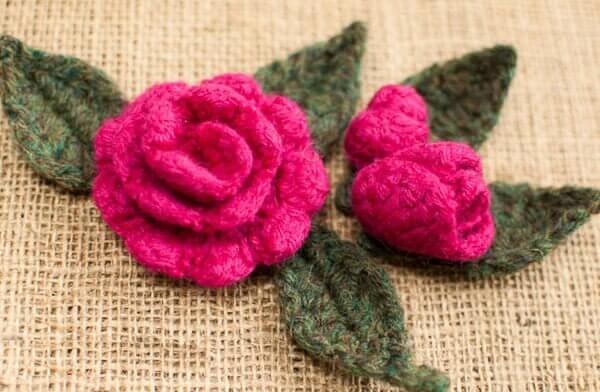
Pattern Details
- Skill level: Easy
- Yarn: Worsted-weight yarn
- Hook: 5 mm (US H-8)
- Construction: Rosebuds are worked flat and rolled into shape; leaf is worked around both sides of the foundation chain
- Optional: Use a feltable wool yarn if you would like to felt your finished flowers
Materials
- Worsted-weight yarn (wool yarn such as Cascade 220 if you want to felt your flowers)
- 5 mm (US H-8) crochet hook
- Yarn needle
- Scissors
See my Crochet Abbreviations Chart if you need help with any of the abbreviations used in this pattern.
Add this pattern to your Ravelry library.
Want a larger, open flower to go with your rosebuds? You can find the free Crochet Rose Pattern here.
Large Crochet Rosebud
Ch 15.
Row 1: Work 1 sc in 2nd ch from hook and each ch across — 14 sts.
Row 2: Ch 1 (does not count as st), work 2 sc in first st, 1 sc in next, 2 sc in next, 1 sc in next, 2 hdc in next, 1 hdc in next, 2 hdc in next, 1 hdc in next, 2 hdc in next, 1 hdc in next, 2 dc in next, 1 dc in next, 2 dc in next, 1 dc in last, turn — 21 sts.
Row 3: Ch 1 (does not count as st), work *1 sc in first st, 1 dc in next, 2 tr in next, 1 dc in next, 1 sc in next, rep from * across, work 1 sc in last st — 25 sts.
Fasten off, leaving a tail about 6 inches (15 cm) long. Now, roll the strip so it resembles a bud, and use a tapestry needle to weave the yarn tail through the bottom of your flower, making sure to go through all layers.
Small Crochet Rosebud
To make the small rosebud, follow Rows 1 and 2 of the Large Crochet Rosebud pattern.
Fasten off, leaving a tail about 6 inches (15 cm) long. Roll the strip into a small bud and use the yarn tail to secure all the layers together at the bottom.
Crochet Leaf
Ch 8.
Round 1: Work 1 sc in 2nd ch from hook, 1 hdc in next, 1 dc in next, 1 tr in next, 1 dc in next, 1 hdc in next, 1 sc in last ch, ch 4; working back along ch 4 just made, work 1 sl st in 2nd ch from hook and each of the next 3 ch; working along opposite side of foundation ch, work 1 sc, 1 hdc, 1 dc, 1 tr, 1 dc, 1 hdc, 1 sc in last ch, ch 2, sl st into 1st ch made to join.
Fasten off and weave in ends.
How to Make the Burlap Wreath
To make a simple burlap wreath like mine, you’ll need a wire wreath form and a roll of burlap ribbon. Gather the burlap into loose loops and work it around the wire wreath form, keeping the loops full and close together to create the fluffy, gathered look.
Once the wreath is covered, secure the ends of the burlap to the back of the frame. Arrange your crochet rosebuds, leaves, and large crochet rose where you’d like them, then securely attach them to the burlap or wire frame.
Felting Your Crochet Flowers
If you’d like the same soft, felted look as my flowers, be sure to crochet them with a feltable wool yarn. You can follow my How to Felt Knitting and Crochet tutorial for step-by-step instructions.
More Crochet Flower Patterns
- Crochet Rose Pattern: Learn How to Crochet a Rose Wreath!
- Sweet and Simple Crochet Flower Pattern
- Stacked Flower Crochet Pattern
- Swirl Flower Crochet Pattern – Embellish Anything!
- Spiral Flower Crochet Pattern


7/4/24 HowDeeee Happy 4th of July! I’ve been looking for a good rose and rosebud pattern and I came across this as I was looking for ideas and a great bud pattern to be using as I’m going to be designing and crocheting my youngest sisters wedding bouquet and veil for her wedding in mid August this year. I am planning to use both patterns to create with. Looking forward to working through my project (& future one’s). Thanks and God Bless you!!
Love your patter, they came out perfect. Thank you so much!
MUY HERMOSO!!
Thank you!
i’m an experienced crochetersite! and mine looked nothing like the rose shown in picture! i’ll try another
What a wonderful rose bud pattern. I can’t wait to try it out!
Thanks so much, Jennifer 🙂
Anyone tried this pattern? Left me hanging…..pleases explain….did I make a wrong turn some where?
Which part are you having trouble with, Treasa? I’d be happy to help 🙂
What are the instructions for after fasten off? I have a flat piece.
Hi Sidney 🙂 Here are the instructions after Row 3: Fasten off leaving a tail of about 6 inches. Now, roll the strip so that it resembles a bud and use a tapestry needle to weave your 6-in. tail through the bottom of your flower, making sure to go through all layers of the flower.
Thank you
I can’t get to the pattern for the rose. It said to click ‘here’ but it didn’t work. I want to do the whole pattern with the buds and rose. It is just beautiful. I love the BL wreath. Thought this would be cute on hats too.
Betty
Hi Betty 🙂 So glad you like it! You can find the rose pattern here: http://www.petalstopicots.com/2013/01/rose-pattern/
Kara, I love these rose and rose bud pattern! 🙂 I noticed the link for the heart shaped wreath says Page Not Found. Just thought I’d give you the head’s up.
Thanks so much for letting me know, Sharleen! I fixed the link 🙂
I have been looking for a rose bud pattern like this. The roses I have been doing kind-of look like other kind of flowers, even though they are pretty just not as pretty as these are.
Thank you, Terry 🙂