
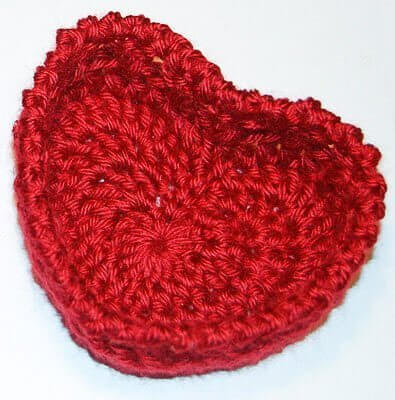
These sweet little baskets are made by building onto the hearts crochet pattern from last week’s pattern here. The crossing double crochets and skipped stitches used on the sides create an X O X O effect. Perfect for all your lovely Valentines!
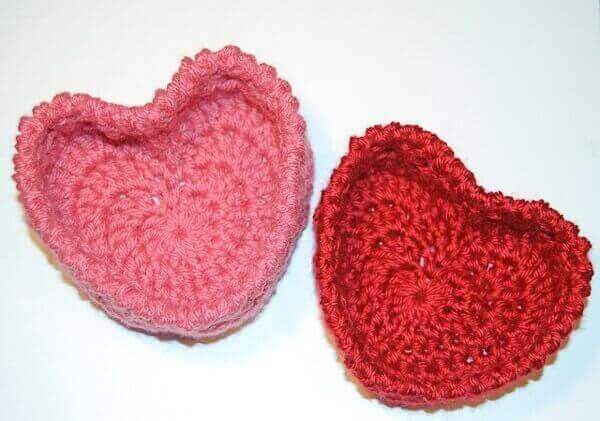
Hugs and Kisses Heart Basket Crochet Pattern


Here’s what you need:
- worsted weight yarn
- H hook
- tapestry needle
Resources and tutorials you may find helpful in following this crochet pattern: Crochet Abbreviations, U.S. to U.K. Crochet Conversion Chart, How to Make a Magic Ring {photo & video tutorial}.
Add this pattern to your Ravelry library.
Finished sizes: small = approx. 4½ in.
Make a magic ring (as an alternative to the magic ring, you can ch 4 and join with a slip stitch in furthest chain from hook to form a ring).
Round 1: Ch 1 (does not count as st), working into the ring, work 4 hdc, 3 dc, ch1, Sl st in ring, ch 1, continue working in ring 3 dc, 3 hdc, join with a Sl st to first hdc of round, pull tail of yarn to close up ring — 16 sts.
Round 2: Ch 1 (does not count as st), 1 hdc in same st as join, 1 hdc in each of the next 3 sts, 1 dc in next, 2 dc in next, 3 dc in next, ch 1, Sl st in Sl st from previous round, ch 1, 3 dc in next st, 2 dc in next, 1 dc in next, 1 hdc in each of the next 3 sts, join — 22 sts.
Round 3: Ch 1 (does not count as st), 1 hdc in same st as join, 1 hdc in each of the next 5 sts, 1 dc in next, 2 dc in next, 3 dc in next, 2 hdc in next, ch 1, Sl st in Sl st from previous round, ch 1, 2 hdc in next, 3 dc in next st, 2 dc in next, 1 dc in next, 1 hdc in each of the next 5 sts, join — 30 sts.
Round 4: Ch 1 (does not count as st), 1 hdc in same st as join, 1 hdc in each of the next 6 sts, 2 hdc in next, 2 dc in each of the next 3 sts, 3 dc in next, 1 hdc in each of the next 2 sts, ch 1, Sl st in Sl st from previous round, ch 1, 1 hdc in each of the next 2 sts, 3 dc in next, 2 dc in each of the next 3 sts, 2 hdc in next, 1 hdc in each of the next 6 sts, join — 42 sts.
Round 5: Ch 1 (does not count as st), 1 dc in same st as join, 1 dc in each of the next 19 sts, 1 dc in ch-1 space, skip Sl st, 1 dc in ch-1 space, 1 dc in each of the next 19 sts, join — 41 sts.
Turn.
Round 6: Ch 1, 1 dc in same st as join, ch 1, skip 2 * 1 dc in next st, working in front of the st just made work 1 dc into the previous st, ch 1, skip 2, repeat from * around, join — 41 sts.
Round 7: Without turning, work 1 reverse single crochet in each st just made around, join — 41 sts.
Fasten off, weave in ends.
Now they are ready to fill with goodies for all your sweeties!

Might I suggest that in row 3 (4th crochet row) it would be helpful to crochet stitches just in the front of the stitches in the previous row so that the basket sits straighter and firmer.
I like your site. I’m gonna make the heart basket and use one side of the sachet for coasters to to fit the basket. Thanks for allowing me to follow the site. Thanks,Kay
I love your site. I think I’ll make the heart basket and use one side of sachet for coasters. Thanks for accepting me. Kay
Absolutely adore this. I make things to sell for ferret rescues and would love to grow this into a bigger version for a bed. Do you have any idea how you would go about making this in a bigger version?
I just love these heart baskets!
So happy you like them! Thanks, Rachel 🙂
Thanks Kara! This is such a cute pattern. I can’t wait to try it out. Thanks so much for sharing this.
Eileen:0
So, so cute! Thank you for sharing this clear and well-written pattern. My little basket turned out perfect! The possibilities are endless for making these in different weight yarns for home decor and gifts too. Thanks again! 🙂
Thanks for posting this! I’m totally trying it tonight. 🙂
Your baskets are very cute and turned out nicely. Mine, on the other hand, resembled a hat for a butt-head! Ugh! I’m not sure where I went wrong, if its the gauge, the yarn, or the creator (me). It is very rounded, the base is not flat at all. I followed the instructions, counted my stitches…(sigh) I don’t know what happened. Its still cute enough for what I want to use it for (to hold a heart-shaped bar of soap). To save my misshapen basket, I think I’ll tell the user to utilize it as a bath scrubbie. I think it may work very well to hold the soap inside while scrubbing with it in the bath or shower. Hmmm…what do think about that? 🙂 Thank you for sharing the pattern!
This comment has been removed by the author.
Thank you very much, adorable.
Hi Kara – this is super cute! I really would like to try this. Do you have instructions to make it a little bit bigger?
Thanks for the pattern!
Hi Kara, I am just learning to crochet little projects and had come accross this one – absolutely cute! I have just one question for you though, is the foundation the magic circle or is it to add after the magic circle has been made? i’m just a little confused 🙂
Thanks,
Teri
I am glad you are trying this out! The foundation is to add after the circle has been made. The only thing I would note is that in my directions for the magic circle, it says “Yo and pull through again to anchor it.” That basically creates a chain … you can count this a the first chain in the foundation ring (I do), but everyone has their own way. Hope that helps! Let me know if you have any other questions at all. I would be glad to help!
Thanks Kara 🙂 I will give it a try –it’s so cute!!
Thanks again!
Teri
Kara, would you happen to have a video tutorial of this?
No, Teri, I am sorry; I do not 🙁 I would be happy to walk you through any parts you are having trouble with. You can always e-mail me at [email protected]. I would be happy to help you out 🙂
You are being featured @CountryMommaCooks Link & Greet Party!
Stop by and pick up a featured button….and have a great weekend:)
You’re being featured tonight at Taking A Timeout Thursday! Thanks so much for sharing!
Just pinned this and can’t wait to give it a try! Thank you so much for sharing at Taking A Timeout Thursday! Hope you had a wonderful Valentine’s Day!
Ok, this is adorable! I wish I understood all those crochet terms!
Kara how fun would it be looking at all the crochet collection you have at home.. I love what you make! 🙂
Thanks for linking up!
Awesome pattern! Love it 🙂 Thanks for sharing.
Oh my gosh! I wish I could crochet! I’m pinning it and asking my mother-in-law to try to teach me one more time!! Saw this over at Bacon Time. Thanks for sharing it!
WOW these turned out beautifully, makes me want to learn how to crochet just so i can make those!
Thanks for sharing the tutorial, i have pinned it!
perfectly cute! I am having a Valentine Linky Carnival and would LOVE for you to link this up:>
http://blissfulanddomestic.blogspot.com/2012/02/valentines-day-countdown-linky-party.html
http://blissfulanddomestic.blogspot.com/2012/02/valentines-day-countdown-linky-party.html
Hello,just find this,so cute,simple but clever.I must make it latter.Thanks for sharing.
Those are so cute! I may even try my hand at one. 🙂
You’ve got to be kidding me!! I just love this!! So much. Thanks. Linda
http://twosucculentsisters.blogspot.com/
I love these! They are fabulous. Thanks for the pattern!
Stephanie
You are very welcome! I am glad you like it 🙂
Too cute ! Never seen in little basket !
Hug
Anna
Thank you, Anna!