
The magic ring crochet technique is one of my favorite tricks! It’s can really improve the look of projects that are worked in the round, such as hats, granny squares, crochet amigurumi, and so on. The magic ring crochet technique creates an adjustable loop that lets you control the size of the center hole of your work by pulling the tail to close the loop. You can pull it all the way closed as is desirable when crocheting hats and amigurumi. Or if you prefer a small opening in a granny square center, you can control that too!
That is the beauty of the magic ring … you have complete control of how it comes out!
In addition to the term magic ring, a pattern may instead refer to it as a magic circle, slip ring, adjustable ring, or a magic loop. These terms all refer to this same technique though.
Magic Ring Crochet Technique
So now that we have covered the why of the technique, I want to show you the how.
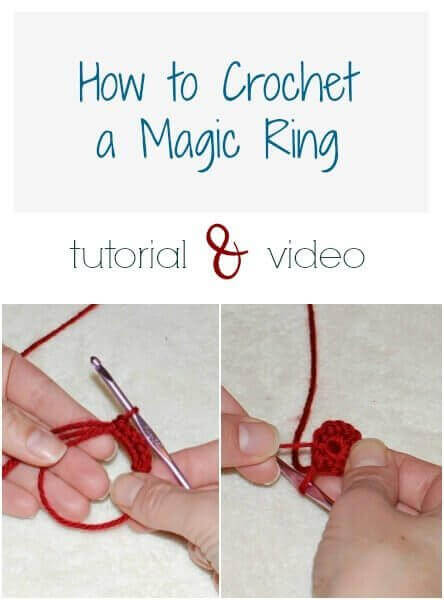
In the instructions below I will show you step-by-step how to crochet a magic ring. You can follow along by video or my written and photo tutorial further down the page …
HOW TO CROCHET A MAGIC RING
Video Tutorial
In this video tutorial I will show you how to use the magic ring crochet method to start off a project in the round. Make sure to turn on your sound so you can hear as I walk you through the steps …
Or if you prefer, you can just follow along with the step by step directions and photos below.
Photo Tutorial
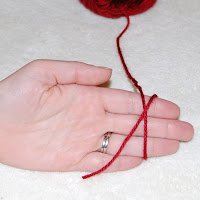
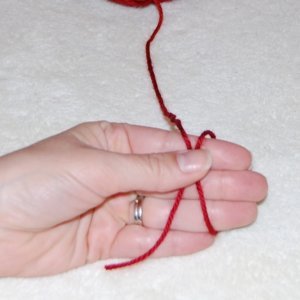
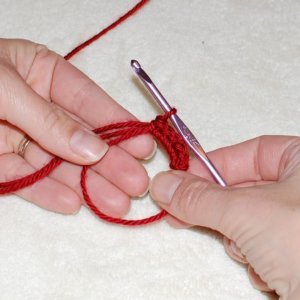
To make a magic ring, wrap the yarn around your fingers with the tail end of the yarn behind the working yarn (the yarn coming from the skein) and leaving a tail about 6 inches long (see Fig. 1). Hold the place where the yarn overlaps between your thumb and forefinger (Fig. 2).
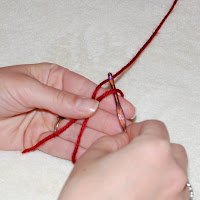
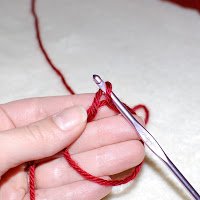
Insert your crochet hook into the center of the loop (see Fig. 3) and bring through a loop of the working yarn, you will now have one loop on your hook (see Fig. 4).
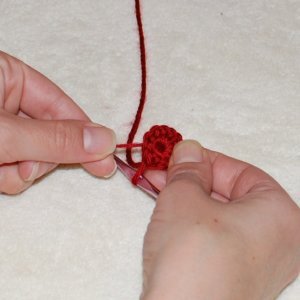
Work a chain stitch to secure and continue working pattern as written (please note that the chain 1 stitch should count in your pattern, for example, if your pattern says Chain 1, work 6 single crochet stitches into ring, you have already made the chain 1 stitch and should just continue working the single crochets). See Fig. 5 below.
Magic rings aren’t just for single crochet stitches though. You can also use taller stitches like half double crochet, double crochet, and so on with the magic ring crochet method. Again, check your pattern for how many beginning chains and the number of stitches to work into the ring.
Once you have finished working your first round of stitches, join with a slip stitch or as directed in your pattern and pull the tail end of the yarn to close up the hole in the center (see Fig. 6).
That’s all that’s to it! When you are finished with your project, use a yarn needle and weave in that beginning tail. I like to weave first in one direction and then bring the yarn through in the opposite direction to really lock that tail in place and decrease the chances of the middle of your circle coming loose.
Double Magic RING
There is also a variation of this adjustable loop technique called the double magic ring, or double magic circle?! To do the double ring, you would wrap the yarn around your fingers twice instead of once as shown in Fig. 1 above. You will now have two strands of yarn around your fingers.
Many crocheters find this double looped center adds some extra durability and strength to the crochet center. This would be especially useful for granny square afghans or other items that will be get a lot of us. However I find that in most instances, the single loop is all you need as long as you really weave your tail in securely.
Next steps
Ready to test out your new skill? Try out one of these patterns that are perfect for starting with a magic loop! …
Spiral Flower
Basic Adult Hat Pattern
you may Also enjoy …
- Invisible Join and Fasten Off
- How to Crochet Standing Stitches
- How to Seamlessly Change Colors in Crochet
- Learn Tunisian Crochet in a Week

Bonjour, Merci de partager votre talent. Vous faites des pièces superbes. J’aimerais savoir quelle grandeur de crochet vous prenez (chapeau d’aviateur) pour la taille 6-9 mois. Une laine qui se tricote en quoi? Numéro de laine recommandée.
Merci pour votre patience.
Marité
I’m left handed. This left me clueless. Maybe I need to look in a mirror. 😢
Hi, this may be a non-issue, but I’m a newb and have been getting confused by patterns. I apologize in advance for my wordiness.
You say:
“Work a chain stitch to secure and continue working pattern as written (please note that the chain 1 stitch should count in your pattern, for example, if your pattern says Chain 1, work 6 single crochet stitches into ring, you have already made the chain 1 stitch and should just continue working the single crochets). See Fig. 5 below.”
This makes sense to me if the pattern starts with any number of chain stitches. However, what if the pattern just jumps right into a double crochet stitch with no chain stitches? For example, your unicorn hat pattern says:
“Magic ring, 11 DC in magic ring, join to first DC, chain 2”
There are no chain stitches at the start, it just jumps right into the double crochet. So, is that chain stitch just extra in this particular example? Or, were there meant to be two chain stitches before the 11 DC (one that’s already included in the magic ring, and one that’s additional)?
I do see your note later where you say:
“Again, check your pattern for how many beginning chains and the number of stitches to work into the ring.”
With this direction, are you saying that, as part of the magic ring, you chain 1 for a round of SC, 2 for a round of DC, etc.?
Related confusion: even though I’ve read elsewhere that three chain stitches, not two, get you to the correct height for DC, perhaps using two prevents the unsightly gaps at the ends of the rounds. This would make sense with your directions to “chain 2” at the end of each round to start the next one. Is that your purpose with using only 2 chains, rather than 3? I did start a test, and there are still gaps, but perhaps not as much as if 3 chains were used.
Sorry if the answer is glaringly obvious, I tend to get hung up on things I am unsure about. I really want to make this unicorn hat for my boss’s little girl.
GOLD STAR for you!!! I have been crocheting forever and have spent the last two years on countless websites trying to figure out the dreaded magic ring. Just when I think Ive got it I don’t. I went on a crochet hat binge last year and, after many more failures, I stumbled on your tutorial. The photos and the text were perfect. By George, I do believe I’ve got it. Thank you! I have started the striped beanie and it’s working! And I love the chain one instead of two. Who knew?
i was trying to read this post on my phone, but there were so many ads popping up i only had about 3/4″ space to see what you wrote and was not able to view an entire image all at once. please consider reducing the number of ads. right now there are ads covering up my typing. soo i can’t see if there are mistakes.
Hi, do you have the measurements of the childs hippo hat please.
I’m not sure what hat you are referring to as I do not have a pattern for a hippo hat.
Thank you for this tutorial. I picked up crochet a couple of months ago and have really been enjoying it. However, the magic circle has been a big struggle for me. But with this tutorial, I am finally getting the hang of it. I still struggle a bit, but I know like everything else I have learned when it comes to crochet, I will get it with practice.
I loved this tutorial. You excel at every job. It is very easy and practical to do .. I also really liked the color. I will do it for my family and I will do some donations for poor children. That is why I love crochet, it can work wonders.
I also have an online crochet shop, who can access, I am grateful: Tapete de Barbante Quadrado
Stumbled upon your site as I was doing internet search for magic circles, and I must say this is the simplest one I could follow thanks. I mastered it quickly, now I can do other projects without any hassle.
Thanks for making it simple in plain form
Thank you for you tutorial and explanation. I have stumbled my way thru the magic ring for quite a while but your explanation makes it much easier. I am new to blogging and I would like to know if you wouldn’t mind if I put a link to your explanation in my pattern on my blog. I have looked at a few different ones and yours is nice a simple and easy to follow. I wouldn’t even know where to start on how to explain it. Thank you for your consideration
Sincerely,
Lani
Hi Lani 🙂 Yes, of course you may link to my tutorial. thanks so much!!
Thank you so much for sharing this helpful video tutorial and picture tutorial as well. I’m rather new to crocheting, and this seems like it will be so much easier than trying to crochet the appropriate number of stitches into that tiny little hole. This way your stitches will be much more natural and relaxed! Thanks again for sharing!
THANK you!! I’ve been trying to figure out the magic circle for like 6 months now! I’ve watched and read a dozen different tutorials and after yours I finally caught on! Thanks for finally getting it through my thick head 😀
I really want to master this–thanks Kara!
You always make it look so easy!!
Lol! Thanks, Kara!
Thank you for the written instructions for magic loop. I learn
better at written instructions.
Thank you so much!! This is the best tutorial I have seen on this! I never understood it until now!
So glad you found it helpful, Shelly!
Thank you, this was so easy that even I didn’t fail!
This was one of the easiest tutorials I have ever used. I did it on the first try.
Yay! That makes me so happy to hear 🙂
Looks wonderfully easy… now back to my happy hooking!
where can I find , whats means SC; DC, HDC, SC decrease
Hi Nelly 🙂 I have a chart of crochet abbreviations under my Resources Tab above. Just click here to get right to it: http://www.petalstopicots.com/resources/crochet-abbreviations/
Hope that helps 🙂
They are for the US:
SC means single crochet
DC means double crochet
HDC means half double crochet
And sorry, but I’ve never come across SC decrease
I am confused about one thing are you putting the hook directly in the hole or between the two pieces of yarn?
I am putting the hook directly into the hole. Hope that helps 🙂
Fantastic! Thanks for sharing!
Emma
You are very welcome!
Oh this is SO MUCH easier than trying to crochet into the tiny hole. 🙂 I’m new to crocheting, so really appreciate great tutorials (and videos) like yours. Thank you!
I am so glad you found it helpful!
I find the traditional loop MUCH easier. Maybe it’s because I’m a lefty or I’m doing something wrong.
Thank you so much for these instructions. My Mother taught me one way to do this, but now I have an additional way, which makes me a happy crocheter! 🙂
Glad you liked it 🙂
Easiest instructions I have found yet!!! Thank you so much!
I am so glad you like it! Thanks, Kristy 🙂
That is one of the best tutorials I’ve seen for the “magic loop”. I just started crocheting again and LOVE it! I found your page from the Naptime Crafters linky party today. And I’m a new follower 🙂
Shasta@InTheOldRoad
I am so happy to hear that it helps you, Shasta!
Great tutorial……… I have always wanted to learn to crochet.
Thanks, Deana!
how do you fasten it off once you do the magic circle? I have tried fastening it off and it always seems to undo itself. 🙁
Hi Kara! Great tutorial. I’ve crocheted for years and never saw this method. It looks easy and good. Yet, I was wondering the same thing too. How do you fasten off the first end of the thread after you have pulled it tight?
I don’t fasten off that end but weave it in once I have closed up my center.