
Your little one will loved being wrapped in this adorable lion hooded blanket
cute and cuddly and makes a great gift for a baby shower or for any new mom. As written, the hooded blanket is perfect for for babies and toddlers, but the pattern is so easy to customize for any size you desire! Another plus … this hooded blanket pattern is also so versatile … just a change of yarn turns this pattern from a comfy hooded blanket to super absorbent hooded towel.
This owl hooded blanket pattern has been a well loved favorite in my shop and has also been published in Baby Brights: 30 Colorful Crochet Accessories. Now I am making it available to all my readers as a free crochet pattern!!
Owl Hooded Blanket / Towel Crochet Pattern
Add this pattern to your Ravelry favorites ❤
Available as a convenient, ad-free pdf download here.
Here is what you will need:
- Approximately 1,420 yds worsted-weight yarn (shown here in Bernat Handicrafter Cotton White)
- scrap amounts of beige, brown, yellow, and orange worsted weight yarn for the lion appliqyue (shown here in Lily Sugar’n Cream)
- US H-8 / 5 mm crochet hook
- US I-9 / 5.5 mm crochet hook
- stitch markers
- yarn needle and scissors for finishing
This free pattern is written in U.S. crochet terms and abbreviations. Stitch counts are provided at the end of each round to help you keep on track.
Resources and tutorials you may find helpful in following this pattern: Crochet Abbreviations, U.S. to U.K. Crochet Conversion Chart.
Notes:
- To crochet a comfy hooded blanket, I recommend a soft and washable acrylic such as Brava Worsted. For an absorbent hooded towel, I recommend Bernat Handicrafter Cotton.
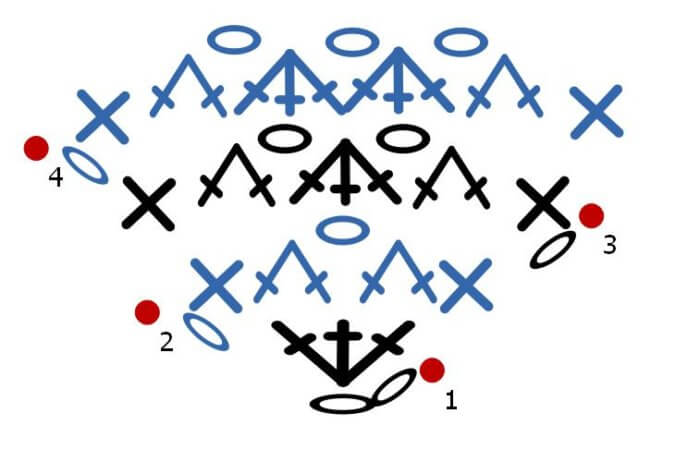
- The stitch pattern used here is called the Rocking Stitch. Here is a tip to make sure your stitching is on the right track … the loops pulled for each sc3tog should follow this sequence from the row below: sc, ch-sp, sc, except in Row 63, where the sequence from the row below would be ch-sp, sc, ch-sp. I have also included a stitch diagram below for a visual of the stitch placement.
- Blanket size as written measures approximately 26½ in. x 26½ in. Blanket size can be easily modified by continuing to increase until you reach your desired size and then begin following the decreasing instructions starting at Row 63 below.
- Gauge is approximately 13 single crochets and 14 rows = 4 in.
Special Stitches:
Single crochet 2 together (sc2tog) – Insert hook into specified stitch and draw up a loop, insert hook into next stitch and draw up a loop, yarn over and pull through 3 loops on hook.
Single crochet 3 together (sc3tog) – Insert hook into specified stitch and draw up a loop, insert hook into next stitch and draw up a loop, insert hook into next stitch and draw up a loop, yarn over and pull through 4 loops on hook.
Long single crochet (Lsc) – Insert hook into stitch of previous row. Draw up a loop to height of current row being worked, complete as single crochet (the Lsc takes the place of the next stitch in the current row).
Crocheting the Hooded Blanket
BLANKET
(H hook)
With white yarn, ch 2.
Row 1: Work 3 sc in furthest ch from hook, turn — 3 sts.
Row 2: Ch 1 (does not count as st here and throughout), 1 sc, beginning in same st as sc just made, sc2tog, ch 1, beginning in st where last loop was pulled, sc2tog, sc in same st as last loop pulled, turn — 5 sts.
Row 3: Ch 1, 1 sc, beginning in same st as sc just made, sc2tog, ch 1, beginning in st where last loop was pulled, sc3tog, ch 1, beginning in st where last loop was pulled, sc2tog, sc in same st as last loop pulled, turn — 7 sts.
Row 4: Ch 1, 1 sc, beginning in same st as sc just made, sc2tog, ch 1, *beginning in st where last loop was pulled, sc3tog, ch 1, rep from * across until 1 st remains, beginning in st where last loop was pulled, sc2tog, sc in same st as last loop pulled, turn — 9 sts.
Rows 5 through 62: Repeat Row 4 (each row will increase by 2 sts, ending with 125 sts in Row 62).
Row 63: Ch 1, sc3tog, *ch 1, beginning in st where last loop was pulled, sc3tog, rep from * across, turn — 123 sts.
Rows 64 through 122: Repeat Row 63 (each row will decrease by 2 sts, ending with 5 sts in Row 122).
Row 123: Ch 1, sc3tog, ch 1, beginning in st where last loop was pulled, sc3tog — 3 sts.
Fasten off and weave in ends.
Click here to reference Crochet Stitch Chart Symbols.
Crocheting the Hood
Follow directions above for blanket, ending after Row 25 — 51 sts.
Fasten off and weave in ends.
Lion Applique
Eyes (make two)
(H hook)
With beige, ch 4 (counts as chain plus dc).
Work 11 dc in furthest chain from hook, join — 12 sts.
Fasten off, leaving a long enough tail to sew eyes to your item.
With brown, make a magic ring (see sidebar).
Ch 1 (does not count as st), 8 sc in ring, join — 8 sts.
Fasten off, leaving a long enough tail to sew eyes to your item.
Snout
(H hook)
With orange, ch 12 (counts as chain plus hdc).
Foundation Row: Work 1 hdc in 3rd ch from hook and in each ch across, turn — 11 sts.
Row 1: Ch 2(counts as st), hdc2tog, 1 hdc in each of the next 6 sts, hdc2tog, turn — 9 sts.
Row 2: Ch 2(counts as st), hdc2tog, 1 hdc in each of the next 4 sts, hdc2tog, turn — 7 sts.
Row 3: Ch 2(counts as st), hdc2tog, 1 hdc in each of the next 2 sts, hdc2tog, turn — 5 sts.
Row 4: Ch 1(not a st), 1 sc in each st across, do not turn — 5 sts.
Edging: Continue working sc edging around snout, join in 1st st of Row 4.
Fasten off, leaving a long enough tail to sew snout to your item.
Nose
(H hook)
Note: It may be helpful to use a stitch marker or safety pin to mark the 1st stitch of the foundation round for when you add your edging.
With brown, ch 2.
Foundation Row: Work 3 sc in furthest ch from hook, turn — 3 sts.
Row 1: Ch 1(does not count as st), work 2 sc in the 1st st, 1 sc in next, 2 sc in last, turn — 5 sts.
Edging: Beginning in same st as last sc made, work 2 sc, work 1 sc on the side of the Foundation Row, 2 sc in starting chain, 1 sc along other side of the Foundation Row, 2 sc in 1st st of Row 1, join.
Fasten off, leaving a long enough tail to sew nose to hood.
Ears (make two)
(H hook)
With yellow, ch 8 (counts as chain plus hdc).
Foundation Row: Work 1 hdc in 3rd ch from hook and each ch across, turn — 7 sts.
Row 1: Ch 2(counts as st), work 1 hdc in each st across, turn — 7 sts.
Row 2: Ch 2(counts as st), hdc2tog, 1 hdc in each of the next 2 sts, hdc2tog, turn — 5 sts.
Row 3: Ch 1(not a st), 1 sc in each st across, do not turn — 5 sts.
Edging: Continue working sc edging around ear, join in 1st st of Row 3.
Fasten off, leaving a long enough tail to sew ear to your item.
Mane
(I hook)
With both yellow and orange, ch 42.
Row 1: Work 1 loop stitch (see below) in each ch across, turn — 41 sts.
Row 2: Ch 1 (not a st), work 1 sc in each of the next 10 sts, 2 sc in next, *1 sc in each of the next 9 sts, 2 sc in next rep from * once more, 1 sc in each of the last 10 sts, turn — 44 sts.
Row 3: Ch 1 (not a st), work 1 loop stitch in each st across, do not turn — 44 sts.
Fasten off, leaving a long enough tail to sew mane to your item.
Loop Stitch
There are a few variations of how to work the loop stitch. This is my preferred method.
To work a loop stitch, loop the yarn over your finger as shown. Insert your hook into the specified stitch and position the hook over and behind the first part of the loop {a}, with your hook, grab the further side of the loop {b} and pull it behind the first part {c} and through the stitch {d}, leaving loop on your finger, yarn over as usual {e} and pull through both loops on hook {f}.
Finishing: Using a tapestry needle, sew mane, eyes, snout, nose, and ears to hood as shown below. Using brown yarn and a tapestry needle, sew whiskers as shown. Weave in ends.
Adding Hood to Blanket and Finishing Edging
Place hood on desired corner of blanket, making sure rows match up (safety pin in place if desired). Attach by working 1 sc along the edge of each row through both pieces, work 3 sc in corner, continue along until hood is attached. Continue working 1 sc along the edge of each row of the blanket, working 3 sc in remaining corners, join.
Fasten off, weave in ends.
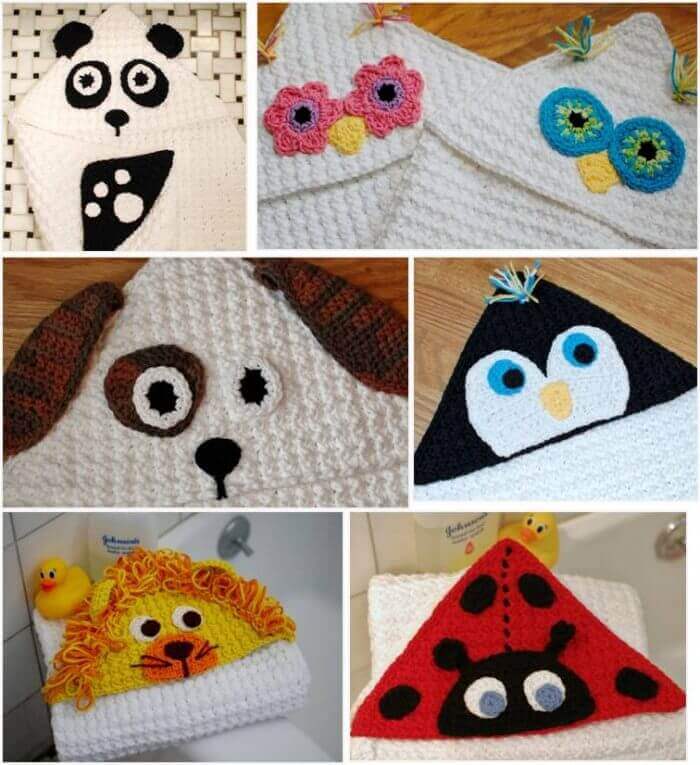
More Hooded Blanket options … make them all!
Now you have a cozy hooded blanket to gift or enjoy. Check out all of my animal applique choices to make just the right hooded blanket for that special someone! Click here or on image below to see full applique pattern package.

Leave a Reply