
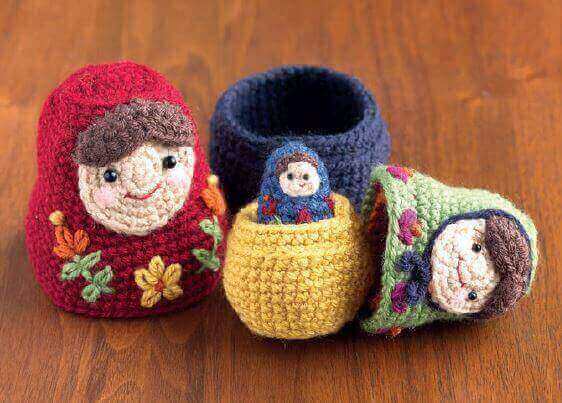
I fell in love with these crochet nesting dolls the moment I spotted them in Crochet At Home: 25 Clever Projects for Colorful Living — and I’m so happy to share this crochet matryoshka pattern with you here, with permission from Interweave Press.
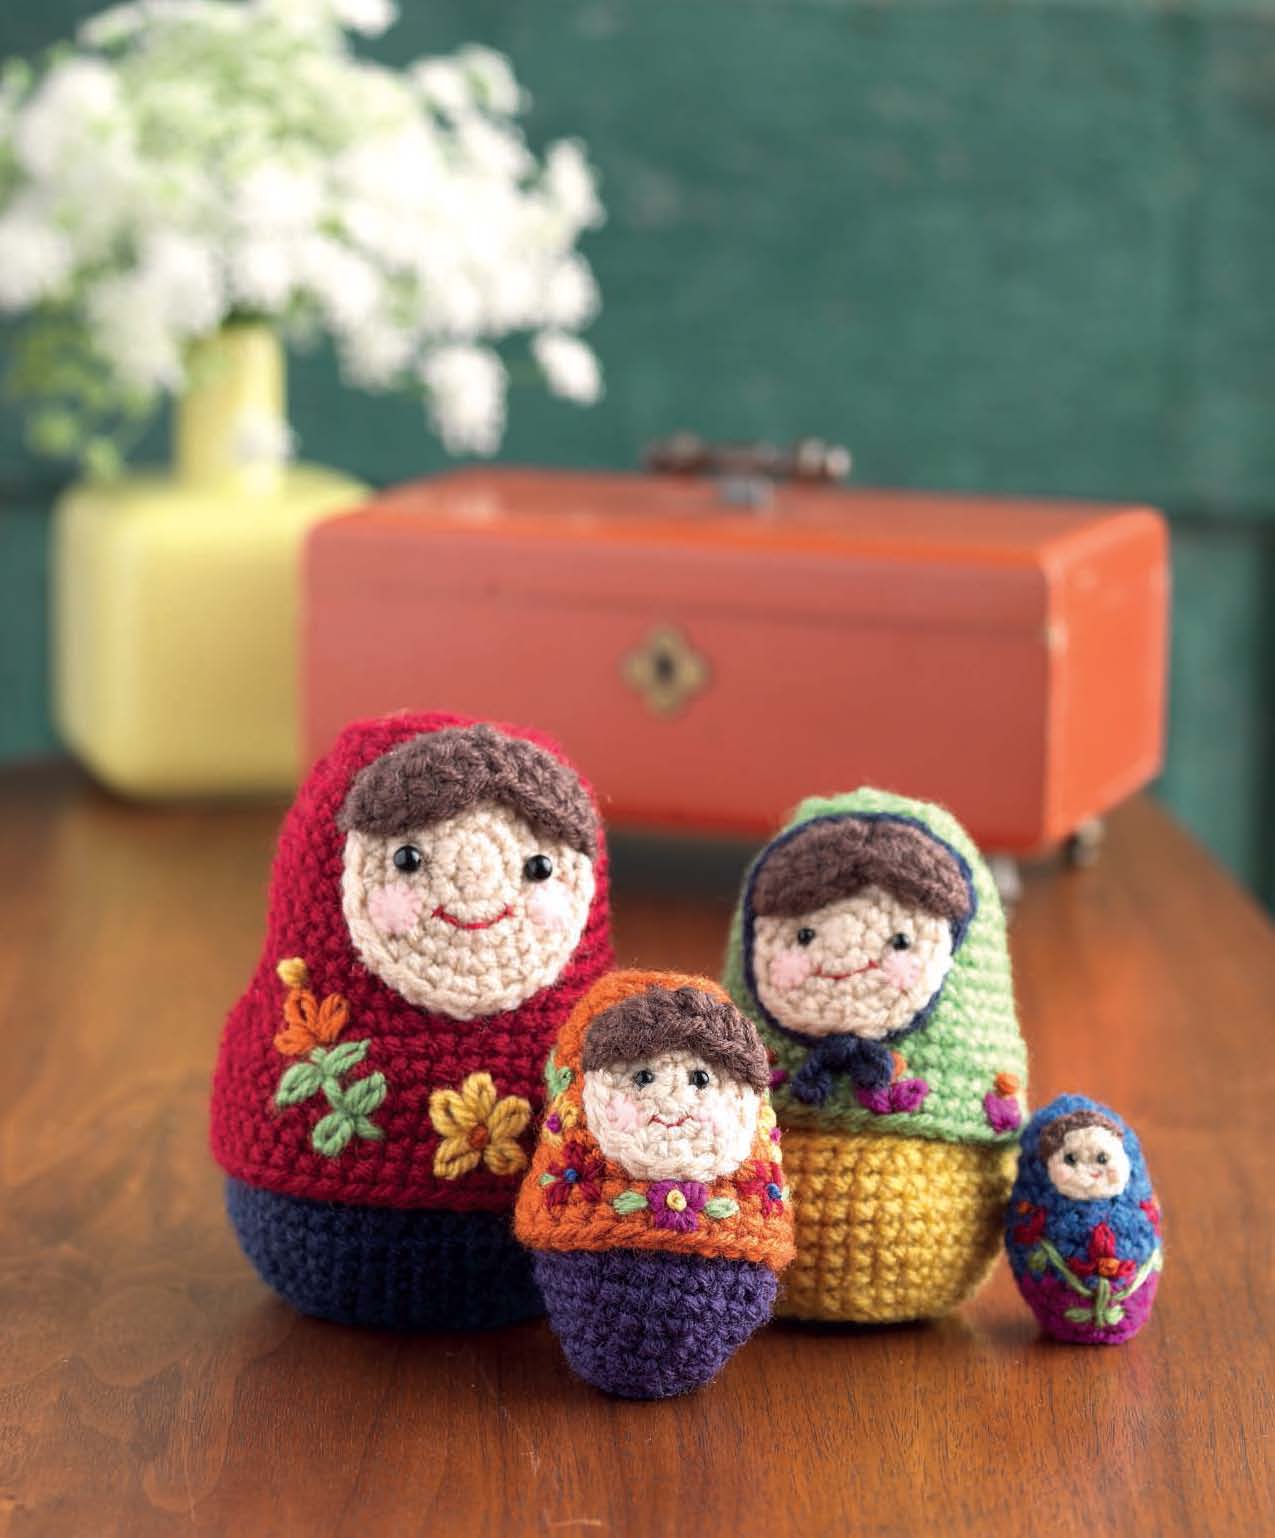
If you’ve ever wondered how to make Russian nesting dolls with just a hook and some worsted weight yarn, this is the pattern to bookmark. You’ll crochet four sizes of nesting dolls — large, medium, small, and baby — each one worked in a simple spiral of single crochet, with embroidered floral details and sweet stitched faces that give every doll its own personality. Stacked together, these crochet Russian nesting dolls add some color to your decor, make a thoughtful gift, or just a fun stash-busting project for using up worsted weight scraps in ten different colors.
Ready to get started? Jump straight to supply list or the size you want to start with:
- Materials List
- Pattern Notes
- Large Crochet Matryoshka Doll
- Medium Crochet Matryoshka Doll
- Small Crochet Matryoshka Doll
- Baby Crochet Matryoshka Doll
Crochet Nesting Dolls Matryoshka Pattern
Before you jump into the patterns, make sure you have everything you need to get started making your own set of crochet Russian nesting dolls.
What you’ll need
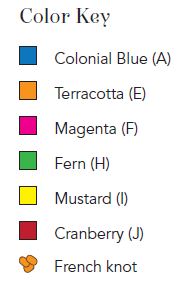
- Worsted weight (#4 Medium). Shown here: Lion Brand Yarn Vanna’s Choice (170 yd [156 m]/3.5 oz [100 g]), in #109 Colonial Blue (A), #110 Navy (B), #123 Beige (C), #126 Chocolate (D), #134 Terracotta (E), #144 Magenta (F), #147 Purple (G), #171 Fern (H), #158 Mustard (I), #180 Cranberry (J), 1 skein each.
- US E-4 / 3.5 mm crochet hook
- Notions: Stitch marker; tapestry needle; black round acrylic beads (for eyes), one hole, sizes 2mm (small) and 4mm (large), 2 beads each size; 3mm (medium), 4 beads; pink felt, 9″ × 12″ (23 × 30.5 cm), 1 sheet; small amount of fiberfill; sewing thread, in colors black (for eyes), red (for mouths), and pink (for cheeks); sewing needle.
Want to find inspiration from other readers? Check out all their crochet matryoshka dolls on Ravelry.
Pattern Notes
Gauge
10 sc and 10 rows = 2″ (5 cm) in sc stitch. Take time to check your gauge.
If you need a reference for the stitch abbreviations, see Reference Crochet Abbreviations here.
Stitch Guide:
Sc2tog (single crochet two together)
Insert hook in next stitch, yarn over and pull up loop (2 loops on hook), insert hook in next stitch, yarn over and pull up loop (3 loops on hook), yarn over and draw through all 3 loops on hook.
Notes:
✤✤ Each pattern is worked in a spiral. Place stitch marker on the last stitch of each round to mark the end of the round. Move marker up each round.
✤✤When starting each pattern, use your preferred method for making the ring, leaving a 6″ (15 cm) tail: (a) adjustable ring (single or double), or (b) chain 2, then start Rnd 1 in 2nd chain from hook.
Large Crochet Matryoshka Doll
Finished doll measurements: bottom = 1¾” (4.5 cm) tall; top = 3¾” (9.5 cm) tall.
Gauge = 10 sc and 10 rows = 2″ (5 cm) in sc stitch.
Bottom
With color B, make a ring. (For a tutorial on making a magic ring, click here.)
Rnd 1: Sc 6 times into ring—6 sc, pm in last stitch of rnd, do not turn.
Cont to move marker up each rnd.
Rnd 2: 2 Sc in each of 6 sc—12 sc, do not turn.
Rnd 3: *2 Sc in next st, sc in next st; rep from * around—18 sc, do not turn.
Rnd 4: *2 Sc in next st, sc in each of next 2 sts; rep from * around—24 sc, do not turn.
Rnd 5: *2 Sc in next st, sc in each of next 3 sts; rep from * around—30 sc, do not turn.
Rnd 6: *2 Sc in next st, sc in each of next 4 sts; repeat around—36 sc, do not turn.
Rnd 7: Working in back loops only, sc in each st around, do not turn.
Rnd 8: * 2 Sc in next st, sc in each of next 5 sts; rep from * around—42 sc, do not turn.
Rnd 9: Sc in each st around, do not turn.
Rnd 10: * 2 Sc in next st, sc in each of next 6 sts; rep from * around—48 sc, do not turn.
Rnds 11–13: Sc in each st around, do not turn.
Rnd 14: *Sc2tog, sc in next each of next 6 sts; rep from * around—42 sc, do not turn.
Rnd 15: Working in back loops only, sc in each st around—42 sc, do not turn.
Rnd 16: Sc in each st around, sl st in next st, fasten off, leaving a 6″ (15 cm) tail. Weave in yarn tail.
Top
With color J, make a ring.
Rnds 1–4: Rep Rnds 1–4 of bottom—24 sc, do not turn.
Rnd 5: Working in back loops only, sc in each st around, do not turn.
Rnds 6 and 7: Rep Rnds 5 and 6 of bottom—36 sc, do not turn.
Rnds 8–15: Sc in each st around, do not turn.
Rnd 16: Rep Rnd 8 of bottom—42 sc, do not turn.
Rnd 17: Rep Rnd 10 of bottom—48 sc, do not turn.
Rnds 18–20: Sc in each st around, do not turn.
Rnd 21: Working in back loops only, sc in each st around, do not turn.
Rnd 22: Sc in each st around, do not turn, sl st in next st, fasten off, leaving a 6″ (15 cm) tail. Weave in yarn tail.
Face
With color C, make a ring.
Rnds 1–5: Rep Rnds 1–5 of bottom, sl st in next st, fasten off, leaving a 16″ (40.5 cm) tail. Yarn tail will be used to sew face piece to top.
Hair
Ch 11.
Row 1: 2 Sc in 2nd ch from hook, hdc in each of the next 2 ch, [sc2tog] twice, hdc in each of the next 2 ch, 2 sc in last chain—10 sts, ch 1, turn.
Row 2: 2 Sc in first st, sc in next st, hdc in each of the next 2 sts, sc2tog, hdc in each of the next 2 sts, sc in next st, 2 sc in last
st—11 sts, turn. Sl st in next st, fasten off, leaving a 16″ (40.5 cm) tail, which will be used to sew hair to face.
Finishing
Arrange hair piece placing foundation edge on face edge, and sew in place with yarn tail.
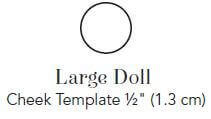
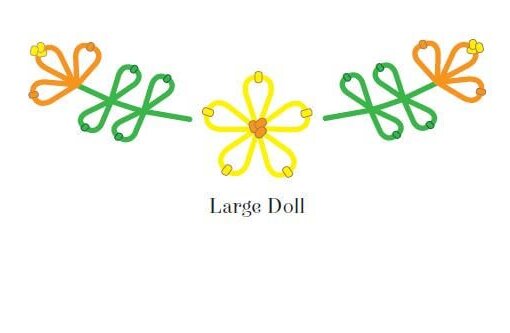
With black thread and 2 large black beads, sew to face for eyes. Sew a smile with red thread. Cut two ½” (1.3 cm) circles (see diagram) of pink felt for cheeks. Sew to face with pink thread.
Arrange embellished face with hair edge along Rnd 5 of top and sew in place. Embroider flowers below face and along edge following diagram for Large Doll; use daisy stitch for flowers, French knot for centers, and straight stitch for stems.
Medium Crochet Matryoshka Doll
Finished doll measurements: bottom = 1½” (3.8 cm) tall; top = 2¼” (5.5 cm) tall.
Gauge = 10 sc and 10 rows = 2″ (5 cm) in sc stitch.
Bottom
With color I, make a ring.
Rnd 1: Sc 6 times into ring—6 sc, pm in last stitch of rnd, do not turn. Cont to move marker up each rnd.
Rnd 2: 2 sc in each of 6 sc—12 sc, do not turn.
Rnd 3: *2 Sc in next st, sc in next st; rep from * around—18 sc, do not turn.
Rnd 4: *2 Sc in next st, sc in each of next 2 sts; rep from * around—24 sc, do not turn.
Rnd 5: Working in back loops only, sc in each st around, do not turn.
Rnd 6: *2 Sc in next st, sc in each of next 3 sts; rep from * around—30 sc, do not turn.
Rnd 7: Sc in each st around, do not turn.
Rnd 8: *2 Sc in next st, sc in each of next 4 sts; repeat around—36 sc, do not turn.
Rnds 9–11: Sc in each st around, do not turn.
Rnd 12: *Sc2tog, sc in each of next 4 sts; rep from * around—30 sc, do not turn.
Rnd 13: Working in back loops only, sc in each st around, do not turn.
Rnd 14: Sc in each st around, sl st in next stitch, fasten off, leaving 6″ (15 cm) tail. Weave in yarn tail.
Top
With color H, make a ring.
Rnds 1–3: Rep Rnds 1–3 of bottom.
Rnd 4: Working in back loops only, sc in each st around, do not turn.
Rnd 5: Rep Rnd 4 of bottom.
Rnd 6: Rep Rnd 6 of bottom.
Rnds 7–12: Sc in each st around, do not turn.
Rnd 13: Rep Rnd 8 of bottom.
Rnds 14 and 15: Sc in each st around, do not turn.
Rnd 16: Working in back loops only, sc in each st around, do not turn.
Rnd 17: Sc in each st around, sl st in next st, fasten off, leaving a 6″ (15 cm) tail. Weave in yarn tail.
Face
With color C, make a ring.
Rnds 1–4: Rep Rnds 1–4 of bottom, sl st in next st, fasten off, leaving a 16″ (40.5 cm) tail, which will be used to sew face piece to top.
Hair
With color D, ch 9.
Row 1: 2 Sc 2nd ch from the hook, hdc in each of next 2 ch, sc2tog, hdc in each of next 2 ch, 2 sc in last ch—9 sts, ch 1, turn.
Row 2: 2 Sc in first st, sc in next st, hdc in each of next 2 sts, sl st in next st, hdc in each of next 2 sts, sc in next st, 2 sc in last st—11 sts,
turn. Sl st in next st, fasten off, leaving 16″ (40.5 cm) tail, which will be used to sew hair to face piece.
Finishing
Arrange hair piece placing foundation edge on face edge, and sew in place with yarn tail.
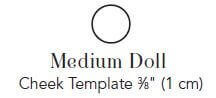
With black thread and 2 medium black beads, sew to face for eyes. Sew a smile with red thread. Cut two 3/8″ (1 cm) circles (see diagram) of pink felt for cheeks. Sew to face with pink thread.
With color A, sew straight stitches to embroider around face edge, and make a little bow in the center under the face.
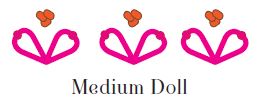
Arrange embellished face with hair edge along Rnd 4 of top and sew in place. Embroider flowers below face and along edge following diagram for Medium Doll using daisy stitch for flowers and French knot for centers.
Small Crochet Matryoshka Doll
Finished doll measurements: bottom = 1¼” (3.2 cm) tall; top = 1¾” (4.5 cm) tall.
Gauge = 10 sc and 10 rows = 2″ (5 cm) in sc stitch.
Bottom
With color G, make a ring.
Rnd 1: Sc 6 times into ring—6 sc, pm in last stitch of rnd, do not turn. Cont to move marker up each rnd.
Rnd 2: 2 Sc in each of 6 sc—12 sc, do not turn.
Rnd 3: Working in back loops only, sc in each st around, do not turn.
Rnd 4: *2 Sc in next st, sc in next st; rep from * around—18 sc, do not turn.
Rnd 5: Sc in each st around, do not turn.
Rnd 6: *2 Sc in next st, sc in each of next 2 sts; rep from * around—24 sc, do not turn.
Rnds 7 and 8: Sc in each st around, do not turn.
Rnd 9: *Sc2tog, sc in each of next 2 sc; rep from * around—18 sts, do not turn.
Rnd 10: Working in back loops only, sc in each st around, do not turn. Sl st in next st, fasten off, leaving 6″ (15 cm) tail. Weave in yarn tail.
Top
With color E, make a ring.
Rnds 1–4: Rep Rnds 1–4 of bottom.
Rnds 5–9: Sc in each st around, do not turn.
Rnd 10: *2 Sc in next st, sc in each of next 2 sts; rep from * around—24 sc, do not turn.
Rnd 11: Working in back loops only, sc in each st around, do not turn.
Rnd 12: Sc in each st around, do not turn. Sl st in next st, fasten off, leaving 6″ (15 cm) tail. Weave in yarn tail.
Face
With color C, make a ring.
Rnds 1 and 2: Rep Rnds 1 and 2 of bottom.
Rnd 3: *2 Sc in next st, sc in next st; rep from * around—18 sts, do not turn. Sl st in next st, fasten off, leaving 16″ (40.5 cm) tail, which will be used to sew face to top.
Hair
With color D, ch 9.
Row 1: 2 Sc in 2nd ch from hook, hdc in each of next 2 ch, sc2tog, hdc in each of next 2 ch, 2 sc in last ch—9 sts, turn. Sl st in next st, fasten off, leaving 16″ (40.5 cm) tail, which will be used to sew hair to face.
Finishing
Arrange hair piece placing foundation edge on face edge, and sew in place with yarn tail.
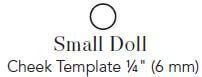
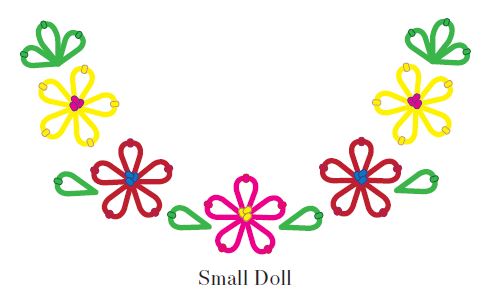
With black thread and 2 medium black beads, sew to face for eyes. Sew a smile with red thread. Cut two ¼” (6 mm) circles (see diagram) of pink felt for cheeks. Sew to face with pink thread. Arrange embellished face with hair edge along Rnd 3 of top and sew in place. Split yarn to embroider flowers below face and along edge by following diagram for Small Doll using daisy stitch for flowers and French knot for centers.
Baby Crochet Matryoshka Doll
Finished doll measures approx. 13⁄8″ (3.5 cm) tall.
Gauge = 10 sc and 10 rows = 2″ (5 cm) in sc stitch.
Body
With color A, make a ring.
Rnd 1: Sc 5 times into ring—5 sc, pm in last stitch of rnd, do not turn. Cont to move marker up each rnd.
Rnd 2: 2 Sc in each of 5 sc—10 sc, do not turn.
Rnds 3 and 4: Sc in each st around, do not turn.
Rnd 5: *2 Sc in next sc, sc in next sc; rep from * around—15 sc, do not turn.
Rnds 6 and 7: Sc in each st around, fasten off yarn, do not turn. Change to color F.
Rnd 8: Sc in each st around, do not turn. Stuff with fiberfill as you work.
Rnd 9: *Sc2tog, sc in next st; rep from * around—10 sc, do not turn.
Rnd 10: *Sc2tog; rep from * around—5 sc. Sl st in next st, fasten off, leaving 6″ (15 cm) tail. Weave in yarn tail.
Face
With color C, make a ring.
Rnd 1: Sc 6 times into ring—6 sc.
Sl st in next st, fasten off, leaving 16″ (40.5 cm) tail, which will be used to sew face to top.
Hair
With color D, ch 4, fasten off, leaving 16″ (40.5 cm) tail, which will be used to sew hair to face.
Finishing
Arrange hair piece placing along top edge of face and sew in place with yarn tail.
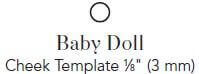
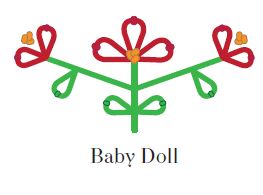
With black thread and 2 small black beads, sew to face for eyes. Sew a smile with red thread. Cut two 1/8″ (3 mm) circles (see diagram) of pink felt for cheeks. Sew to face with pink thread. Arrange embellished face with hair edge along Rnd 10 of top and sew in place. Split yarn to embroider flowers below face, from bottom edge up along side by following diagram for Small Doll using daisy stitch for flowers, French knot for centers, and straight stitch for stems.
Stitchy Nesting Dolls were designed by Amy Gaines and appear in Bara, B. (2013). Crochet at Home: 25 Clever Projects for Colorful Living. Interweave Press. Pattern reprinted with permission from Interweave Press. Photography by Joe Hancock. It can be purchased from Amazon, Barnes & Noble, and Interweave.


Hi I am so sorry to sound a bit thick but im having trouble with following the instructions on the large doll top, it says repeat rows 1-4 of the bottom which takes you to 24 stitches then it says row 10 increase to 24 stitched. Im confused
please help
PLEASE IGNORE ^^
I figured it out, I printed it wrong doh lol
Because it is easy to me to knit the doll by the pattern map.
I’m sorry, I do not 🙁
Could you please send a pattern map paper of the doll if it is found in my own email.
Thank you so much for sharing by way of this CAL.I’ve never participated in one so this should be fun.
My 3 year old granddaughter Emily loves these dolls. The hairdresser has a set of wooden ones that Emily plays with while having her hair cut. Now Grandma can surprise her with a set of her own for a birthday present in November.
This is the CUTEST CAL ever! Love it!
I love CAL’s, and matrioshkas, thank you for doing it!!!
I just finished my doll, I’ll post pictures on ravelry 😀
I have never heard of a CAL before. What is the premise?
These are amazingly adorable! I saw this pinned on Pinterest by a friend. I think I know what I will be doing, times three, for my daughters. I think they would just flip over these! They are not little anymore, but would totally enjoy the dolls.
CAL stands for crochet along and it is when a group of people work on a project together and share their pics, help each other through, etc. Feel free to join in at any time!
Ah, so it’s like incentive to get it done, or just fun for people who already would. Great idea. We’ll see if I am able to keep up. It would be good to get this done soon, so I am not scrambling at Christmas like usual! Thanks for getting such a fun project going.
So excited. This is my 1st CAL. Trying to use up some bits I have lying around. Started the bottom and ran out of the color i was using so mine are going to be striped i guess. Oh well. Each doll is unique no matter what.
Started and finished this one last night. It was so much easier than I expected. I used different colors based on what I had around and she’s so cute!
Thanks again for doing this!
I’m in too! Gotta help my 16 yr old clean his room (if nobody hears from me…send help!