
The Standard Rope Cables Pattern is a classic cable knitting design that creates beautiful twisted, rope-like textures. These cables can cross either left or right, depending on where you hold the stitches on your cable needle.
Both versions are worked over 6 stitches as part of a 12-stitch repeat. The only difference between the left- and right-crossing cables is whether the stitches on the cable needle are held in front or behind your work.
This knitting stitch pattern is excerpted from Cable Left, Cable Right by Judith Durant, courtesy of Storey Publishing. Below you’ll find explanations of both cable crossings, along with photographs and knitting charts showing each design.
Standard Rope Cable Knitting Pattern
Cable Pattern Details
- Technique: Cable knitting
- Design: Standard six-stitch rope cables
- Pattern repeat: 12 stitches, including a 6-stitch cable
- Cable crossings: 3/3L (left) and 3/3R (right)
- Pattern format: Cable crossing explanations, stitch photographs, and knitting charts
- Source: Cable Left, Cable Right by Judith Durant
Rope cables are created by crossing groups of stitches over one another. In these six-stitch cables, three stitches cross over three others to create either a left- or right-twisting design.
Some cable patterns begin with a setup row worked on the wrong side, particularly when transitioning from ribbing into a cable design.
Left-Crossing Rope Cable (3/3L)
A left-crossing rope cable is worked over six stitches, with three stitches crossing from right to left over the other three stitches.
To work a 3/3L cable, slip 3 stitches onto a cable needle and hold them in front of your work. Knit the next 3 stitches from the left needle, then knit the 3 stitches from the cable needle.
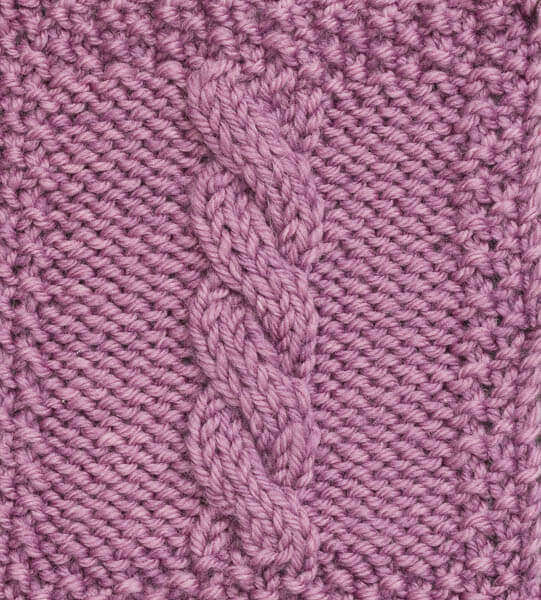
Left-Crossing Cable Knitting Chart
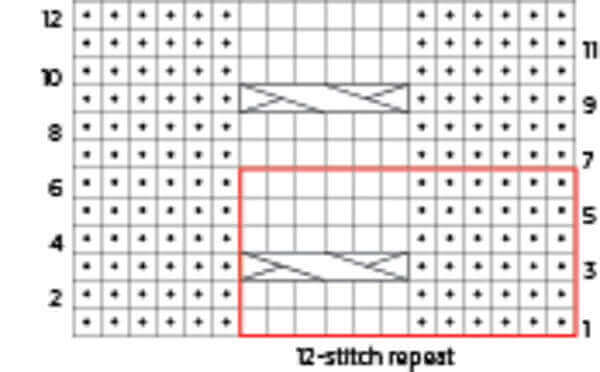
The chart illustrates the stitch arrangement for the left-crossing rope cable.
Right-Crossing Rope Cable (3/3R)
A right-crossing rope cable is also worked over six stitches, but the cable crosses in the opposite direction.
To work a 3/3R cable, slip 3 stitches onto a cable needle and hold them behind your work. Knit the next 3 stitches from the left needle, then knit the 3 stitches from the cable needle.
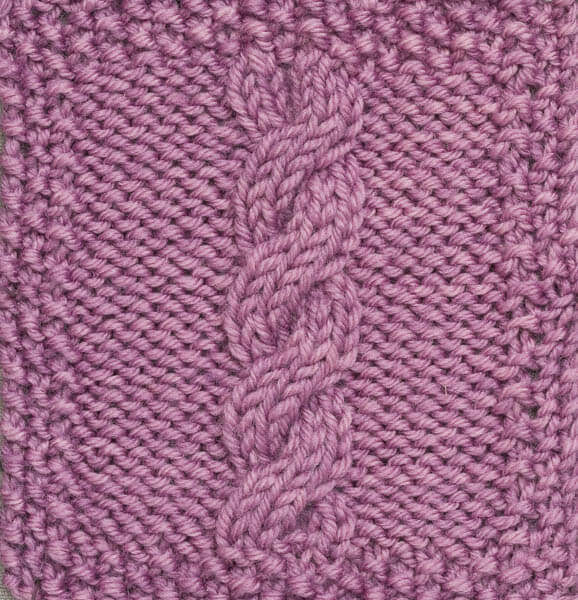
Right-Crossing Cable Knitting Chart
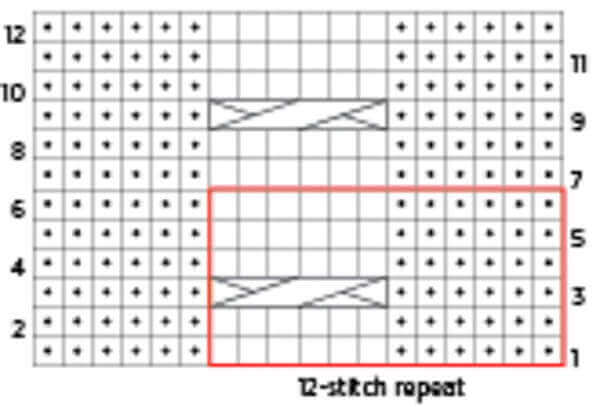
The chart illustrates the stitch arrangement for the right-crossing rope cable.
Please note: The original stitch-symbol keys are not included with these chart excerpts. The instructions above explain how to work each cable crossing, but additional chart symbols may require reference to the original book.
Pattern credit: Excerpted from Cable Left, Cable Right © 2016 by Judith Durant. Photographs by Mars Vilaubi. Used with permission from Storey Publishing.
For corrections or questions about the original book patterns, contact Storey Publishing at corrections@storey.com or visit the publisher’s corrections page.
More Cable Knitting Patterns to Explore
These Standard Rope Cables are part of a collection of four cable stitch patterns shared with permission from Storey Publishing. Explore the other designs for more knitting inspiration:
- 4-Rib Symmetrical Pretzel Knit Cable Pattern – A decorative, symmetrical cable featuring interwoven stitches.
- No Cross Diamond Cable Pattern – A diamond-shaped knitting motif created without traditional cable crossings.
- Loose 5-Rib Braid Cable Pattern – A beautiful braided cable with alternating right- and left-crossing stitches.
Looking for a project that puts cable knitting to use? Try my Free Cable Knit Blanket Pattern – Cables and Columns for a cozy project featuring beautiful cable texture.
Looking for Your Next Knitting Project?
- Basket Weave Knit Dishcloth Pattern
- Easy Boomerang Shawl Knitting Pattern
- Chunky Knit Mittens Pattern for Beginners
- More Free Knitting Patterns

I love anything cabled. Have not made a sweater yet, but am going to tackle that one day.