
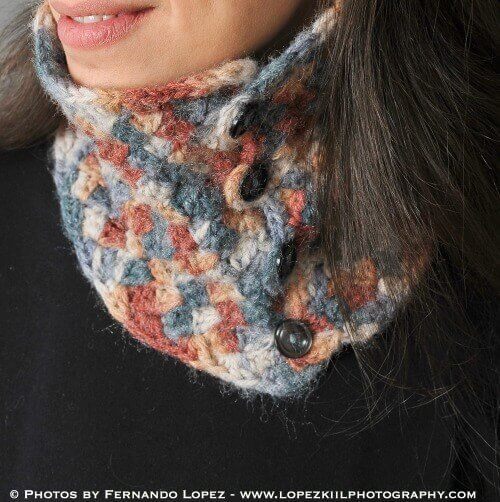
This crochet neck warmer pattern was one of the first patterns in my shop, and it has long been one of my favorites (I still wear it!). With its cozy textured stitches and four-button closure, it has all the warmth of a scarf without the extra bulk.
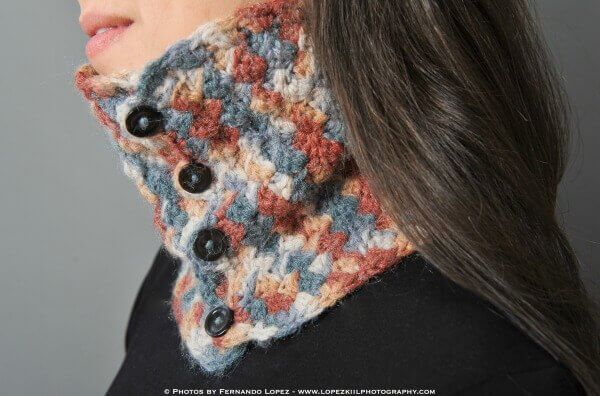
One of the things I love most about this neck warmer is how many ways you can wear it. Button it all the way up, fold it over like a collar, drape it in front, or give it a little twist for a different look. The textured stitch pattern looks beautiful in both solid and variegated yarns.
This free crochet neck warmer pattern uses worsted-weight yarn and a simple repeating stitch pattern. It’s a fun project when you want something practical, cozy, and easy to customize.
Crochet Neck Warmer Pattern Instructions
Pattern Details
- Skill level: Easy to intermediate
- Yarn: Worsted-weight yarn
- Hook: 4 mm (US G-6) or 5 mm (US H-8)
- Finished size: Approximately 18¾ × 7¾ in. (47.5 × 19.5 cm) using a 4 mm hook; approximately ¼ in. (0.6 cm) larger using a 5 mm hook
- Gauge: 16 sts and 11 rows = 4 in. (10 cm) in pattern stitch
- Construction: Crocheted flat in rows, with edging and four button loops; buttons sewn on afterward
Materials
- Approximately 160 yd (146 m) worsted-weight yarn
- 4 mm (US G-6) or 5 mm (US H-8) crochet hook
- Four ¾-in. (19 mm) buttons
- Tapestry needle
- Sewing needle and matching thread
- Scissors
- Stitch markers (optional, for button placement)
Crochet Abbreviations
ch = chain
dc = double crochet
hdc = half double crochet
rep = repeat
sc = single crochet
sk = skip
sl st = slip stitch
st(s) = stitch(es)
This pattern is written using U.S. crochet terminology. For additional help, see my Crochet Abbreviations guide and U.S. to U.K. Crochet Conversion Chart.
Pattern Notes
- The neck warmer is worked flat in a repeating textured stitch pattern.
- You can use either hook size, depending on your preferred fabric and finished dimensions.
- Four button loops are worked into the edging along one short end.
- Check the button-loop size against your buttons before completing the edging. The buttons should pass through easily without slipping out.
- Adjust the number of rows if you’d like a longer or shorter neck warmer.
❤️ Add this pattern to your Ravelry library.
How to Crochet the Neck Warmer
Ch 29.
Row 1: Starting in the 2nd ch from the hook, work 1 sc in each ch across, turn — 28 sts.
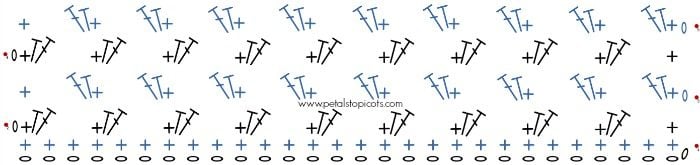
Row 2: Ch 1, [1 sc, 1 hdc, 1 dc] in first sc, sk next 2 sc, *[1 sc, 1 hdc, 1 dc] in next sc, sk next 2 sc; rep from * 7 more times, work 1 sc in last sc, turn — 28 sts.
Row 3: Ch 1, [1 sc, 1 hdc, 1 dc] in first sc, *sk next 2 sts, [1 sc, 1 hdc, 1 dc] in next sc; rep from * 7 more times, work 1 sc in last sc, turn — 28 sts.
Rows 4–52: Repeat Row 3, ending at Row 52 or continuing until desired length. Turn.
Crochet Neck Warmer Stitch Chart
The stitch chart below illustrates the repeating textured stitch pattern used for the neck warmer. If you’re unfamiliar with crochet diagrams, see my Crochet Stitch Chart Symbols guide for help reading the symbols.
Crochet Neck Warmer Edging and Button Loops
Edging note: The button loops are worked along one short end of the neck warmer. Before fastening off, check that the four loops are evenly spaced and align with the buttons on the opposite end. Adjust the loop placement or chain length as needed for your finished piece.
Begin edging in the last stitch of Row 52.
Round 1: Ch 1, work 1 sc in each of the first 4 sts, *ch 2, sk 2 sts, work 1 sc in each of the next 4 sts; rep from * across, work 2 more sc in last st; **rotate piece and work sc evenly across side edge, work 3 sc in corner; rep from ** across next 2 sides.
Button-loop tip: Test the button loops with your buttons before continuing. Each button should pass through its loop easily but without slipping out. If necessary, undo the loop and adjust the number of chains.
Round 2: Work 1 sc in each of the first 4 sts, *work 5 sc in ch-2 loop, work 1 sc in each of the next 4 sts; rep from * 3 more times, sl st in corner to join and fasten off. Do not continue edging around the remaining 3 sides.
Weave in ends.
Finishing and Attaching the Buttons
Sew the four buttons along the short end opposite the button loops, approximately 1 in. (2.5 cm) from the edge.
Use stitch markers to mark the button positions and check that each button aligns with its corresponding loop.
Using a sewing needle and matching thread, securely sew the buttons in place.
Try your finished neck warmer buttoned, folded over, draped, or twisted to find your favorite way to wear it!
Professional photos courtesy of Lopez-Kiil Photography.
More Neck Warmer & Cowl Crochet Patterns
- Free Crochet Mobius Cowl Pattern
- Chunky Crochet Cowl Pattern … Perfect for Beginners!
- Reversible Colorplay Cowl Crochet Pattern
- Inside Out Cowl Free Crochet Pattern
- Post Stitch Cowl Crochet Pattern


This cowl is simply stunning! Thanks for the pattern
So often I gravitate to the big, bulky cowls, but I’m loving this with the worsted weight yarn. Very pretty!
My husband has been asking for something like this for when he rides his Harley. I’m going to see if he likes the button look first before I start though.
What yarn did you use? Its delicious!